DIY hazelnut crafts autumn. Crafts made from walnut shells
Good afternoon, today I will show you what interesting crafts you can make from ordinary nut shells. We will do a lot with our own hands children's crafts from different nuts - peanuts, walnuts, hazelnuts, and even pistachios. There are funny crafts - bears, frogs, snails, crabs, bugs, hedgehogs, owls - that can be done in kindergarten or school lessons. I will also post here ideas for New Year's crafts made from nuts, which can be used to decorate a Christmas tree or garland for the New Year. You will see how interesting it is to play with simple nuts. I will also give you ready-made templates for crafts made from paper and nuts.
Crafts made from nuts
And colored cardboard.
The simplest crafts for children using nuts are cardboard silhouettes, where the nut plays the role of a voluminous tummy, a bird’s wing, etc. That is, in children's crafts of this kind, the nut is an auxiliary element.

You can show your imagination and use this principle to make craft silhouettes of mice, turtles, owls, hedgehogs, ducks, cats, and dogs from nuts. At the beginning of the lesson, we must decorate the shell with stripes and spots. Then use scissors to cut out the silhouette and finally attach the nut shell to the plasticine.

And such hedgehog crafts made from nuts can be an addition to an autumn composition made from natural materials. For example, take a box, cover it with moss (or sawdust) - put autumn leaves on top, plant mushrooms from plasticine - and launch funny pot-bellied hedgehogs made from nuts into this piece of forest.

I posted many other ideas with crafts in the shape of a hedgehog in a separate article.
Also for the New Year, using this cardboard technique, you can make interesting crafts with your own hands - toys for the Christmas tree, or a New Year's garland with stars from walnuts (as we see in the photo below).


Crafts made from nuts
and paper strips.
You can also make it from long paper strips interesting three-dimensional crafts for children with a nut inside. The paper is cut into a wide strip, tapering towards the end. We wrap the first half of the strip around a pencil (we form a twist roll) and release it, allowing it to unwind. Glue the eyes onto the front part and add horns. On the lower part of the snail craft - on the back - we place half a walnut - on a plasticine mat so that everything sticks.

Using a similar technique, you can make a SWAN craft with your own hands (photo below) from nuts and white feathers. If you don’t have a pen, you can see it as a dummy cut out of paper. We cut out an oval and cut it in the form of a feather - like the teeth of a comb on both sides, and fluff it with our hands. This imitation of a feather can be used instead of natural fluff in this craft made from nuts and paper.

Crafts made from nuts and PLASTICINE.
In kindergarten classes in younger groups, we teach children how to sculpt simple shapes. The duration of the lesson (15-20 minutes) does not always allow you to sculpt large objects with many details. And that’s why it’s good when some of the parts are already ready - in the form of nuts. The walnut is used as the final element of the applique - like a cradle for a mouse, or a hollow for an owl.

Most often, children make fungus crafts from plasticine and walnut shells. You can save the plasticine and make legs from long thick sticks - which are attached to the caps using waste plasticine (left over from old crafts).

You can add beautiful autumn leaves from plasticine to your mushroom craft. We mix different plasticine lumps - autumn shades (yellow, red, orange) - let the colors smoothly transition into each other. We make circles, then ovals - flatten it into an oval pancake and draw veins in a stack.
You can use a stack to cut a leaf of a more complex shape - like oak or maple. But this is for older children. And before class, give visual examples of the shape of maple and oak leaves. So that children can put the template on a piece of plasticine, trace it along the contour with a stack, and then cut it out along the marked lines.

THIS is what you can do... Go back and forth across the Internet and look for interesting ideas for modeling plasticine. And MENTALLY try them on like a walnut (or like a peanut). And you will find a sea of ideas that you can implement using plasticine and walnuts with your own hands.
For example, a PEACOCK plasticine craft may give you the idea to place a nut (painted to match the color of a peacock’s breast) inside the craft and lay a tile of a peacock feather pattern on top of this nut.
And the felt round bee gives ideas for a similar craft, but made from walnut.

Any oval or round-shaped objects can become a source of ideas for nut crafts for children.

Any crafts that have a spherical shape can be made from round walnuts and plasticine (or other materials). Search, think - use your imagination and you will see how many ideas for crafts made from large walnuts are around you.

Painted crafts made from nuts
With my own hands.
You can paint the nut shell with gouache in any color - let it dry and draw any patterns on this background - feathers, stripes, elements of the face of any character or animal. You can use glue eyes (special ones from craft kits).
You can make these eyes yourself with nail polish. – apply a large amount of white varnish on polyethylene film and dry it – again a drop of white – dry it. Add a drop of black varnish to the center - dry it, add a black drop again, build it up - dry it. Cover the eye with transparent varnish and dry it. Peel off (or cut off from the file) the finished eye and use it for crafts.

Elements of the muzzle can be painted simply with paints with a thin brush, or with felt-tip pens of rich colors.
Painted walnut halves can be a source for quick and easy children's crafts. The children themselves will enjoy decorating the nuts. The main thing is then, after the paint has dried, spray the nut with hairspray. This way the paint won’t creep from the children’s sweaty palms from diligence.

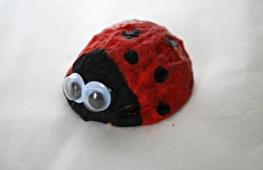
A painted nut shell can turn into a sea of children's crafts - penguins, whales, bugs, bees, ladybugs, mice, bunnies.

You can add clothing items cut from felt or felt to crafts made from nuts. You can sculpt clothes - from felted wool for felting - pour warm water and soap into a bowl, dip a piece of wool in the water and use your hands to sculpt any shape you need from wool, like plasticine. Dry it and get a felt cap or cape for your DIY nut craft.

And here is another craft that uses two types of nuts - walnuts and peanuts. This festive bear can be used as a decoration for the New Year tree. Or it can be planted next to a den, a barrel of honey - inside a craft for a competition for kindergarten or school.
The nut parts of the bear are assembled using hot glue from a glue gun.

You can also make crafts like boats from nuts with your own hands. With sails. Or with oars.

Crafts made from hazelnuts (hazelnuts).
The hazelnut is similar in shape and color to the face of a mouse, squirrel or hamster. Therefore, just such a craft is asking for our hands. You can make a squirrel from nuts using plasticine or use feathers dyed in the color you want, pieces of fur or felt. You can felt a squirrel's tail from felt.


New Year's crafts made from nuts.
With my own hands.
Here are ideas for crafts made from nuts that are suitable for New Year decorations. You can make Christmas snowmen inside decorated with nut shells. A cheerful mouse or chick in a New Year's hat.


You can make New Year's crafts from nuts using delicate lace. You can buy it in a store, or crochet it yourself.

You can put the nuts in a round ring and style it as a small Christmas wreath. It can be painted in New Year's colors - red white green.

Long peanuts - sometimes shaped like snowmen - can be used to create crafts for the New Year. You can make a whole garland of snowmen from nuts.

A variety of New Year's ideas are suitable for nut material - everything you do for the New Year with your own hands can include NUT. This is the basis on which you can attach New Year’s decor in a designer way.

There are masters who make real New Year's masterpieces from ONE walnut. Cozy little houses are created from acorn caps, fimoplastics and other natural materials. They are decorated in Christmas style and decorate the Christmas tree for the New Year.


Crafts from pistachios.
You can also make interesting crafts from pistachio shells. For example, here is an original way to decorate the interior of a children's room. Magic birds made from pistachio halves will look beautiful on the wall of the room.

You can make bouquets of flowers from pistachio nuts.

Or post real panels. Excellent work for the competition of crafts made from natural materials.

Here are some ideas for crafts made from nuts and nut shells. Now you can do a lot of interesting things with your own hands - both in classes with children and for competitions in kindergarten and school.
Good luck with your ideas.
Olga Klishevskaya, especially for the site
Crafts made from walnut shells can be a wonderful decoration for the New Year holidays. The idea of decorating the New Year tree with crafts made only from natural materials arose a long time ago. I got the idea from a friend of mine who, a few months in advance, begins to prepare for the holidays without fuss, thinking through all the decorative details in advance, making Christmas tree decorations from walnut shells with her own hands. It's always nice when your home is surrounded by handmade things.
Everyone knows that walnuts are healthy - the core can be eaten, but you need to try to carefully crack the shell to keep the two halves intact. Below in the video you will learn how to split a walnut into exactly two halves. When the shells are collected, you can begin to spend your creative time, be sure to involve your children in this exciting activity, they will get great pleasure from such an entertaining activity.
A friend suggested an exciting game that both adults and children really liked - decorate the Christmas tree with nuts with surprises in which predictions are hidden. You can learn how to make such surprise nuts from the video:
You can decorate your Christmas tree with these original nutshell toys. To make them, you will need, in addition to the shell, burlap, twine and stamps. If you don't have stamps, you can cut out a small figure from felt, glue it onto a plastic bottle cap, then dip your homemade stamp in ink or paint and make an imprint on the burlap.


Soon many will go shopping in search of factory-made Christmas tree decorations, and this year we invite you to make your holiday decor original and make such a stylish decoration for the Christmas tree.


Simple and stylish - crafts made from walnut shells for a Christmas tree

Topiary or a fairy tree made of walnuts - I have never seen anything like this!

Knitting lovers will appreciate these ideas for Christmas decorations.


Candles in walnut shells are an amazing and beautiful decor that will create a festive atmosphere and beauty in your home.

Just look at what wonderful little animals are made from walnut shells! Children will definitely be delighted with such creativity.


Walnut Tale


Walnut shell mushrooms


And this is jewelry craftsmanship


Crafts made from walnut shells
How to make gift wrapping - a box from a walnut shell
Nadezhda Lichman
Together with the children, we decided to make three-dimensional crafts from natural material – from walnut shells – for the All-Russian competition “Podelkin”.
This is the most interesting job for children. Walnut shells are great for children's creativity. The children had fun painting the shells in different colors, using plasticine to model parts for crafts as shown, gluing finished parts to the shells, and drawing faces. We compiled several compositions from these crafts and sent them to the All-Russian exhibition “Podelkin”.
This is what we got.
The results were amazing mushrooms. The shells were painted brown and red - these are mushroom caps, and the legs were made from tree branches; for the fly agaric, they were painted white.

And these are wonderful little mice.

The bunnies turned out very cute. The ears were glued from paper, and the tail from a piece of cotton wool.

And what funny ladybugs and bees they turned out to be.


For a luxurious octopus, we crocheted the legs from threads.

And the spider turned out to be not scary at all.

These are cute, agile hedgehogs. The shell was smeared with PVA glue and sprinkled with buckwheat.

The strawberry and pineapple turned out wonderful.

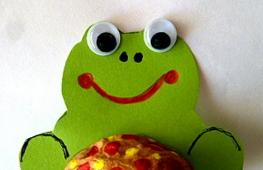
These are funny crabs with frogs.

Delightful owl and butterfly.


And these are brave whales and brave geese.


Thank you for watching our crafts with your children.
I would like to congratulate you, dear, good colleagues, on our wonderful, wonderful holiday and want to wish:
May your life always be permeated with sunshine and warmth, may joy and smile brighten up your life with its hardships and worries!
Publications on the topic:
Easter is widely celebrated in preschool institutions. This is a very beautiful holiday, for which a lot is devoted to preparation.
On the eve of the 70th anniversary of the Great Victory, I organized and carried out work on making crafts from paper and cardboard. For execution.
Materials for crafts: 0.5 liter plastic bottles, napkins, white paper, PVA glue, gouache, candy box, toothpicks, threads. Technique.
Summary of a lesson by a teacher-psychologist with children of the middle group “A fairy tale has come to visit us” Topic: “A fairy tale has come to visit us” Objectives: 1. To increase the communicative competence of children with the help of fairy tale therapy, play therapy, and techniques.
Dear Colleagues! I bring to your attention crafts made by my middle school students for mothers and grandmothers for March 8th. Thank you.
For work you will need: flower blanks of different colors, white round centers for flowers, a green quadrangle with cuts.
I decided to please you with my creativity again! This time I made a craft from walnut shells. To do this you need: 1. shell.
And again visiting the blog “Razvivashka” is a wonderful mother and needlewoman Nastya Kondratovets. Nastya loves making origami figures, but today she will delight us with wonderful crafts made from natural materials.
My daughter and I often make crafts from natural materials; we use almost everything that surrounds us. The main thing is to notice the similarity between a crooked leaf of a tree and a ship’s sail. We really like it walnut crafts . Half a nut shell looks like a boat, a mushroom cap, the body of a hedgehog, a mouse, a turtle and much more.…
So, let's begin. First you need to peel the nut. Chop it in half with a knife and remove the kernels.
My advice: If the nuts are from last year and don’t crack easily, pour boiling water over them for a few minutes and then cool.
To make this craft you will need:
- half a nut shell
- plasticine
- toothpick
- scissors
- paper.
1. Roll up a small piece of plasticine (about the size of a pea, I took more and then removed it) and glue it in the middle of the shell, pressing down lightly.
2. Cut out a sail from paper; its shape can be square, triangular, trapezoidal, etc., but the main thing is that it is symmetrical. Otherwise, the ship will tilt. Place the sail on the toothpick (mast).

DIY boat
3. Insert the mast with the sail into a pea of plasticine. You can attach a plasticine flag to the top of the mast. The ship is ready to set off to conquer the expanses of water - it floats beautifully in a plate, bathtub and puddle, almost like :)


DIY boat
To make this craft you will need halves of nut shells and multi-colored plasticine.
I will make boletus and fly agaric. The principle of operation is almost the same, the main difference is in the colors.
1. Fill the nut shells with yellow (boletus) and white (fly agaric) plasticine. Make a depression in the middle of the shell with your finger or a modeling spatula.


2. Turn the shells over. Apply brown plasticine on top of the boletus shell; cover the fly agaric shell with red plasticine with white dots. You can also use acrylic paints to “color” mushrooms.

3. For the boletus, take white plasticine, add a little brown, knead so that the colors almost mix, and form the stem of the mushroom. For realism, you can add a little black plasticine at the base.


4. For the fly agaric leg, knead white plasticine and roll it into a sausage. But the mushroom has a “skirt” on its stem; lightly pinch it with your fingers to create a frill. You can apply a little black plasticine to the bottom of the leg.

Craft mushroom
5. Put the caps on the mushroom stems, you get 2.

DIY hedgehog
We will need half a shell, 1 teaspoon of buckwheat, PVA glue, 1 black peppercorn and a felt-tip pen.
1. Apply glue to 2/3 of the shell, so that the sharp end of the shell remains clean.

2. After a minute, you can pour in the buckwheat, making sure that there are no empty spaces left.

3. Glue a peppercorn onto the sharp tip and draw eyes with a felt-tip pen. So he appeared.

Crafts made from nuts: mushrooms and a hedgehog in the forest
Let's put mushrooms and a hedgehog in the clearing. To make a clearing you will need a lid from a mayonnaise bucket, or another base, and plasticine.
1. Take green, dark green and yellow plasticine.

forest clearing
2. Knead it and start spreading it over the base, pinching off pieces. When the surface is covered with plasticine, the clearing will be ready.

forest clearing
3. You can sprinkle the forest clearing with dried herbs - I used dried chamomile.

forest clearing
We place mushrooms and a hedgehog in a forest clearing.

Crafts made from nuts
So cute nut crafts My daughter and I succeeded. Katyushka and I love decorating our crafts, so DIY mushroom we attached a dried leaf, and to hedgehog craft glued a small chestnut that looked like a green apple. Or maybe you have an interesting pebble or flower that can be planted in a clearing? Start tinkering and your imagination, enriched by the imagination of your baby, will allow you to create small and maybe even large masterpieces.
One of the unusual materials is walnuts. They come in large sizes, and the hard surface lends itself well to painting and holds its shape. Therefore, it is easy to create a lot of crafts from them.
Interesting ideas for nut crafts
It’s easier under the strict guidance of a group, but let’s look at what crafts from nuts can be made at home using improvised materials. There are a lot of options, any children's fantasy can be realized.


Ladybug on a flower
What we need: colored plasticine, 3 walnuts. First you need to divide the nut into 2 halves. We sculpt the head and red back of an insect from plasticine. On top you need small black dots characteristic of a “ladybug”.

The flower is made from 5 halves of a walnut, which are connected with yellow plasticine. To do this, crumple a yellow plasticine ball, then flatten it downwards to better hold the shell. The flower is ready.

We decorate the flower with thin colored plasticine veins. We attach the “ladybug” to the resulting flower.

Let's look at the best ideas for crafts made from walnuts
The easiest crafts can be done by the little ones; they do not require a lot of time and many details. Animals are the most interesting for kids.


Little mice. If you paint the shell with gray paint, glue on large ears made of thick paper (in the shape of droplets). The eyes are small store-bought beads or buttons. The twine (thin rope) will become a long tail.

Bunnies. We paint the shells with white (gray) paint. Cut out long ears with rounded ends. The tail can be made from cotton wool. All that remains is to paint the face.

Penguins. You need black and white paint, penguins have a white belly. We draw the eyes, cut out a small triangle from red paper - the nose, glue the elongated gray, orange legs and nose.

Octopuses. We paint the shell in a pinkish or light brown tone, and draw a cheerful face on the side. From fluffy wire of bright color we cut off 8 long legs (4 on each side), bend them in different ways.

Bees. Small bees look very funny; paint the shells with black and yellow stripes. The head should be black. Pick up fluffy black wire and glue 2 antennae on the back in a semicircle.

Cancers. First, take an orange piece of paper, outline the shell, 6 legs should be visible from under it (3 on each side). In front of the crayfish, 2 large claws are extended forward; we cut out their contours with scissors. We paint the shell orange and glue it to the base.

Little frogs. First, glue 4 pumpkin seeds to each shell. Then we paint everything green and draw a mischievous face.

Whales. In the ocean, whales appear blue, so you need to paint them blue. We cut out a fish-like tail from blue paper and glue it to the back of the shell. We cut out a kind of twig from white paper so that it looks like a fountain that a whale releases from its head. We make black eyes and white – a long mouth.

Spiders. For funny spiders you will need black paint and fluffy black wire. On the shell we draw (with ready-made glue) eyes and 4 legs on each side, we bend them upward, as if running.

New Year's toys for the Christmas tree
We present a detailed master class on crafts made from walnuts on the New Year theme.
Garland of stars. Cut out large 6-sided stars from thick colored cardboard; they should be 2 times larger than a walnut shell. For example, glue a blue one onto a yellow 6-sided star to make 12 rays, as in the picture. Do not forget to stretch a double thread of 10-12 cm inside the stars to hang the craft on the Christmas tree.


Glue a shell into the center of our glued 2-color star. It’s better to make several of these stars from different colors; you’ll get a New Year’s garland on a branch.

Deer is a toy for the Christmas tree. The deer's head is a shell without paint. Glue eyes and nose onto the head. The base will be cardboard, preferably a little darker in color. The head of a deer will be glued onto the cardboard, so the base is larger than the shell, there are small ears at the top, glue black antlers, they grow upward.

A double thread (rope) must be glued between the horns and the base. This will make it more convenient to hang the toy on the Christmas tree.


Volumetric crafts
Detailed manufacturing instructions.
Swan. Prepare 3 white feathers in advance (can be from a pillow). If not, you can cut white paper (like a curved comb) into thin strips.

We cut out a wide, long strip of thick white paper, glue 3 feathers to the edge of the strip in different directions, and secure it on top with a shell, as shown in the photo below.


Feathers need to be fluffed for beauty. We bend and fold the long strip to form a long swan neck and head (circle). We draw black eyes, cut out a long sharp beak from red paper and glue it on. Snails, etc. are made using the same principle.

Such walnut crafts are used to decorate children's rooms. On the shelves display a collection of animals and birds made by a child’s hands.


Original children's toys and animals in the photo of crafts made from walnuts.

Photos of crafts made from walnuts