How to lay a rubble wall. How to lay rubble stone? For work you will need
Rubble masonry is called masonry made of natural stones that have an irregular shape, with two approximately parallel surfaces, so-called beds.
Natural stones suitable for masonry include:
— limestone;
- sandstone;
- shell rock;
- granite;
- cobblestone.
Cobblestone is usually used in the construction of foundations for buildings up to two floors high.
During construction, rubble stones weighing up to 30-35 kg are usually used. It is this weight that is more convenient for use, so larger stones are first split into small stones. This process is called plinting among specialists. Simultaneously with plinting, stones are pinned, this is the so-called cutting off of sharp corners of stones, adjusting them to the shape of a parallelepiped.
To plinth stones, a rectangular sledgehammer weighing about 6 kg is used, and to process (pin) stones, a special hammer-cam weighing about 2.4 kg is used, which chips off the sharp corners of stones (example in Fig. 77). It is also used to settle and crush rubble stones during laying. In addition to the tools shown in the figure below, the same tools are used in rubble masonry as in brick masonry.
Rice. 77. Tools for rubble masonry:
a – metal rammer; b – hammer-cam
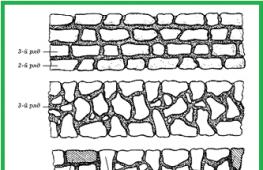
There are 3 main types of rubble masonry:
- under the shoulder blade;
— under the bracket;
- under the bay (example in Fig. 78).

Rice. 78. Types of rubble masonry:
a – under the shoulder blade; b – under the bracket

Rice. 78 (continued). Types of rubble masonry:
c – in formwork
Masonry under the blade is carried out in horizontal rows 25-30 cm thick with the selection and pinning of stones, filling of voids and bandaging of masonry seams. The very first (bottom) row is laid on a prepared base made of large stones. The stones are selected and laid as tightly as possible, and for a better fit they are settled by tamping. Then the resulting voids are filled with fine crushed stone and filled with liquid solution.
Each next row begins with laying versts. In places where internal and external miles are being built, at corners and intersections, lighthouse stones are laid, along which mooring cords are stretched on both sides of the masonry.

To begin with, the verst rows are laid out dry with stones. This is necessary in order to be able to select the most suitable location for the stones in the entire masonry.
Then the stones are lifted one by one, a layer of mortar about 4 cm thick is laid, and finally installed in their places. After the inner and outer versts have been laid, you can begin to fill the backfill.
Processing of natural stone for construction
The backfill mortar is prepared a little less frequently than usual; the backfill is filled with a little too much of it, so that when laying the stones it is squeezed out and fills the vertical seams between the stones. To fill the backfill, you can use stones of any size and shape (within reason, of course).
Also make sure that the stones do not come into contact with each other, that is, the seam between the stones should be at least 0.5-1.0 cm, as this significantly reduces the strength characteristics of the masonry.

After laying the backfill, the masonry is crushed by placing crushed crushed stone and small stones into the solution. The surface of the laid row of masonry is leveled and mortar is added to the recesses between the stones.
Subsequent rows of masonry are performed in the same sequence. The masonry under the bracket is made of calibrated stones, that is, stones of the same height selected according to a template.
Masonry with a pinned outer surface is a type of masonry under the blade. When performing this masonry, all irregularities on the front surface of the stones laid in external or internal versts are first dug in. As a rule, this masonry method is used in the construction of pillars or basement walls.
The masonry under the bay is usually made of torn rubble or cobblestones. At the same time, careful selection of stones and laying out of milestone rows is not carried out. The masonry is carried out in formwork, which is pre-installed in the trenches upon completion of the excavation work. If the soil in the construction area is dense, then when the trench depth is up to 1.30 meters, the masonry is carried out without formwork, against the walls of the trench.
The first layer of rubble stone, about 30 cm high, is laid on a dry base opposite the walls of the formwork or the walls of the trench and compacted by compaction. The first layer can be laid either with or without mortar.
After which, all the resulting voids between the stones are filled with crushed stone. Next, the laid layer of stones is filled with liquid mortar so that all voids are filled with mortar.

Further laying is carried out in horizontal rows approximately 30 cm high, after which each row is filled with mortar.
Rubble masonry “under the bay” is usually used in the construction of foundations of buildings up to 8 meters high.
Masonry using vibration compaction ensures the strength of the erected structure by 35–45%, erected using the shovel method.
This masonry is performed in the following sequence: the first row is laid dry, then the voids between the stones are filled with fine gravel, then the mortar is spread in a layer of 45–55 cm and after which the masonry is compacted until the mortar no longer fills the voids in the masonry. Next, the next row of stones is laid using the method of laying under a shovel, after which the layer is covered with mortar and again thoroughly compacted. This masonry is carried out in formwork or in trenches opposite the walls.
Rubble stone walls
Price
Practicality
Appearance
Ease of production
Environmental friendliness
final grade
The construction of a house must be approached thoughtfully. After all, it is being built to last for many years, so you cannot make mistakes here even in the smallest details. The main thing is to choose the right material. An excellent solution. Houses made from it are very rare, although they are very durable and look great. Much more often you can find foundations made of rubble stone.
Foundations are usually reinforced, but this is a very labor-intensive job. Rubble stones for foundations can be an excellent alternative and replace expensive and complex reinforcement. They can have a variety of shapes, but they must have at least one parallel surface.
The stones should be large, but for ease of work it is better if their weight is no more than 30 kg. The soil must be thoroughly compacted before laying them. The concrete mixture should make up half the stones. The bottle must be taken without cracks.
This is what the foundation of a house made of rubble stone looks like:
Foundation made of rubble stone foundation made of multi-colored rubble stone
Types of rubble foundation
Before arranging the foundation, preparatory work is carried out. First, remove the top layer of soil and move it to another place. When choosing a foundation design made of rubble stone, you should take into account the water saturation of the area, know how high the groundwater lies, and to what depth the soil freezes in cold weather.
There are different types of foundations. When arranging a rubble quarry, tape is more often used.
Strip foundation constructed using the following technology:
- They dig a trench. Its depth depends on the degree of soil freezing. A formwork system is made in it and the solution is poured into it. Sand and flat-faced rubble (bedded stones) are poured into the formwork and compacted well.
- The starting row is filled with cement-sand mortar and allowed to dry completely. After this, the remaining rows are laid. At the same time, such a foundation can serve as walls in basements. Since the stones have different sizes, it should be slightly wider than the walls.
You cannot put crushed stone under the stones, as it has a shorter service life, and after its destruction the house will settle. In addition, stones with sharp edges should not be placed in the first row.
Pillar foundations are also very widespread. For their arrangement, rubble and reinforced concrete or wooden pillars are used. This foundation is used only for one-story buildings.
Technology for building a rubble stone foundation
Before starting the construction of a rubble foundation, it is necessary to prepare stones of the required size in advance.
Dig a trench under the foundation and level its bottom. If the soil is too liquid, it must be compacted with sand, crushed stone, or slag. Highly located groundwater should be diverted from the trench.
To increase the strength of the structure, it is better to carry out masonry using the “under the blade” method.
The finished rows are poured with liquid cement mortar and compacted with a tamper. If even small voids remain in the masonry, water can get into them, which freezes in winter, and the foundation quickly collapses.
The next rows are laid on a plastic and thick solution. Its layer should be no more than 30 cm.
For milestone rows, corners and intersections, larger stones are used. They should be laid with the wide side down.
Learn more about how to make a rubble stone foundation in the video:
Rubble stone house
Houses made of rubble stones are very rare, since the masonry has to be done from unprocessed, very uneven material. Rubble masonry requires too much mortar, due to the need to seal the gaps between the stones. Not every mason will agree to such work, since it requires knowledge of special techniques that differ from ordinary masonry.
But after a long period of work, a unique structure is obtained. This house has an unusual, very beautiful appearance. It turns out to be so durable that it can stand for several centuries.
Photos of houses made of rubble stone
House made of rubble stone house made of rubble stone house made of rubble stone house made of rubble stone house made of rubble stone
Rubble stone retaining wall, brief description of process and materials
Retaining walls on a site are built to decorate it or to strengthen slopes and slopes. Such structures help to add a “zest” to the design of the site.
To build a retaining wall from rubble stone, you will need the following materials and tools:
- rubble stone;
- cement;
- clay (to give plasticity to the solution);
- sand;
- Master OK;
- grater;
- cuttings of bars for marking,
- glue (tile and natural stone);
- drill with attachments;
- cord;
- level (bubble level, hydro level or laser)
Preparation of mortar for masonry
Take a cement-sand mixture (preferably prepared in bags) and mix it with water. To mix, you can use a drill and screw the mixer attachment onto it. Tile adhesive and adhesive for natural stones are added to the mixture.
It is better not to pour in all the water at once, but add it while mixing, bringing the solution to the consistency of thick sour cream.
Masonry retaining wall
- The laying is carried out along the boundaries pre-marked on the ground.
- The turf from the ground must be removed.
- The masonry area is covered with sand and trampled underfoot. Then stones are laid on the sand.
- The second row is laid out on the mortar, placing a stone on it, and knocking on it with a trowel handle or a hammer. The stone should seem to be pressed into the solution. To reduce gaps, small pebbles are placed between large stones. There is no need to be afraid that the masonry will become dirty with the solution; after the solution has hardened, it can be easily removed with a brush.
- The next row is placed like the second. A retaining wall of four or more rows must be reinforced with mesh or made thicker.
- After the wall is laid out, it must be left for a day. After this, use a drill with a wire brush inserted into it to clean the stones and seams.
The process of laying a retaining wall made of rubble stone:
Rubble stone plinth
Rubble stone is very convenient for covering the base. This plinth looks very beautiful, especially when it is lined with stones of various sizes.
Designers advise choosing a stone in a contrasting color with the wall of the house or a similar shade.
An example of cladding the base of a wooden house with rubble stone

A rubble stone foundation is a highly reliable structure. Rubble stone is a stone made of hard rocks, the compression resistance of which is at least 100 kg/cm2. Such a foundation is good because it can easily cope with the effects of moisture contained in the soil. Rubble has been used as a building material for many centuries; fortresses, castles and other impressive structures have been built from it.
Diagram of a strip foundation made of rubble stone: 1 – brick wall; 2 – foundation waterproofing; 3 – rubble stone; 4 – sand cushion; 5 – soil; 6 – sand; 7 – backfill; 8 – blind area of the building; 9 – soil freezing depth.
Pros and cons of a rubble stone foundation

The main advantage is considered to be the possibility of using materials that are obtained as a result of processing various rocks. This is especially true in regions where similar work is being carried out. The main disadvantage of laying such a foundation is that it is a rather labor-intensive process and there is no way to automate it. All work is done manually using old methods.
High load-bearing capacity is ensured by such a foundation due to the correct selection of stone and compliance with masonry rules. It is also important to correctly determine the optimal parameters of the foundation.
Return to contents
Rubble stone masonry

Types of rubble stone masonry: a – under the shoulder blade; b – under the bracket; c – under the shoulder blade with the front surface pinned;
1 – finger stones;
2 – solution;
3 – crushed stone base;
4 – bedded stones.
Placed on a sand bed. Its thickness should be 15-20 cm. The stones should be torn, that is, obtained as a result of work accompanied by explosions. It is advisable to give preference to a bed-shaped stone, that is, one in which 2 planes are parallel. This relative arrangement of element planes may not be entirely accurate.
The laying is done using cement mortar “under the blade”. The maximum thickness of the joints is 1-1.5 cm, they must be completely filled with cement mortar. If the seams are made larger or filled with poor quality mortar, the supporting structure may be destroyed due to settling of stones. Before laying, the stones are cleaned of dirt and moistened with water.
At the intersection points of wall structures, in the corners and the entire bottom row of masonry, it is recommended to use stones of the maximum size. This is done to achieve maximum structural stability. This stage of work is the most difficult, since the stones can reach a mass of 30-35 kg and they have to be moved several times in order to be placed in a stable position.
The first row of masonry is carried out using pre-filled cement mortar, this helps to increase the load-bearing capacity. Those areas of the base on which masonry is not carried out must be covered with small stones. These areas serve as a kind of wedges that must be constantly hammered with a hammer or sledgehammer during the laying process.
The masonry is filled with mortar, and the resulting cavities are filled with small stones. Next, the surface must be carefully leveled, after which you can proceed to laying the next row. It is carried out using a solution that has high density and plasticity. In this case, the permissible draft is approximately 4-6 cm.
During all work, it is necessary to strive to create horizontal rows.

a- under the outside; b – under the inside, on strong soils; c – under the inside, on soft soils.
1 – waterproofing; 2 – insulating filling; 3 – finished floor level; 4 – soil or sand cushion; 5 – blind area of the building, 6 – ground level; 7 – soil backfill; 8 – clay-bit preparation.
Their optimal thickness is 30 cm. In this case, the masonry elements should not be in direct contact with each other - only through a seam filled with mortar. It is necessary to select each element so that it fits as tightly as possible to the previous ones and at the same time uses as little solution as possible. The seams of the vertical connection of the elements of the lower row of masonry must be covered by the upper row of stones.
To expand the rubble foundation, ledges are made, each of which contains at least 2 rows of stones. The basic rule when performing this work is to lay stones in such a way as to transfer the vertical load to the following elements along a common plane. You cannot concentrate the load at any particular points: this is contrary to established standards. This distribution of load can lead to shifting of the stones, which can gradually lead to the complete destruction of the masonry.
Return to contents
Cladding works

Scheme of the construction of a columnar rubble foundation.
If the building under construction provides for the arrangement of a basement, then you cannot do without lining the rubble foundation. As a rule, cladding is done using brick. Brick laying is carried out parallel to stone laying. The brick must be tied with pokes every 4-6 rows. Thanks to this type of cladding, the brick rows must coincide with the rows of the base. The total thickness of the base and cladding must be at least 75 cm.
The height of each row of rubble for the foundation should be 15-25 cm. All work is carried out against the walls of the formwork or trench. Installation of milestone rows is not carried out. The resulting cavities must be filled with crushed stone, which is filled in layers with the same solution that is used for masonry.
Rubble stone is a common material that has been actively used in the construction of various structures for more than one century. The rubble itself is a rock. The sizes of stones, as a rule, vary from 25 to 50 cm. Natural rubble is represented mostly by irregularly shaped pieces of rock. But to build a plinth and any other structure, it is best to use stones with flat edges. Irregular specimens are perfect for decorative decoration of the facade and other elements of the building.
For the basement part of the structure, the rubble must have a so-called tiled shape, that is, have two smooth edges. This will make it much easier. If for some reason you can only use rubble stone of irregular shape, then you can completely get by with it - only the process of constructing the masonry will become more complicated, but other characteristics of the material will not deteriorate.
Natural quarry comes in different shapes and colors.
Advantages and disadvantages of the material
Like any building material, rubble has its pros and cons. Among the main advantages of rubble stone are:
- This is an environmentally friendly material obtained naturally.
- The bottle is durable and has excellent performance characteristics. The service life of the material is practically unlimited. The base, made of rubble using the correct technology, has a high load-bearing capacity.
- The material is resistant to moisture.
- If the base is made of rubble stone, then there is no need to additionally reinforce the structure.
- The masonry is attractive from an aesthetic point of view, so there is no need to coat it additionally.
- Exclusivity of the material - there are virtually no two identical natural stones.
Of course, there are some disadvantages that are important to know about:
- First of all, building a basement from rubble will not be cheap.
- The technology for constructing a plinth or any other structure made of irregularly shaped natural stone is quite complex, so it is virtually impossible for a person without experience to do such work with their own hands.
- When using rubble for construction at the initial stages of constructing a structure, certain problems arise with performing the necessary calculations.
Natural material has both undeniable advantages and some disadvantages.
Due to the cost of the material and the difficulty of doing the work yourself, rubble stone is not used as often as, for example, brick. It is chosen when a high load on the base is expected, i.e. when constructing a massive structure.
Tools and solution
Before carrying out work on constructing a plinth made of rubble stone with your own hands, it is necessary to prepare an appropriate set of tools, including a trowel, a spatula and a shovel for preparing and supplying cement mortar, a jointer for processing seams, a pick and a sledgehammer for chipping and splitting stones, a level for control evenness of masonry.
In cases where work will be performed at subzero temperatures, antifreeze additives should be added to it when preparing the solution. If you cannot find and purchase such a filler, you can use an alternative as table salt.
Stone sorting and cleaning
The preparatory stage includes the following activities:
- The material must be carefully sorted, choosing stones of the same height with acceptable edges. If the stones are too large, then they need to be split into two or three parts. For laying the first row, specimens with parallel surfaces should be selected.
- Before you begin the process of laying rubble stone on the base, you should clean it of any dirt. Otherwise, even ordinary dust and oil stains will impair the adhesion of the building material to the cement mortar.
Rubble laying process
Once the stones have been sorted and cleaned, you can begin laying them. The sequence of actions is as follows:
- Rubble stones must be laid on a solution prepared in advance. The solution should be prepared immediately before starting work and used all within 1–2 hours.
- The width of the seams depends on the size of the stones. For specimens measuring 50 cm, the seam thickness can be up to 4 cm. For smaller pieces of rock 30 cm in size, a seam thickness of 2.5 cm is sufficient. For stones measuring 10–15 cm, the seam should not exceed 1–1.5 cm. If the seams are unreasonably thick, certain problems with rubble settling may arise, which will result in the loss of the appearance of the masonry or its complete destruction during operation.
- The bottom row must be laid out with the largest stones, having two maximally flat sides. This will ensure a high level of stability of the base. Smaller stones are installed in the space between large pieces of rock, and the voids are filled with mortar. You can use a hammer to adjust the stones.
- The laying of each row must be done with preliminary fitting of stones without mortar. After installation, it is recommended to compact the stone as much as possible.
- Upon completion of the work, it is necessary to carry out the process of securing the masonry using cement mortar diluted with water. Due to it, it will be possible to fill all the voids formed during work.
Rubble concrete masonry
Often builders use a different technology to lay out the plinth. This is the so-called rubble concrete masonry. In her case, the process of building a base with your own hands becomes much easier. Laying is done in the following sequence:
- The masonry process using this technology requires the presence of formwork. That is why, before starting masonry, you should make high-quality and stable formwork.
- Next, the lower part of the formwork is filled with liquid cement mortar to a height of approximately 15–20 cm.
- Then it is necessary to lay rubble stone into the thickness of the concrete, maintaining a distance of approximately 4–5 cm from the edges of the formwork.
- As soon as the concrete dries and gains strength, the process is repeated completely, only now the first layer of masonry needs to be filled with cement mortar. Thus, all rows are built to the required height.
- After the cement mortar has completely hardened and gained strength, the formwork can be removed, work can be done to create a high-quality waterproofing layer, and the construction process of the structure can continue.
If you can’t build a rubble stone plinth with your own hands in one day, then the working surface of the walls should be covered with film or tarpaulin. It is important that the cement mortar does not dry completely until work resumes. The masonry should also be covered if the work is carried out in hot and windy weather.
The two technologies described above for constructing a plinth made of rubble stone are relevant if the rock has an irregular shape and is not processed in a factory or with your own hands. In cases where the material is well processed, no problems with the masonry should arise, because the construction technology in this case is generally no different from the device.
Cladding the base using rubble
It is not in all cases rational and profitable to make the base entirely from rubble stone. In some situations, it is recommended to simply cover the base surface made of concrete blocks or monolithic reinforced concrete with it. In this case, it is necessary to use rubble stone tiles, which are more affordable and easy to work with.
Tiles that are flat on both sides are suitable for finishing work.
The cladding of the base with natural stone is carried out as follows:
- At the first stage of work, it is necessary to prepare the working surface of the walls by plastering them.
- Before starting cladding, the rubble tiles must be laid out as they will be located on the surface of the base. This approach allows you to do the work yourself much better and faster.
- After this, the solution must be applied to the back of the rubble stone and applied to the surface of the base. You need to press the material as hard and tightly as possible, trying to ensure that all the tiles are located in the same plane.
- It is necessary to begin work on laying rubble tiles from the bottom and top rows. After this, you need to fill all the space that remains free between these rows.
- Upon completion of installation, the seams are filled with cement mortar so that no voids remain. If you want to give this finish the most aesthetic appearance possible, you can make the seams slightly recessed.
Should we build from rubble or veneer it?
The construction of a rubble stone plinth is a rather complex process from a technological point of view. In addition, the purchase of this material can take quite a lot of money, so it must be fully justified. For example, rubble stone is excellent for creating a plinth in situations where the construction of a massive structure is planned.
If you want to use rubble stone on the base only because of its attractive appearance, then it is recommended to purchase facing rubble tiles - this will significantly simplify the construction technology, as well as significantly reduce costs.
In some situations, finishing a base with natural stone is much easier than completely building it out of it.
By and large, you don’t have to buy material in a store if rock mining is going on nearby. In this case, it is best to negotiate directly with the stone quarrying company, which will also allow you to save a lot and get really high-quality and “fresh” building materials.
Erecting a fence from rubble is not a difficult task, especially if you follow the recommendations and practical advice of experts. In order for a fence made of rubble stone to please the owner’s eye and serve for more than one generation, you just need to learn the rules for selecting and processing rubble, laying the foundation, erecting walls, and a few more secrets.
How to select and process stone
Any DIY construction begins with the preparation of the material. The fence is no exception. Before starting construction, you should:
- carefully select a large and beautiful stone as in the photo, which will become the main one in the masonry. A smaller stone will be used to tie together the main stones. Non-standard, oblong stones will also be used in the foundation, flower beds and paths;
- purchased building material is not always clean, so it requires preliminary cleaning. To do this, just wash off the dirt with a stream of water. Wet stone guarantees a strong bond;
- The rubble is selected for masonry in shape and color so that the appearance of the fence is respectable.
Processing natural materials does not require special training. It is easier to chop along the fibers; the chip line is marked with a chisel. Irregularities are knocked down with a pick, and small defects with a chisel.
Foundation secrets
Rubble stone is a heavy building material, so the foundation for a rubble fence must be strong and durable (at least two weeks). The best option for a do-it-yourself foundation is a strip one:

- The depth of the trench is no less than the depth of freezing of the ground.
- The foundation design is unbreakable, even at the gates and entrance gates.
- Reinforcement is required, with access to the surface at the locations of the pillars. The number of rods depends on the thickness of the reinforcement.
- Several places of the foundation are strengthened with metal pipes or filled-in glasses - supports.
- The design of several spans involves the erection of pillars between them. They are erected in places of support, under the obligatory condition - they must be the same width as the foundation. And they can be finished with fragments of natural stone.
- The finished trench is lined with formwork.
The trench is filled with high-quality concrete, into which small elements or construction fragments can be added (for strength).
Fence laying technology
The masonry of a fence made of rubble stone is double-sided using a universal mortar, between which a large and even natural building material is laid, with the same distance. To make the solution yourself, you will need sand and high-quality cement in a standard ratio of 3:1.
The viscosity of the solution is given by adding tile adhesive in small quantities.

Even laying between mortar
Base
A regularly shaped stone is used for the base of the fence; the corners are formed from rectangular stones, the surface of which is wide. When laying a fence with your own hands, you need to monitor the horizontal plane of the top edge.
Natural building material does not have the same shape, so for leveling, wedges made from triangular stone fragments are used. They are removed after slight hardening, and the voids are filled with solution.
Wall
Laying rubble stone with your own hands does not require strict instructions; imagination and ingenuity are important. Several small elements for dressing are overlapped by larger elements, and the resulting voids are filled with small stones or fragments and mortar. The amount of material decreases towards the top of the structure. A new row always starts from the corners where large elements are laid. The wall is completed with brick and a thin slab or concrete screed.
There should be a minimum amount of voids between the rubble. Without waiting for the solution to completely harden, you should unstitch the installation seams.
A rubble fence can be laid with the addition of facing bricks. This installation option will add individuality to the design. The pillars and base can also be built from the same brick, and rubble stone can be placed on top, thus creating a kind of rubble frame.
On a note

- use a hammer or perforator to beat off the interfering sides of the rubble;
- excess solution should be removed literally immediately and immediately wiped with a dry cloth, since dried solution is difficult to wipe off from the surface;
- It is easier to chop stones along noticeable lines of magma on the stone surface;
- deep jointing is more suitable for a massive fence and makes it look voluminous.
Rubble stone construction guarantees not only good quality and artistic value, but also long-term reliability. And a structure built with one’s own hands becomes the pride of the owner. You will learn equally useful information about what rubble stone is and how to use it for construction in the video below.