How to make a snail from a walnut. Crafts from walnuts: a detailed description of how to make decorations and toys (90 photo ideas)
You can hardly find a child who doesn’t like to make crafts. Moreover, there are countless options and ideas for their implementation. Crafts are even divided by season, depending on the availability of materials used. For example, in summer the main theme of products is flowers, fruits and berries, and fresh herbs. Accordingly, there are also
There's a lot of fun associated with them. After all, it’s fun to climb a tree and knock down a dozen nuts, then you have to peel them, and this is a whole art. Her cunning is known to many, as she stains everything she touches. How fun it is for the kids to extract nuts from the shell. And, of course, eat them.
It is intact nut shells that are the basis of many crafts. There are no limits to children's imagination. Ideas are often suggested by the child himself, so you should make products together with him. Crafts made from walnut shells can be made in the shape of an insect, fish, bird, animal, boat, mushroom and much more.
Bug
Let's look at a few ideas for creating products. You can easily and simply make beetle-shaped crafts from walnut shells. To do this you will need black plasticine and you should also stock up on several thin twigs and two shells. You can use a sheet of green cardboard as a basis. The plasticine should be kneaded in your hands and filled into the shell. This way it will be attached to cardboard, which can be cut into the shape of a sheet and drawn with veins. Then the beetle will look very believable.

The insect can be additionally painted on top, or you can leave it as is. Having attached the shell to the cardboard, you need to stick black plasticine along its edge. Three branches should be fixed on it on one side and the same number on the other. These will be the beetle's legs. You can make horns in the same way. Only the branches for this purpose should be chosen thinner and shorter. You can make a beetle's head from brown plasticine.
There is another option for making such crafts from walnuts. Everything is done exactly the same, but branches are not used. The insect's legs can be constructed from brown or black plasticine.
Turtle and caterpillar
What kind of crafts can be made from walnut shells? For example, a turtle. Its shell has a color similar to the shell. You need to take one half. The head, paws and tail are attached to it. They can be made of plasticine, cardboard or colored paper.

A few more shells will make a beautiful caterpillar. As a basis, you can take a part of a branch of medium thickness. We attach the halves to it using plasticine, which should be painted with gouache in different colors. You can put horns on the glue. We paint the eyes and face of the caterpillar. If desired, a pattern can be applied to all segments of her body.
Frame
You can make a frame as a craft from walnuts. A photo of a loved one or close friend will look great in it. How to make such beauty? To do this you will need transparent varnish and Moment glue. Nuts should be carefully peeled from the shell so as not to damage it. Then you need to divide it into two parts, after which you should cover each with transparent varnish. Next, you need to take a photo frame that is supposed to be decorated. Apply a drop of glue to each nut on the back side and attach it to the base close to each other. Having filled the entire area of the frame, leave it until completely dry.

Small gaps between the nuts can be filled with coffee beans planted on glue. Such a composition will not only be beautiful, but also fragrant. When the surface of the walnut craft becomes dry, the photo can be inserted inside.
Tree
What other crafts can be made from walnut shells? From these elements you will get a lot of interesting things for the interior. For example, a decorative tree. It can be done using the core of a nut. To do this, you will need a straight, even branch that will act as a trunk, as well as a pot filled with sand, earthen mixture or small stones. From brown plasticine you need to roll a ball with a diameter of about 10 cm. Next, we place it on a branch at a height of about 10-15 cm from the level of the pot and paste it with halves of nuts or shells. The top of this structure will need to be coated with golden spray paint.
Next, you need to remove the craft from the filler in the pot, tint it, let it dry and put it back again. The trunk under the ball can be beautifully tied in green. Such a tree can be used as a money tree. Therefore, it should be placed in a prominent place, then it will definitely attract good luck and success.
Christmas tree decoration
Crafts made from walnuts can be a wonderful decoration for the Christmas holidays. You can also create an excellent alternative to a Christmas wreath - this is a composition of nuts. The circle can be completely decorated with shells or partially with whole nuts. Weaving from coniferous branches is suitable for the basis of such a wreath. The circle can also be made from wine corks glued together.

There are a lot of options for creating a frame. Nuts are also attached with glue. Only they must first be painted in a golden or silver shade. Then the composition will look especially festive.
Conclusion
Crafts from walnuts, photos of which you see in our article, are quite simple to make. Creating such products is a great opportunity to show your imagination, make decorative elements with your own hands, or have fun with your children.
And again visiting the blog “Razvivashka” is a wonderful mother and needlewoman Nastya Kondratovets. Nastya loves making origami figures, but today she will delight us with wonderful crafts made from natural materials.
My daughter and I often make crafts from natural materials; we use almost everything that surrounds us. The main thing is to notice the similarity between a crooked leaf of a tree and a ship’s sail. We really like it walnut crafts . Half a nut shell looks like a boat, a mushroom cap, the body of a hedgehog, a mouse, a turtle and much more.…
So, let's begin. First you need to peel the nut. Chop it in half with a knife and remove the kernels.
My advice: If the nuts are from last year and don’t crack easily, pour boiling water over them for a few minutes and then cool.
To make this craft you will need:
- half a nut shell
- plasticine
- toothpick
- scissors
- paper.
1. Roll up a small piece of plasticine (about the size of a pea, I took more and then removed it) and glue it in the middle of the shell, pressing down lightly.
2. Cut out a sail from paper; its shape can be square, triangular, trapezoidal, etc., but the main thing is that it is symmetrical. Otherwise, the ship will tilt. Place the sail on the toothpick (mast).

DIY boat
3. Insert the mast with the sail into a pea of plasticine. You can attach a plasticine flag to the top of the mast. The ship is ready to set off to conquer the expanses of water - it floats beautifully in a plate, bathtub and puddle, almost like :)


DIY boat
To make this craft you will need halves of nut shells and multi-colored plasticine.
I will make boletus and fly agaric. The principle of operation is almost the same, the main difference is in the colors.
1. Fill the nut shells with yellow (boletus) and white (fly agaric) plasticine. Make a depression in the middle of the shell with your finger or a modeling spatula.


2. Turn the shells over. Apply brown plasticine on top of the boletus shell; cover the fly agaric shell with red plasticine with white dots. You can also use acrylic paints to “color” mushrooms.

3. For the boletus, take white plasticine, add a little brown, knead so that the colors almost mix, and form the stem of the mushroom. For realism, you can add a little black plasticine at the base.


4. For the fly agaric leg, knead white plasticine and roll it into a sausage. But the mushroom has a “skirt” on its stem; lightly pinch it with your fingers to create a frill. You can apply a little black plasticine to the bottom of the leg.

Craft mushroom
5. Put the caps on the mushroom stems, you get 2.

DIY hedgehog
We will need half a shell, 1 teaspoon of buckwheat, PVA glue, 1 black peppercorn and a felt-tip pen.
1. Apply glue to 2/3 of the shell, so that the sharp end of the shell remains clean.

2. After a minute, you can pour in the buckwheat, making sure that there are no empty spaces left.

3. Glue a peppercorn onto the sharp tip and draw eyes with a felt-tip pen. So he appeared.

Crafts made from nuts: mushrooms and a hedgehog in the forest
Let's put mushrooms and a hedgehog in the clearing. To make a clearing you will need a lid from a mayonnaise bucket, or another base, and plasticine.
1. Take green, dark green and yellow plasticine.

forest clearing
2. Knead it and start spreading it over the base, pinching off pieces. When the surface is covered with plasticine, the clearing will be ready.

forest clearing
3. You can sprinkle the forest clearing with dried herbs - I used dried chamomile.

forest clearing
We place mushrooms and a hedgehog in a forest clearing.

Crafts made from nuts
So cute nut crafts My daughter and I succeeded. Katyushka and I love decorating our crafts, so DIY mushroom we attached a dried leaf, and to hedgehog craft glued a small chestnut that looked like a green apple. Or maybe you have an interesting pebble or flower that can be planted in a clearing? Start tinkering and your imagination, enriched by the imagination of your baby, will allow you to create small and maybe even large masterpieces.
In order to start creating some crafts, it is not necessary to buy expensive materials. It turns out that many interesting things today can be made from handy materials that are not used in any way on the farm. For example, if you like to eat walnuts, then do not throw away the shells. Remember that you can make beautiful crafts from it. Indeed, crafts made from nut shells can be very diverse. You can make:
- berries and mushrooms,
- funny animals,
- Christmas tree decorations,
- voluminous toys.
Children's crafts made from nut shells
Well, let's find out what kind of crafts you can make from nut shells.
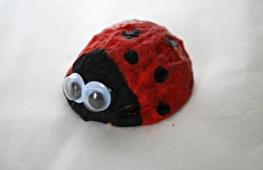
Ladybug on a nutshell flower.
To create a craft, prepare: 3 walnuts and plasticine.
- We divide the nuts into halves, and from plasticine you must fashion individual parts of the ladybug.
- We attach the head and wing covers to half of the nut shell. We apply dots on the wings using plasticine.
- Now we take yellow plasticine, roll it into a ball and flatten it a little. The petals will imitate nut shells. Therefore, we attach 5 nut shells to a ball of yellow plasticine.
- Next, we decorate the flower with veins. To do this, we use plasticine of different colors.
- After that, we attach our ladybug to the flower.
Funny animals made from nut shells. Crafts for children.
In this article you can also see children's crafts made from nut shells. Invite your child to make similar crafts and you will see how much he will like this activity.
In order to make mice, you need to take nut shells and gray paint. Of course, the shells are painted gray, and ears and a tail are attached to the top, which you and your child must cut out of colored paper.

To make penguins, the shells are painted in two colors. Namely, the colors used for this are white and black. Then the penguins should draw eyes and glue on the beak and paws.

Rabbits from nut shells are also very easy to make. You paint the shells gray and draw a face. Next, glue the ears and tail to the shell. At the same time, we use a piece of cotton wool for the tail.

For turtles we make a paper base that will have legs, a head and a tail. But the nut shell will be the shell.

And to make such a cheerful octopus, take fluffy wire and a nut shell. For the paws, 8 pieces of such wire are used that will imitate paws.

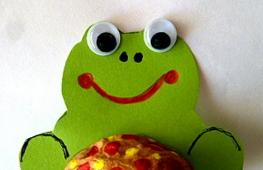
To make frogs, in addition to shells, take pumpkin seeds. Paint all materials green. After that, we attach pumpkin seeds to the shell and draw funny faces on the crafts.

And to make whales, take blue paint to paint the shells with. We attach a tail to the back of the shell, and a water stream on top, which is cut out of paper. Don't forget to draw the facial features of the whales.

And to make funny bees, you must paint the shells with black and yellow. But for the antennae, use fluffy wire.
Craft made from nuts - caterpillar.
- For this craft, take a sheet of green colored paper.
- You will also need 6 walnut halves. You must paint them with orange and white paint. After that, in the center of each shell you should draw a small spot of green color.
- For the caterpillar's head, take a whole nut. On it you must draw all the facial features of the caterpillar. We attach a bunch of brightly colored threads to the top of the head.
- Now you must attach the resulting caterpillar to a green leaf.
Walnuts, or rather their shells, are one of the best materials for interesting crafts. A whole set of special properties of walnut shells (special surface texture, long paint retention, relatively large sizes) allows both adults and children to make crafts from it, and the risk of any injuries during the manufacturing process of the toy is completely eliminated. In our review, you will look at several types of crafts made from nut shells and tell you how they can be made.
The first step in making all crafts is to clean the nut - you need to peel the nut very carefully, completely removing the nut itself, while leaving the shell completely intact (if you can’t do this, it’s better to ask someone for help - if there are cracks on the shell, the craft will not work).
"Walnut Ladybug"
To make a ladybug, take three walnuts and plasticine of different colors. Peel the nuts, divide them into halves and make the face and wings of the future ladybug out of plasticine, then attach the face and wings to one of the halves, after making characteristic dots on the wings (this can be done with a marker or plasticine of a different color). Make a ball from a piece of yellow plasticine and attach it to the five remaining halves of the shell - you will get a flower on which you will plant the ladybug you made earlier. The craft is ready!


"Funny little animals"
You can make a lot of funny animals from walnut shells without much effort. Below we will tell you how to do this.
- To make penguins, paint the shells black and white, then draw the eyes and attach the beak and paws made from paper.
- Paint walnut shells gray, cut out a long tail and characteristic mouse ears from paper, and then attach them in the right places - you will get funny little mice.
- To make turtles, paint half of the shell green, adding the characteristic brown spots to the shell, then make a paper base with legs and a muzzle. Attach the base to the shell and your turtle is ready!
- To make bunnies, paint the shells white, attach large ears cut out of paper to the head, attach a tail to the back of the bunny and draw a muzzle on the front side of the craft - the cheerful bunny is ready!
- You can even make an octopus from the shells! To do this, paint the shell pink and attach eight wire legs covered in pink fabric to it.
- To make frogs, attach legs to the bottom of the shell (pumpkin seeds can be used as legs), paint the shell green and draw funny faces on the front of the toy.
- To make whales, paint the shell blue, cut out a stream of water and a tail from paper, and then attach them to the shell in the right places.
- Paint the shell with stripes of yellow and black, and attach antennae made of fluffy black wire to the top of the shell - you get funny bees.
- To make crayfish, paint the shell orange and attach a pre-cut paper base with drawn claws and a face to the bottom of the shell.
- Spiders - that's what else you can make from nutshells! To do this, paint the shell black and attach legs made of black fluffy wire to the base of the shell.


"Caterpillar on a leaf"
- Take a green sheet of paper and cut out a shape in the shape of a tree leaf.
- Color the six nut halves white and orange as shown.
- Make a light green spot in the upper central part of each shell halves.
- Take a whole nut and draw a smiling face on it - this will be the head of our caterpillar.
- Secure the caterpillar to the leaf using PVA glue (in principle, you can just put the shells on the leaf without fixing them).


"Magic Nuts"
- Divide the nuts into halves and remove the kernel.
- Place a small surprise inside the shell that will easily fit into the shell.
- Glue the halves together with a glue gun and offer a surprise to someone close to you.

"Walnut Athletes"
- Make three whole nuts using a glue gun, attach paper eyes and a mouth to the top of the craft - you get an athlete ant.
- Using the same glue gun, attach paws made of wire antennae to the ants, bend the wire and insert sports equipment made from improvised means into the ant’s hands. If you wish, you can make many of these ants - you will get a whole Olympic team.


These are the kind of athletes you can achieve.