Connecting the dishwasher to the sewerage system, electrical network, and water supply. Simple rules for installing a dishwasher Dishwasher liner
Have you decided to fill your kitchen with household appliances? Keep in mind that the dishwasher draws and drains water, which means it requires the correct connection. You will learn how to properly connect a dishwasher to the sewer and what tools you will need in our publication.
Selection of PMM and connection features
Before purchasing a dishwasher, you should determine where it will be installed. Will it be built into an old or new kitchen set? When ordering new furniture, a niche for the dishwasher is provided in advance, taking into account its parameters. But if the kitchen is already ready, then it is better to choose a place closer to the sink. Why is installation far from the drain undesirable? Here are some facts:
- Too much distance will put too much stress on the drain pump. This will lead to rapid wear of parts and damage to the pump.
- You will need a hose extension, since the elements that come in the kit are quite short in length.

Some users advise how to make the task easier. For example, lower the drain hose into the sink. But we do not recommend doing this for the following reasons:
- you will have to constantly clean the sink of grease and pieces of food that fall into the drain after washing dishes;
- an unpleasant smell in the kitchen is guaranteed;
- a high hose increases the load on the pump;
- this is unsafe: if the hose slips, a flood is guaranteed; In addition, the leakage protection may not work because the seal is broken.
Preparing for installation
First, decide on the connection diagram. There are two options:

If the dishwasher will be located far from the sink, then consider a pipe layout so that there are as few turns or bends as possible. Make sure that the diameter of the pipes is no less than the diameter of the hose, which will allow for easy connection.
What tools and parts will be needed
If you connect the drain through a waste siphon, then choose a part with two or three drainage outlets (tee) for connecting a washing machine and dishwasher. How to choose the right siphon, read our article.
You also need:
- non-return valve - it will not allow water to flow back into the machine if the sewer is clogged;

- clamps, gaskets.
Tools:
- open-end wrench;
- building level;
- fum tape for waterproofing.
Prepare a place to install a dishwasher: expand the unit or rearrange the cabinet. To do this, remove the door from its hinges and remove all the shelves. Remove the back wall as well.
You can begin installing and connecting equipment.
Connection steps
Before building the machine into the cabinet, connect all hoses and secure the connections. Reinstall the device and carry out the rest of the work.
How to organize drainage through a siphon:


Connection to sewerage:
- Install the hose in a curved position (U shape), no lower than 40 cm from the floor.
- Connect one end to the dishwasher and the other to the drain. Be sure to include a check valve to prevent waste from getting into the machine.
Now you know what kind of drain is needed for a dishwasher. Next, get down to organizing the water supply. Upon completion of work, perform a test run to ensure there are no leaks. A video on the topic will help you:
Dishwashers are installed in the kitchen, not far from the sink. This is no accident. In this case, connecting the dishwasher is the simplest - the sewerage system and water supply are located nearby, and the socket for a permanent connection still needs to be installed separately.
The peculiarity of installing a dishwasher is that it must be positioned perfectly level. The maximum permissible deviation from the horizontal is 2°. If this requirement is not met, the dishes may not be washed well enough. Therefore, the first step after unpacking is to install it in place and level it. For this purpose, the design includes height-adjustable legs. We take a building level, place it on the car, and ensure that it stands level relative to the horizontal. Then we check the verticals, if everything was done correctly, and there should be no deviations here.
Power Requirements
Dishwashers, even economical ones, consume a considerable amount of electricity. For example:
- for BOSCH SPS 40E12 (class A), maximum power consumption 2.4 kW;
- CANDY CDCF 6 07 (class A) consumption - 1.3 kW.
- SIEMENS SR24E205 (class A) requires a maximum of 2.4 kW;
- ELECTROLUX ESF 9420 LOW - can consume 2.1 kW.
- WHIRLPOOL ADP 7570 IX - power consumption 2.1 kW.
With high power consumption, one of the conditions for normal operation is a separate power supply line with an installed circuit breaker and RCD. A separate line will also reduce the impact of power surges on the electronics that control the operation of the unit. They are felt whenever the refrigerator, freezer or microwave is turned on/off. The control board reacts very poorly and keeps jumping, and replacing it (almost no one repairs it, they just replace it) costs a lot of money. If you want the equipment to work for a long time and without problems, draw a separate line from the shield.

As you understand, the average power of a dishwasher is 2.1-2.4 kW. First, select the circuit breaker. It must be selected based on current, but the characteristics rarely contain this value, so you have to calculate the current based on power. For example, the power of a dishwasher is 2.4 kW. We find the maximum current: 2400 W / 220 V = 10.9 A.
Circuit breakers come in the following ratings - 6 A, 10 A, 16 A, 20 A (there are also more powerful ones, but they are definitely not needed for this equipment). For this example, a 16 A circuit breaker is required. It is better not to take a 10 A circuit breaker - when turned on at full power it will be knocked out. Therefore, we take the nearest larger value, and this is 16 A.

From the input of the circuit breaker, the phase is supplied to the RCD. It protects against leaks due to insulation breakdown, and will also work if someone touches live parts. It is also selected by current, but it must be a step higher than the automatic one. For this example, this is 25 A (RCDs come in 10 A, 16 A, 25 A, 32 A). The second parameter by which this type of protection is selected is leakage current. For lines to which only one device is connected, the leakage current is 10 mA. Both of these devices are installed in .
The next parameter that you need to decide on is the cross-section of the cable cores. Copper wires have recently been used for wiring, as they are easier to work with. For devices with a power of up to 4.1 kW, a cross-section of 1.5 square meters is sufficient. mm (more is possible, less is not possible).
Now about what kind of sheath the cable should be in. It depends on the material of the walls along which the power supply line will be laid:

One more point: dishwasher sockets must be grounded. This is a mandatory requirement to maintain the warranty. Also, when choosing, pay attention to the voltage for which it is designed. For branded copies this parameter is written on the back side. If there is no such inscription, this is cheap Chinese consumer goods, and it’s better not to take risks.
Where and how to remove the drain
The next step is connecting the dishwasher to the sewer. The drain hose is located on the rear wall of the housing; it is about 1.5-2 meters long. If necessary, it can be extended to a similar one of the same diameter, but the total length cannot be more than 5 meters (see the operating instructions for details). This distance can be pumped by pumps that operate to remove water.
The best option is to have a separate sewer outlet. Then everything is simple, a rubber coupling is inserted into the pipe, ensuring a tight fixation of the corrugation, and the end of the drain hose is tucked into it. If it is closed with a plug, remove it. But this option is rather an exception. More often the dishwasher is connected through the sink siphon or through the outlet into the sink.

If the sewer outlet is cast iron, there are special rubber couplings for a sealed transition to plastic. You will need to know the diameters of your outlet and plastic tee. Accordingly, the adapter is installed in a cast iron pipe. You just need to put it there without any additional funds. Insert a plastic fork into the coupling. A sink is usually connected to the vertically directed outlet, and a dishwasher is connected to the one at an angle.
For special siphons for connecting a dishwasher, the outlet is made so that the drain hose can be pulled over it. For reliability, it can be tightened with a clamp.
The connection of the dishwasher to the sewer should be such as to avoid the formation of loops and creases, even when everything is pushed into place. At the same time, the corrugation should not be allowed to approach from the side - there should be a slight upward bend. This eliminates the possibility of drainage from the siphon or tee getting into the machine.

To fix the corrugated hose in a given position, there are special plastic couplings. They are put on the corrugation from below and hold it securely.

Water connection
The dishwasher is connected to the water supply using a standard hose, which is also located on the back of the housing. It is easy to recognize by its rather large nozzle. This is an overflow blocker. It is needed for correct operation and it is not recommended to remove it.

Now about what kind of water to connect the dishwasher to. You can connect to a hot one only in one case - if your unit supports such a function (indicated in the description) and you do not have a DHW meter. In all other cases, it is better to fill the machine with cold water. The main motive for connecting to a hot water supply is to save electricity. If the water is hot, there is no need to heat it. This is true, but this solution has disadvantages:

You can connect to the water supply at any point where there is a detachable connection. For example, in the place where a flexible hose is connected to a sink. They unscrew it, install a tee, then a ball valve (or a tee with a ball valve at once). On the part that connects the dishwasher to the tap, on the second outlet there is a flexible hose to the sink mixer.
Check before starting
Before pushing the machine into place, check the tightness of the connections. To do this, you need to open the water supply (turn the tap to which the dishwasher inlet hose is connected). If there are no leaks anywhere, you can push it in.
7214 0 2
Installation of "Moidodyr" in the kitchen or how to connect a dishwasher to sewerage, water supply and electricity
Waiting for the promised 3 years
March 8 is behind us, and the time has come to install the kitchen device called the “kitchen dishwasher” that was finally purchased and given to my wife. Someone may notice that there is no particular need for such a miracle technique, they say, with the money saved you can easily buy something more worthwhile for your home.
Alas, dear reader, this is not the best way to save money, even if your home still needs a lot of things. In my case, my wife waited and did not complain for almost 3 years, and during this time we changed our place of residence, settled in a partially renovated house, and invested all our available funds in its improvement.

A few more words about the purchase - I chose the Candy brand. I won’t write about the model itself, as they say, “it depends on the taste and color of the price and brand...”, but I’ll just share my observations:
- I was surprised by the instructions because they do not contradict the realities of life. Example? Please:
- There are no restrictions like “don’t cover” or “don’t put anything on top”;
- For cleaning, they do not impose special products of a specific brand, which you must buy. It is written simply - put a deep plate, pour vinegar into it, close the lid and start the cleaning program.
- There is a choice of detergents - powder, gels or tablets. As for me, powder and liquid are preferable, because... they can be dosed depending on the degree of contamination. This means real cost savings, which is important.
What to do in the kitchen
So, the car was purchased, the location for its location was agreed upon in advance at the family council. They wisely refused to install it in a cabinet under the sink, since it is illogical to close the inlets and shut-off valves with bulky equipment.

Almost all models are standardized in size to match the parameters of kitchen furniture.
But, before connecting the washing machine to the sewerage system, water supply and electricity, it was necessary:
- Route the electrical cable to the installation site, equip it with a special waterproof socket;
- Install a special through-tee on the cold water supply with tap;
- Install a tee on the sewer outlet pipe to connect the drain hose.

Connection
Electric outlet
Electricity is no joke, this is a well-known fact. Especially when there is water in close proximity. Therefore, I decided to run a separate three-wire cable to the electrical panel.

Captain Obviousness suggests: this rule should be followed when installing with your own hands not only a dishwasher, but also a washing machine and a dryer.
The power of my, or rather our “family” dishwasher was 2.4 kW (the instructions and the sticker on the back of the unit will help you find out the technical parameters). It is quite logical that I chose the option of hidden installation of a three-core copper cable of the VVGng brand with a cross-section of 3x1.5.

I laid the wire in a plastic plinth and brought it out to the electrical panel in the vestibule, where I connected it through a machine with a rated current of 10A. On the wall directly next to the installation site of the dishwasher I installed a waterproof socket with IP55 grounding.
Actually, at this point the electrical connection stage can be considered successfully completed.
Sewerage
It's time to take care of the reliable drainage of the dishwasher. In principle, the procedure is similar to installing a washing machine. I have already talked in detail about how to connect a washing machine to the sewer; the difficulty when connecting a new unit lies only in the need to install an additional element, namely a pipe onto which the drain hose is placed.
For any device connected to the sewer system, a water seal is required to prevent foul odors from penetrating into the room.
A priori, connected household devices do not have such elements and are not provided for them, which means that the owner should take care of this.
So, how to connect a dishwasher to the sewer correctly? After all, it is impossible to build its own water seal system for each kitchen plumbing device. And you don’t need to do this at all - remember how your washing machine is connected.

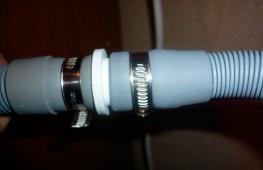
To do this, I had to go to a hardware store, where I purchased a siphon splitter with a diameter of 40 mm (pictured above), designed to connect two drain hoses at the same time:
- From the washing machine;
- From the dishwasher.
The work on connecting to the sewer took a minimum of time:
- Placed an empty container under the siphon;
- First I unscrewed the drain hose from the washing machine;
- Then he unscrewed the sealing nut of the siphon cup;
- I unscrewed the nut to remove the old splitter;
- In its place I installed a new one with two outlets;
- Put everything back together;
- I crimped the hoses with special metal clamps so that they would not slip during operation.
Under no circumstances should you use silicone sealant to coat the rubber seals of the siphon with it before assembly.
All connections must be removable.
Water supply
The time has come to talk about connecting to the water supply, although in terms of importance this should be addressed first, before installing the outlet. Why?
Yes, because, my dear reader, splashes and leaks of water when connecting to the water supply are quite likely, so it is better to take care of installing tees and shut-off valves in advance.

As a matter of fact, the algorithm of my work boiled down to the following:
- Shut off the valves at the inlet of hot and cold water supply;
- I opened the kitchen faucet to relieve pressure and drain the remaining water from the tap;
- Using two keys, I loosened the connection on the supply line;
- Dismantled the old tee;
- Cleaned the threads of the ball valves from the old sealing tape;
- I wound a new one with 5-6 turns;
- Installed a new tee;
- I screwed the water supply hose to the mixer to one of the terminals;
- To the other - the washing machine hose;
- To the third - the water supply hose to the dishwasher;
- Checked and tightened all threaded connections;
- Turned on the water supply (opened the ball valves on the connections);
- I made sure there were no leaks.
First start

We have come to the final part - all that remains is to do the first washing of the dishes, which, as you understand, is more important for the wife. And for me the most important thing is that the connection is correct, but I can’t check all these parameters at once. Why?
Because the electrical part and water supply will work within a minute after switching on, but as for draining wastewater - only after the end of the first washing cycle.
Then let's go!
- According to the instructions, first I took out the detergent container - it is located on the door. I poured a small amount of liquid into it and installed it back;
- At the bottom of the chamber, I unscrewed the lid of the container and poured regenerating salt into it. Its quantity is different for each model, so you need to read the manufacturer’s recommendations;
- He pulled out the tray and placed several dirty plates and cups in it;
- Without closing the door, I turned on the dishwasher - the indicators on the panel lit up. This model has an indication lamp for selecting the softness level; it must also be selected before starting the machine;
- I selected the program and closed the door.
When the washer is started, the solenoid valve relay is activated, opening the cold water supply. This stage also went well. And when the primary wash ended, the dishwasher drained soapy water - which is also accompanied by a characteristic sound.
As a visual inspection showed, all connections are tight - there are no leaks.
Service
Alas, the dishwasher needs regular cleaning. Or rather, its individual elements - fat and food debris are captured by the filter block, and also settle on the nozzles and blades of the washing injectors, reducing their efficiency.

To clean the filter unit you need:
- Remove the plug from the socket;
- Open the machine lid;
- Remove the filter element from the sump;
In my model, you need to lift the plastic handle and turn the filter 90 degrees counterclockwise.
- Rinse it in the kitchen sink under running hot water;
- Put it back.
For preventive cleaning of wash injectors, you will need the open-end wrench included in the kit. I read them like this:
- I unscrew the retaining nut with the machine turned off and de-energized;
- I carefully remove the impeller from the rod;
- I wash it in warm soapy water. I use an old toothbrush to clean;
- I'm putting everything back together;
- I tighten the nut.
Finally
I hope that the information offered to readers will help in connecting a dishwasher on their own. You can visually familiarize yourself with the connection procedure by watching the video in this article. Feel free to share your own experience or ask questions in the comments. Good luck!
July 18, 2016If you want to express gratitude, add a clarification or objection, or ask the author something - add a comment or say thank you!
Buying a dishwasher makes life easier, especially for those who take care of all household chores. With the advent of this necessary unit, all “duties” and “kitchen chores” are canceled, you have time for other, more interesting things. At current utility rates, the device pays for itself very quickly. If you have thought through everything and made a purchase decision, all that remains is to figure out how to properly install and connect the dishwasher to the electrical network, water supply and sewerage. Knowing all the subtleties and nuances of the process, you can save on the services of a specialist.
Before proceeding directly to the installation of the device, you should choose the optimal location for its placement and prepare the necessary tools.
Where is the best place to place the device?
Modern kitchen sets, as a rule, have a niche for a dishwasher with standard fasteners. There are also many good models with non-standard types of fastenings. The furniture passport, as a rule, indicates the type of fastening and what brands it is suitable for. If this data is not in the passport, you need to measure the mount and check whether it is compatible with the device. If not, the mounting strips can be easily rearranged using a Phillips screwdriver. It’s worse if the width of the niche is smaller than the size of the dishwasher, then you’ll have to look for another model. Another convenient option is to place it on a table, but this solution is only suitable for a compact portable model.

A dishwasher is a profitable purchase that saves your time
Required tools and materials
To connect the device yourself, you need to stock up on tools, water fittings and consumables. The only tools you will need are pliers and a screwdriver, and the consumables will be vinyl or cotton tape. Electrical tape is used to wrap metal threaded parts to prevent them from being scratched when tightened with pliers. If you have a small (#1) adjustable wrench, no insulation is required. You will also need FUM waterproofing tape.
For water shut-off and water tap fittings you need to purchase:
- Drain siphon with one or two fittings. If there is an automatic washing machine in the house, one fitting is enough. If there is no car, the second fitting is closed with a plug or rubber plug. In the future you will be able to connect a washing machine to it.
- Bronze, brass or metal-plastic tee with 3/4 inch thread. Silumin water fittings tend to disintegrate without warning.
- A filter for rough water purification, exactly the same as that installed in front of the water meter.
- Ball valve made of bronze, brass or metal-plastic, but in no case made of silumin.
- When installing the dishwasher at a large distance from the sink, you will need a connecting pipe for the henka, since the length of the standard henka may not be enough.

You can connect a dishwasher and washing machine to a siphon with two fittings
The process of connecting a dishwasher step by step
The easiest way to connect is a small portable model. This is done by connecting a hose to a cold water tap. Simply lower the drainage hose into the sink. After use, the device can be stored in a closet. This is convenient if you have limited space in your kitchen.

If you have a small kitchen, consider a portable, easy-to-connect model that can be mounted on the countertop
To connect a stationary device, you cannot do without the knowledge and skills of a specialist. Installing a dishwasher yourself is also possible, but only if you are completely confident in your abilities and follow the instructions and our advice.
Connecting a dishwasher takes place in several stages:
- a socket is installed and power is supplied to it;
- separate water supply is organized;
- drainage of water into the sewer system is arranged;
- performance check is carried out.
Note! The dishwasher connection diagram and the sequence of installation steps can be changed based on the technical readiness of the room and the features of the specific appliance model.
Power supply
Connection to power supply is possible only through a Euro socket with reliable grounding. Replacing a Euro plug with a “Soviet” one will entail loss of warranty, and is far from safe even when the device is turned off. The simplest and most correct solution to providing it with electricity would be to connect it to an outlet specially prepared for repairs. If there is no outlet, additional effort will be required.

To connect to the power supply you will need a European socket and grounding.
Safety is an important condition, so installation of the dishwasher must be carried out according to the following rules:
- The dishwasher is a powerful unit with high energy consumption. Therefore, when connecting it, it is not recommended to use extension cords and tees, which can cause breakdown or fire of the device.
- You cannot use an electric stove socket to connect the dishwasher.
- To install the socket in a convenient place, a wire with a diameter of at least 2 mm is supplied from the electrical panel. A 16 A safety switch is installed in the electrical panel, which automatically turns off the power supply if the load in the network exceeds the maximum permissible.
- When connecting yourself, you should remember that a three-core cable is used to ensure grounding.
Very important! Do not ground electrical appliances to gas, water or heating pipes. Is it dangerous!

For safe operation of the device, the connection to the power supply must be made in compliance with all rules and regulations.
If you are a resident of an apartment building, then you will not need grounding, but protective grounding, in which the grounding wire is connected to a solid neutral. This work cannot be trusted to amateurs; it is better to contact a DEZ electrician. If detected by the energy service, you will have to answer for “self-made” zeroing.
Supplying water to the device
To connect water to the dishwasher, you need:
- turn off the water;
- disconnect the cold mixer connection from the pipe;
- remove old waterproofing;
- connect a tee to the pipe;
- connect the mixer to the tee;
- observing the sequence, attach the filter, ball valve and henka;
- insulate threaded joints with foam tape, winding it in 10-15 layers (if the tape gets knocked down and comes out, rewind it in the other direction);
- close the ball valve.
Good to know! Additional protection such as Aqua Stop or Aqua-Control will save you from having to close the tap after washing dishes.
A filter is installed on the water supply outlet to prevent sand and rust from entering the machine. If the hoses included with the device are not long enough, they can be “extended”. To save energy, some devices have a hot water connection.
Good to know! In our conditions, connecting the dishwasher to hot water is undesirable. This is explained by the fact that substances are added to hot water to protect pipes from rust. They can damage the car.
To ensure proper connection to the water supply and sewerage system, you should carefully study the instructions included with the device.

Organization of drainage
Key points for connecting the device to the sewer:
- The simplest way to organize a drain is to use a siphon, which is equipped with an additional outlet and a valve that protects against the penetration of water from the sewer and sink.
- The placement of the drain hose also helps to ensure protection against water from entering the sewer:
- the hose coming from the device must be fixed to furniture or a wall 60 cm above the entrance to the sewer network.
- then the hose is bent so that the water from the dishwasher flows into the siphon on its own.
- Before connecting the drain, you need to make sure that the hose is long enough. Otherwise, it can be doubled, but not more. If the hose is too long, the load on the pump increases and may affect its performance.
Checking the functionality of the device after connection
Once the dishwasher is installed and connected, a test is performed. To do this, a dry test is carried out. Checked:
- water filling speed;
- heating water;
- drying mode operation.

Note! The test is carried out according to the instructions without utensils, but with detergents and restoring salt. The connections of hoses and pipes are carefully checked for leaks.
Installing a dishwasher yourself is a rather complex process that requires maximum concentration and attention to detail. If this is your first experience, treat the installation with the utmost responsibility or call a specialist. Before calling, check the make and serial number of the model so that you can provide this information to the technician. This will help him prepare for work.
Video: installing and connecting the dishwasher
In order for the dishwasher to function flawlessly in the long term, it must be properly connected. Dishwashers are available in a built-in version (for example, in a kitchen unit) or in a separate version.
Rice. 1. Appearance of the Bosch SRV55T13EU dishwasher
Using the example of a Bosch dishwasher model SRV55T13EU (Fig. 1), we will consider a simple connection method that can be used universally - in the city and the countryside, taking into account some of the features of a particular connection discussed in the article.
You can connect the machines yourself, following the recommended path; performing work operations in the following sequence:
- control of appearance upon receipt (delivery);
- installing the dishwasher in a selected location (not far from the water supply and drainage points);
- connecting to the sewerage system (drainage) using a drain hose;
- connection to the hydraulic circuit of a centralized water supply (in the village to the water supply circuit);
- connection from a 220 V lighting network (with a ground loop) and a separate automatic fuse 10-13 A. The automatic fuse-switch (see Fig. 2) must operate when a leakage current appears and have a corresponding designation on the body.

Since the power of the dishwasher consumed from the network during operation is high - up to 2.3 kW, the electrical connection is made to a specially grounded outlet (see Fig. 3 and 4).

Rice. 3. Correct (left) and incorrect (right) connection of the dishwasher to the 220 V lighting network

Rice. 4. Practical connection to an outlet

Rice. 5. If your apartment does not have such sockets, the grounding wire (according to electrical safety rules, it must be yellow-green in color and with a cross-section of at least 2.5 mm²) is installed independently. An option for wiring in a house under construction is presented.

Rice. 6. Additional wiring of ground wire
Bosch SRV55T13EU has an automatic solenoid valve, which is programmatically controlled by the central processor of the machine, passing water from the water supply into the working chamber and to the heating element (heating element).

Rice. 7. Aqua-Stop Bitron solenoid valve

Rice. 8. Illustration of connecting the incoming water hose to the solenoid valve
The counter part to it must have an external thread with a diameter of 26.4 mm (see Fig. 8).
This valve has its own characteristics: inside the supply hose (2.5 m behind the dishwasher) there are connecting wires.
As a rule, an underwater hose with a solenoid valve is connected to a cold water supply. However, it is useful to know that this solenoid valve is designed for a water temperature of +25...+70º C, and at an input temperature of +60º C, the operating time of the washing machine will be less (per wash) - due to the fact that there are no costs time for heating water with a heating element in the working chamber, and at a temperature less than +60º C - more (see Table 1 at the end of the article).
The internal heater (heater) of the dishwasher ensures the water temperature in the working chamber up to +65º C (depending on the set program).
The dishwasher can also operate in semi-automatic mode if it is not equipped with an Aqua-Stop solenoid valve, if the pressure in the hydraulic circuit is low (less than 0.5 bar), if water enters the machine by gravity (country version). In the last case considered, the water supply is controlled manually by opening/closing the water tap.
If the water pressure is insufficient or does not flow at all, the “Check water supply” segment lights up on the indicator. This may be in the following cases:
- the water tap is closed;
- they turned off the water to the apartment;
- the flexible inlet hose of the hydraulic circuit is severely bent;
- the filter in the solenoid valve is clogged (Fig. 9).

Rice. 9. View of the built-in filter in the solenoid valve
To localize the malfunction, you will need to turn off the power supply to the dishwasher, stop the water supply, unscrew the solenoid valve at the junction with the water supply hose from the apartment (house) hydraulic circuit, remove the filter from the Aqua-Stop solenoid valve and clean it. Then put everything back in the reverse order, connect the water and power to the dishwasher.
Attention, important!
Never cut this hose or immerse the plastic solenoid valve housing in water.
To avoid an electrical accident and leaks, lay the inlet and drain lines so that the hoses do not bend and are not adjacent to the heating elements. It is best to mask these technical communications with hard plastic “false panels” to prevent even the unlikely impact of children or pets.
If the dishwasher is installed in a country house and operates in conditions of temperature changes, make sure that after use there is no water left inside the working chamber and in the hoses (both inlet and drain) (so that it does not freeze in winter).
To drain the remaining water, close the water tap (turn off the inlet circuit), disconnect the supply hose and let the water drain. This way you will protect yourself and your dishwasher for a long time.
Some technical specifications and installation requirements
- supply voltage of the solenoid valve 220-240 V, 50/60 Hz;
- power consumption 2.3 kW;
- minimum water pressure in the inlet circuit 0.5 bar (0.05 MPa);
- maximum water pressure 10 bar (1 MPa);
- in case of increased hydraulic pressure, an additional pressure reducing valve is installed in front of the tap or solenoid valve;
- The minimum volume of supplied water is 10 l/min.
We will sequentially consider connecting the underwater (input) and outlet (drain) hoses to the dishwasher.
Dishwasher installation
Connecting the underwater (incoming) hose to the sewer lines
On the water pipe side, the connection is threaded, using an adapter hose; it is shown in Fig. 10.

Rice. 10. Threaded connection of the inlet hydraulic circuit using an adapter hose

In Fig. 11 illustrates the types of connections and dimensions of some connecting elements for underwater and drain hoses.
Using the supplied parts, connect and secure the supply hose to the water tap; Make sure that the fresh water supply hose is not kinked or pinched.
Connecting the drain hose to the sewer lines
The drain valve (adapter connected with a compression clamp) has an outer diameter of 22 mm (see Fig. 11); Dimensions are similar to the output of all types of dishwashers and automatic washing machines manufactured after 2000.
To connect the water outlet from the dishwasher, install a standard siphon with a drain pipe and outlet under the sink (see Fig. 12 and 13).

Rice. 12. Siphon with drain pipe and outlet to the dishwasher

Rice. 13. Technological illustration of connecting a siphon with an outlet indicating dimensions

Rice. 14. Illustration of the correct outlet and connection of the dishwasher drain
Attention, important!
To find out the duration (in time - in minutes) of the selected program, press the dishwasher on/off button once.
Turn it off in the same way after “0” appears on the display. There is one more important nuance of program management.
If, during program management, you simultaneously press both buttons labeled Reset and hold for 3 seconds, the washing program stops, the “0” symbol will appear on the information display, and another minute after pausing the program, you can completely turn off the dishwasher.
This method is suitable for emergency stop of the program, adding dishes, in case of power failures and the need to change program parameters.
The table knows everything
There is a certain consumption of detergent and electricity, established experimentally and recommended by the manufacturer, depending on the installed (programmed) dishwashing program. This information is included in the table. 1.
Table 1. Relationship between program type, water and electricity consumption
Despite the apparent complexity of the description, all these sequential steps can be performed by any zealous owner - in order to bring pleasure from operating the dishwasher to his loved ones.