What time to plant gladioli. Baby gladioli, planting and care, how to grow gladiolus from a tuber bud
Gladioli are noble flowers that look very beautiful in the design of personal plots. Most amateur gardeners grow these plants using the classic scheme: germinating corms on a windowsill, planting them in the soil, after flowering, digging up the bulbs and storing them until next spring.
But during storage, planting material can become unusable; often the bulbs are affected by pests and diseases, rot, and get sick. You have to buy new bulbs. You don’t have to do this if you try to propagate these flowers with the help of small children emerging from the mother’s bulb. How to grow gladioli for children, is planting and care difficult?
One corm lives no more than five years, then it begins to age and get sick, which the grower does not like. You have to look for a replacement; it is best to grow planting material from the baby that is suitable for planting next year. Gladioli from children grow healthy, strong and beautiful. Before we look in more detail at all the stages of growing colorful beauties from children, let’s talk about what gladiolus children are, about growing, and preparing for planting.
Let's start with the size of gladiolus corms. The size and flowering capabilities of gladioli bulbs are denoted by one term, usually incomprehensible to novice gardeners, analysis of corms.
- Corms of the 1st selection include specimens with a diameter of 3.3 centimeters or more. When planted, such a bulb will produce several good flower stalks, the corrugation of the flowers will appear in full force, and the coloring will be bright and intense.
- The bulbs of the 2nd selection are smaller - they are planting material with a diameter of 2.5 to 3.1 cm. Their flowering will also please flower growers.
- Bulbs of the third type include corms ranging in size from 1.5 cm to 2.4 cm. When small bulbs are used, the flowering of gladioli occurs with a long delay, not all buds open, and few of them are formed on the peduncle.
- Bulbs of the 4th type are the smallest, maximum size 1.4 cm. They bloom much later. The plant requires more care; with this care, you can achieve good flowers, of course, not the same as when planting bulbs 1-3 times.

At the base of the corm, tubers are formed, which are otherwise called children. There are two types of children:
- Children of the 1st category (from 5 to 10 mm) can produce corms of the 2nd or 1st selection.
- Children of the 2nd category (from 3 to 5 mm). These are small children that produce only bulbs of the third harvest in the first year after planting.
We conclude that the baby is an organ of vegetative reproduction. Appears at the end of the growing season at the base of the corm. The baby is covered with a dry, dense shell, which protects it from external influences. It is worth noting that the babies are well stored, their germination and safety reach almost 100%. The main functions of gladioli babies include:
- Update and preserve the collection of gladioli varieties.
- Reproduction of gladioli by children allows you to increase the number of plants grown.
- Obtain plants that easily adapt to a new location and are resistant to various diseases.
How are babies stored in winter?
When laying gladioli corms for storage in the fall, the children are separated, washed and dried well. To do this, you need to lay them out in a dark, dry and warm place. They should be there until mid-November. Before further storage, it is necessary to sort the babies by size. Store them in a dry place at temperatures up to +15°C. If the temperature in the storage room is maintained in the range of +5...+10°C, the babies can be preserved without losing their germination capacity for 24 months.
How to prepare tubers for planting
Beginning gardeners always have the question of what to do with children? Before planting, it is necessary to carry out a number of activities that will help the children prepare for planting in open ground.
Each baby is covered with a dense shell. It is this that protects against various damages during storage. But when planting, this shell can only do harm, delaying the germination of children for a month or more. It is recommended to remove it or disturb it. Manually removing the shell is not difficult, but it takes a lot of time and effort. If there is a large amount of planting material to be processed, this can become a labor-intensive process. Due to inexperience, there is a possibility of damage to the delicate tissues of the baby and the future growth point of the flower. Each of us determines for himself whether he will spend time and effort on removing the shell, or wait several weeks, wondering whether the babies will germinate. Experienced gardeners say that peeled plants not only germinate faster, but also form a larger root bulb.
An effective way is to germinate baby gladioli before planting. To do this, 25-30 days before planting, the children are taken out of their storage location and placed in a bright and warm place for 1-2 weeks. Place according to the size and variety of gladioli in ziplock bags or jars. A little weak solution of potassium permanganate is poured into each container, the containers are closed, but so that there is air access. The children should not be completely immersed in the solution; there should be just a little water. Root primordia and shoots appear in 12-14 days. You can place the babies on a damp cloth, put them inside bags, and place them in a cold place, for example, in the refrigerator. Children prepared in this way will produce friendly sprouts.
Growing seedlings from children
In early spring or even in winter, you can start seedlings. Despite the fact that you have to spend time growing seedlings, you can get 100% results. Growing seedlings occurs according to the standard scheme, only when growing gladioli seedlings there are two mandatory conditions:
- you need to plant the children in separate containers so as not to damage the roots;
- The plant needs to be provided with cool conditions to grow. The temperature should be +5…+15°C.
The children are placed in cassettes or small cups and poured into a tray. After the first shoots appear, you need to expose the planted seedlings to light. Lighting with energy-saving lamps is suitable, which will provide the best conditions for growth and formation of the root system in children.
In April, you can start planting baby gladioli in the beds. Since each baby is planted in a separate container, there are no difficulties with planting.
Planting and care

How to plant children
To plant in the beds, you need to wait until the ground warms up to +10°C. Planting is carried out shallowly, no more than 3 cm. This is necessary in order to improve the development of corms and accelerate germination. The children are laid out along the bottom of the furrow and sprinkled with sand. There is no need to water gladioli yet.
If children are planted that were germinated without cleaning, the depth should be 5-6 cm. The grooves are shed with water. The children are placed at the bottom of the furrow and covered with earth. You can plant individually, then there is a chance of getting large corms in one season.
When planting a large number of gladioli, experienced gardeners prefer dense planting, in which the furrow is made wide, and the children are placed in it in a wide strip. When planting, a distance of no more than 2 cm is left between the children of gladioli. A meter-long groove with such planting can accommodate up to 400 children.
Child care
At the time of planting and active growth, children need moist soil. They need to be moistened regularly. When the babies hatch and the first shoots appear, you need to protect the beds with non-woven material or film from possible cold snap. There is no need to worry too much, since gladioli usually tolerate slight drops in temperature well.
Plant feeding is carried out within 12-14 days after germination. Mullein solution is best, but any organic fertilizer can be used. The soil between the rows must be loosened regularly. It is necessary that the root system be provided with additional air supply. Fertilizers will help form large corms. Young bulbs do not tolerate drought very well, so it is necessary to ensure regular and constant watering throughout the season.
With good care and favorable conditions, large gladioli babies can bloom in the first year. But it is better to carefully break out the flower stalks. For what? To allow the corms to ripen more fully by the time of autumn digging. In the fall, from the small children you planted, you can get full-fledged corms, which are dug up before the first frost.
Gladioli are representatives of bulbous plants that are not considered particularly demanding. They are especially good for cutting - they retain their fresh appearance and bright colors for a long time. There are certain secrets of growing gladioli, following which you can achieve longer flowering and effective reproduction from your flowers. And, first of all, they are associated with planting gladioli. We will tell you in this article how to properly plant gladioli in the garden.
Gladiolus. © bcballard Content:
Choosing a place to plant gladioli
Gladioli do not grow and bloom well in shaded areas. Therefore, when choosing a place to plant, give preference to sunny areas. This not only ensures good flowering, but also prevents the development of diseases. The causative agents of most diseases develop most actively in wetlands.
Of course, not every site can have a constantly illuminated place. In this regard, it should be remembered that shading gladioli from the eastern side delays flowering for 15-20 days, while shading from the south - they may not bloom at all.
When groundwater is constantly high, plants may be “suffocated” because air does not penetrate to the roots. In areas with such conditions, they choose higher places for gladioli or make a high ridge. In hot climate zones, ridges cannot be made.
To ensure that only gladioli plants fully consume the moisture from irrigation, it is necessary to plant them at a distance of no closer than 3-5 m from trees and other plantings. It is good to use shrubs to protect the flower garden from the prevailing northern and western winds.
In an unsuccessfully chosen area, gladioli not only bloom poorly, but also do not form a full-fledged corm. As a result, it will not be possible to get good flowers next year due to poor-quality planting material.
Preparing the soil for gladioli
The soil for gladioli is prepared in the fall. The best soils for them are chernozem, light loamy and sandy loam. Heavy clay soils, peaty and purely sandy, often found in garden plots, require improvement. Sand is added to peat, peat to sandy soil, and sand and peat to clay soil.
For gladioli, soil with a slightly acidic reaction is preferable - pH 5.5-6.5. Therefore, before planting corms, a soil analysis is done. To do this, a cup of soil is taken from four to five points on the site and submitted for analysis to an agrochemical laboratory. It is better to perform the analysis in the spring. Based on its results, the grower can determine not only the acidity of the soil, but also the amount of microelements in it. If acidity is high, quicklime or chalk is added to the soil at the rate of 100-200 g per 1 m².
The soil for gladioli is dug up to a depth of the root system - 45-50 cm. All weeds are selected at the same time. If possible, legumes are planted in the area designated for these flowers the previous year. This will improve the soil structure and repel the worst enemy of gladioli - the wireworm.
In the fall, phosphorus-potassium fertilizers are added to the soil. Their quantity is calculated based on the results of soil analysis and the selected plant nutrition system (see the corresponding section). Since it is difficult for novice gardeners to analyze the soil, it is possible to add nitrophoska to it at the rate of 30 g per 1 sq. m. without harming the plants. m. Chernozem soil does not need to be filled with fertilizers in the fall.
To simplify maintenance work, ridges 1-1.2 m wide of arbitrary length are prepared. To prevent water from draining from the beds when watering, they can be edged around the perimeter with boards, slate, plastic, or stone tiles. In the spring, dig up the soil again using one spade and select the remaining weeds. Nitrogen fertilizers are applied during digging, for example, urea - 15 g per 1 m2.
The baby is cleaned the day before planting so that it does not dry out. If the baby under the shell is sick, dried out, with black spots, it is thrown away. To prevent diseases from spreading, all waste planting material is burned.
The peeled corms are laid out, sprouts up, for vernalization, like potatoes. This event promotes better flowering and less susceptibility of plants to diseases at the beginning of growth.
Planting material purchased in a store or on the market is treated against diseases and pests. It is better not to use chemicals for this in the garden. It is good to soak the corms and baby bulbs in garlic infusion (250-300 g per 10 liters of water) for 2 hours.
Garlic acts on both pathogens and plant pests. It is passed through a meat grinder and filled with 10 liters of water. Planting material is immersed in the resulting infusion not only before planting, but also after digging. In the spring, a solution of lower concentration is prepared (300 g per 10 l), in the fall - a higher concentration (500 g per 10 l). For processing during digging, the concentration can be further increased by taking up to 1 kg of garlic per 10 liters of water.
If there is no garlic, the planting material is treated with a solution of potassium permanganate - against pathogens, and karbofos - against pests. In spring, in a solution of potassium permanganate (1 g of potassium permanganate per 10 l of water), then in a solution of karbofos (30 g per 10 l of water), the corms and children are kept for 30 minutes. In the fall, take a stronger solution of potassium permanganate (5-10 g of potassium permanganate per 10 liters of water) and leave for 30-60 minutes.
The karbofos solution is of the same concentration as in the spring, and the material is kept in it for the same time. After disinfection before planting, the material can be treated with growth stimulants and microelements for faster root development. Usually they use one of the following preparations per 10 liters of water:
- heteroauxin - one tablet;
- sodium hummate - 1 g;
- succinic acid - 2 g.
Planting material is kept in a growth stimulator solution for 10-12 hours.
Solutions of microelements for processing planting material can be of different compositions. To soak the corms before planting, it is better to use the recommendations of A. N. Gromov (Table 1). The processing time for the material in the recommended composition is 12-14 hours.
Table 1. Doses of microfertilizers for processing corms
Table 2. Doses of microfertilizers for the treatment of tubers
Table 2 shows the doses of microfertilizers recommended by T. G. Tamberg for preparing a solution for soaking tubers before planting. Processing time - 4 hours.
When and how to plant gladioli?
Planting begins when the soil at a depth of 10 cm warms up to 8-10 ºС. In the middle zone this usually happens at the end of April. It is necessary to clearly grasp this point, since a delay in planting leads to loss of soil moisture, which will adversely affect the development of corms and delay flowering.
It is more advisable to first plant corms and children of new, especially valuable varieties, which it is advisable to quickly propagate. Planting is done in sand, which at the first stage of plant development will protect the corms, the baby and their tender young roots from contact with the soil. To do this, pour sand in a layer of 1-2 cm into a dug ditch or hole, plant corms or baby plants and sprinkle sand on top again, and then soil.
To make it easier to care for plants, corms and children are planted in rows along or across the ridge. The location of individual specimens of planting material in a row and the distance between rows may vary depending on the size of the corms, the power of the variety and the tasks set by the grower during cultivation.
When placing plants, you should also take into account that the greater the distance between plants, the better the nutritional conditions and the lower the likelihood of contracting diseases from a neighboring plant. The smallest distances between large corms in a row are 15 cm, between rows - 20, for children - 5 and 15 cm, respectively.
Planting depth depends on the composition of the soil and the size of the corms. Planting material with a diameter of 4-5 cm (the one that produces flower stalks of the best quality) is planted to a depth of 10-12 cm. On sandy and chernozem soils, the planting depth can be increased to 15 cm, on clayey and swampy soils - reduced to 7-9 cm. This must be remembered that small-planted corms are more likely to get sick. Therefore, you should not plant smaller than 7 cm.
The florist will not be mistaken if he plants the corm at a depth equal to three of its diameters: it is obvious that small ones will have to be planted shallower, large ones deeper. Small corms may not germinate when planted deeply due to lack of air access. The baby is planted at a depth of 3-5 cm.
Planting can be along the ridge or across it. In any case, the previously dug soil is leveled with a rake. After which, marking the direction of the row, a groove of the required depth or hole is made across or along the ridge at a distance designed for planting corms or children.
Before planting, it is good to apply nitrophoska 3-4 cm below the bottom of the corm at the rate of 1-2 g per each or other planting fertilizer. During planting, the grooves and holes are watered so that the soil is moist and does not take moisture away from the planting material.
 Planting gladioli corms in two rows. © Lucinda
 Questions and answers about planting gladioli
Is it possible to plant gladioli before winter?
To form a root system, gladioli require low positive temperatures (10-15 °C); active shoot growth occurs at 20-25 °C. However, in order for the corms to develop well, they must first be stored at temperatures of about 3-9 °C. During this period, the root system is not yet formed, so low temperatures cannot delay the development of the plant.
Corms can withstand not only low positive temperatures, but also short-term negative ones, but their development is delayed. Large corms die at minus 2 °C. Therefore, planting before winter is possible only in the southern regions with shelter to create a wintering regime similar to the storage regime.
A baby with a hard, dense shell can more easily tolerate low temperatures, which can be observed during warm winters in the Non-Black Earth Zone. In such cases, it can withstand temperatures down to minus 4 °C.
Those gardeners who provide conditions on the site that protect the soil from freezing also plant gladioli before winter.
 Gladiolus, variety ‘Little Fawn’. © Stand My Ground
 Is it possible to grow gladioli for the New Year and March 8th?
This is possible, but for normal plant growth in winter, additional lighting is necessary, maintaining a certain air and soil temperature, humidity and good air exchange - ventilation. All this is difficult to provide in a residential area.
In specially equipped greenhouses, gladioli bloom at any time. However, the process of preparing planting material and culture conditions are very complex. For example, to obtain cuttings by March 8, corms are dug up early, for cutting by the New Year, corms from the previous year's harvest are preserved under certain conditions.
Employees of the Main Botanical Garden in Moscow have developed a light culture of gladioli. Articles describing their methods were published at different times in the journal Floriculture.
How to ensure that gladioli do not bloom all at once?
There are several ways:
- plant corms of varieties with different flowering periods at the same time;
- plant corms of the same variety at different times;
- plant corms of the same variety that are unequal in size at the same time, since plants from small planting material bloom later than from large ones.
Is it possible to cut a corm with two shoots?
A corm with two sprouts is cut if they want to propagate a variety and get many flowering plants. Cut vertically, making sure that part of the bottom is preserved on both halves. Immediately after the operation, the cut is sprinkled with crushed coal or filled with brilliant green and planted.
Is it possible to plant a baby with a cracked shell?
You can plant such a baby if it is not affected by fungal and bacterial diseases, which can be noticed when examining the tubers.
During the winter the corms dried out greatly. What should you do with them before planting?
A healthy corm will never dry out. If it wrinkles and becomes hard, then it is undoubtedly affected by some kind of disease. If the corm has been stored at elevated temperatures, it may dry out a little, but will remain healthy. Before planting, such corms are soaked for several hours in a warm solution of baking soda (one teaspoon per 1 liter of water). However, it is better to soak the planting material in a solution of microelements (see Table 2).
I bought an interesting variety. How to reproduce it faster?
If you bought a baby, then you need to increase the growing season for it, that is, plant it early in a greenhouse, under film or in boxes at home. If there is one or more corms, then before planting they are cut into several parts so that each part contains one bud and part of the bottom.
Is it possible to plant a baby in a shell without cleaning it?
You can plant it in a shell, but the baby will not germinate longer. To speed up germination, before planting, it is soaked for a day in a warm 0.2% solution of potassium permanganate or 0.1% baking soda. After planting the children, water the area well and cover with film until shoots emerge.
How should you plant gladioli so as not to confuse young and old corms?
It is better to plant the baby and corms on different ridges. Plants from children planted separately develop better.
Gladiolus is an incredibly beautiful, delicate and fragrant flower. We have long been accustomed to the fact that it decorates our flower beds. But this was not always the case. For example, the ancient Greeks considered this plant a weed in wheat fields. Gladiolus was eradicated and fought against in every possible way.
But in the times of Ancient Rome, this flower was already grown in the gardens of the patricians. Today, many gardeners want to enjoy the beauty of gladioli in their gardens. How to grow this flower? Let's figure it out.
First of all, you need to choose the right planting material. Gladioli are planted from bulbs. They come in different sizes and colors. When purchasing, it is very important to choose good bulbs from which beautiful, healthy flowers will grow.
You can select high-quality gladiolus bulbs by adhering to four main criteria.
First, you need to look at the size. The main thing here is not to buy too large bulbs. They will not bring good results.
Also, you should not take those that have a concave bottom, reaching 1 cm in diameter or more. This characteristic indicates that this plant has already bloomed, and perhaps more than once. You should not expect high-quality children from such bulbs. As well as beautiful abundant flowering.
It is best to choose bulbs whose bottoms do not exceed 3-7 mm in diameter. The tuber itself should be approximately 2-4 cm. The surface of the bulbs should be shiny and smooth, in no case wrinkled.
The second criterion is root tubercles. It is their appearance that matters. When you buy gladioli in April, these tubercles should already be sufficiently formed. In addition, pay attention to their color. It should not be brown, but light.
The overall appearance is another feature that you need to pay attention to when choosing this flower for planting.
Firstly, the tubers should not show any external signs of disease. They should look clean and beautiful.
When it comes to sprouts, you should choose an onion with one large, strong sprout. Most likely, such gladioli have not yet bloomed, that is, they are called juvenile.

But bulbs that have three or more sprouts are still not worth buying. This sign usually indicates that the plant is suffering from herbaceousness.
This gladioli disease has no cure. Its symptoms are small, deformed flowers that have a greenish color.
You can see red spots on some tubers. Sometimes they can be eaten quite deep, with a purple powder on the surface.
Such damage indicates the presence of thrips. The best way to get rid of the problem is to completely burn such bulbs. But if these are very valuable varieties that are difficult to obtain, then you can try to overcome the problem with the help of insecticides.
 In gladioli, the color of the bulb depends on the variety
 It is also important to remember that gladioli varieties are determined by the bulbs. For example, if you choose the right material for planting, you can enjoy the flowering of this plant from mid-summer until the end of September.
By the way, flowering time is determined by the size of the bulbs. For example, if the diameter is 2.5-3 cm, then such gladioli will bloom 2-3 weeks earlier than those that reach 1.5-2 cm.
But choosing the right corms is only half the battle. It is also very important to properly prepare them for planting.
The first thing to do is to clean the planting material from scales. These are dry formations that resemble those that cover real onions. Gladioli need to be cleaned very carefully. If you rush and make sudden movements, it is easy to damage the sprout that breaks out from the middle and is immediately invisible.
As for the children, they need to be cleaned much later - best before planting in the ground. Otherwise, the young bulbs will simply dry out. If it turns out that the baby is sick, black dots or spots are visible on it, then it is best to throw them away altogether. It is best to burn all waste that remains after such events, this way you can protect the plants from the spread of diseases and pests.
After peeling, the corms must be placed correctly. They are laid out sprouts up. This method of preservation helps improve flowering, as well as increase the immunity of flowers during an important period - the beginning of growth.

If the planting material is not collected independently, but purchased, then it must also be treated against diseases and the presence of pests. By the way, you don’t have to use chemicals for this. Natural preparations work very well. This way you can avoid introducing harmful chemicals into your area.
Corms are kept in garlic infusion.
It is easy to prepare - about 250-300 g of garlic are taken per 10 liters of water. You need to infuse it for about 2 hours, after grinding it in a meat grinder.
Gladiolus tubers can be infused in this infusion even after digging in the fall. If there is no garlic, then potassium permanganate will come in handy.
Its solution helps get rid of diseases. And the karbofos solution is used to control pests on planting material. It is necessary to soak the corms in these substances for about 30 minutes.
If desired, other types of processing can also be used. Before planting, the corms are treated with growth stimulants, microelements that stimulate root development.
As for germinating gladioli, it all depends on your desire. This process is optional. But it will help gladioli grow and bloom faster.

The time for planting gladioli depends on several factors. It is influenced by the climate zone and weather. But in general we can say that corms are planted on the site starting from the end of April and until about mid-May.
It is important that at this time the soil at a depth of 10 cm is already warmed up to approximately 8-10 0 C.
Selecting a location
The beauty of the flowers also depends on the location of the flowerbed and the soil on it. The choice of site for planting affects their further condition.
- Gladioli love to grow in areas with a lot of light.
- The soil must be well drained.
- It is important to ensure that there are no strong drafts in this place.
- There is one rule - the further north the place where gladioli will be planted is located, the more light it should receive.
- The slightest darkening will inhibit the growth of the plant, as well as its flowering.
- In places where groundwater is high, gladioli will not be able to grow.
- If you live in the southern regions, then gladioli should be slightly protected from the hot sun. To do this, they are slightly shaded at lunchtime.
- Areas located on slopes should not be chosen for gladioli.
Flat surfaces or with a slight slope - up to 5 0 towards the south are most suitable. This will ensure the removal of excess moisture.

The correct site must also have suitable soil. One of the most important qualities for the growth of gladiolus is acidity. The optimal pH is 6.5-6.8.
If the soil has a higher acidity level, then the plants do not look very beautiful. The tips of their leaves begin to wither and darken, the flowers do not open fully, and fusarium occurs.
Acidic soil must be neutralized. To do this, you can use simple means - egg shells or dolomite flour. These substances are added during digging at a rate of 150-200 g per 1 m2.
You also need to pay attention to the structure of the soil. Black soil is excellent, as well as sandy loam or light loam. You can create an excellent composition yourself.
- Sand is added to heavy loams.
- On the contrary, you need to add a little clay to sandy areas.
- Also, when digging, humus and compost are added.
Digging is best done immediately before planting. This is especially true for areas that warm up very well. But in arid regions, the site is dug up only in the fall, and in the spring it is simply loosened.
Gladioli grow well in areas where perennial herbs, vegetables or legumes were previously planted.
But after root vegetables and asters, gladioli do not want to grow.
If you chose a place for gladioli in the fall, then before the onset of winter you can add fertilizer to the soil. For example, phosphorus (100 g of superphosphate per 1 m2) and potassium (about 30-40 g of potassium chloride per 1 m2). But potassium magnesia or potassium sulfate is best applied before spring digging. By the way, it should be smaller than the autumn one, about 10 cm.

Immediately before planting, furrows are made on the site. Each of them needs to be shed with water, you can also use a solution of phytosporin. River sand is poured at the bottom of the furrows - about 2 cm. Instead of sand, you can use sphagnum.
The varieties that need to be propagated quickly are planted first. It is best to plant in rows. How far apart the bulbs should be placed depends on the variety and size of the planting material.
But you should understand that the greater the distance between gladioli, the better for them. This makes it easier to care for and the plants are not so susceptible to infection from each other. The minimum distance should be about 15 cm in rows and about 20 cm between them. For plant children it is slightly smaller - 5 and 15 cm, respectively.
As for the planting depth, it depends on factors such as soil composition and bulb size. So, if they are 4-5 cm in diameter, then they need to be planted approximately 10-12 cm into the ground. Such corms produce the highest quality flower stalks.
Chernozems and sandy soils require deeper planting - up to 15 cm. But in clayey or marshy areas it is better to reduce it - to 7-9 cm, but not shallower. Gladioli planted too shallowly are more susceptible to disease.
There is one simple formula for calculating the planting depth - it should be equal to three diameters of the selected corm. Small children do not plant deep - 3-5 cm.

In order for gladioli to be beautiful and healthy, they can be grown from the same bulbs for no more than 3-4 years. After this, the planting material ages and the plants completely degenerate. Old tubers simply may not even germinate. That is why it is necessary to regularly update the bulbs and replace them with young ones.
This is easy to do by growing new plants from babies. They are more resistant to diseases and can adapt to unusual conditions much more easily.
Growing from children is the rejuvenation of planting material and its improvement.
In fact, gladioli children are organs with the help of which vegetative reproduction occurs. They form in large numbers near the tubers - about 20-30 pieces each. To prepare and plant children, the same measures are taken as for adult bulbs. Before germination, the beds with planted children can be covered with film. Small gladioli germinate in about 15-20 days.
It is better not to allow these plants to bloom, even if they produce flower stalks.. Such gladioli will delight with their beauty only in a year.

Gladioli require a lot of attention and careful care throughout the summer. After the plants become 10 cm tall, it is advisable to mulch the soil under them with humus (5 cm thick). This will avoid overheating of the earth and its dehydration.
Watering occurs once every 7 days. This should be done in the early morning or late evening. When watering, you need to spend approximately 10-12 liters of water per 1 m2. Moisture should not get on the leaves.
After watering, the soil needs to be loosened; this will prevent a crust from forming when the moisture dries out. It is advisable to loosen the bed once every 10 days. After the buds appear, it is advisable to tie up the gladioli, otherwise they may break in bad weather.
Another important point of care is the removal of dried flowers. If they remain on the plant, then it will waste its energy on ripening seeds that are not needed at all.
Weeding also needs to be done - as needed. In general, it is done up to 4 times during the summer.
And, of course, don’t forget about feeding.
- The first is done after the first leaves appear. Ammonium sulfate is used in dry form, urea, ammonium nitrate is also suitable (on average 25 g per 1 m2).
- The second feeding is done after up to 5-6 leaves appear on the plants. Per 1 m2 you need to add 10-20 g of ammonium sulfate, 15-20 g of superphosphate, as well as 10-20 g of potassium sulfate.
- Already before budding, the last fertilizing is done - potassium chloride (15-20 g) and superphosphate (30-40 g) per 1 m2.
Organic fertilizers are also suitable as top dressing. For example, at the beginning of growth between the rows, you can water with an infusion of bird droppings. After this, the soil must be loosened and the plants hilled up. But horse manure cannot be used to fertilize gladioli.
You can increase the decorativeness and beauty of flowers by spraying with solutions of mineral substances: boric acid (0.15 g), potassium permanganate (0.15 g) or copper sulfate (0.2 g) per 1 liter of water.

If you decide to decorate your home with a bouquet of gladioli, then you need to cut them correctly. The remains of peduncles should be hidden deep in the leaves. The latter must be at least 4 pieces. This will ensure the development and growth of the corm, which will be useful when planting next year.
Preparing and planting gladiolus bulbs in spring: video
Due to their visual appeal, variety of colors and shapes, as well as ease of cultivation, gladioli have traditionally been very popular among gardeners in many countries around the world.
Translated from Latin, the name of this flower is translated as “sword” or “sword.” The gladiolus or hybrid sword owes its nickname to the shape of its leaves, thin, narrow and elongated like a sword.
Gladioli in floriculture
Gladioli are one of the most important and sought-after crops in private and industrial floriculture. Their main value is obtaining high-quality cutting material suitable for making “mono” bouquets and compositions with other flowers and plants. At the same time, gladioli are preserved quite well when cut. In a bouquet placed in clean water, these flowers can last up to 10 days.
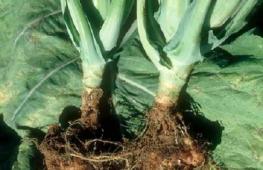
The plant has an annual type corm, round in shape, which is covered with a layer of membranous scales. After planting it in the ground in the spring, it gradually loses its vital juices, transferring them to the growing flower, after which it dies over time. In this case, several small onions (usually up to three pieces) are formed on its surface.
The number of replacement corms formed is influenced by the plant variety, the age of its mother bulb, the conditions in which the gladiolus has to grow, as well as the depth of its planting.
According to the length of flowering time, gladioli are divided into several types:
- early (their period from planting to flowering is approximately 70 days);
- mid-early (from 80 to 90 days);
- late (90 days or more).
In the middle zone they bloom in July and bloom until frost. The timing of flowering is influenced by factors such as the type of flower, the size of its corms and the time of planting.
Plant propagation methods
You can grow gladioli in your garden using one of the following methods:
- from seeds;

The “weak point” of this option: the danger of missing the collection of seed material. The fact is that the loss of seeds from dried pods can occur unexpectedly, as a result of which most of them will be scattered in the wind. In addition, the resulting seeds may be from different plants, different from the mother flower. However, this “minus” can also be considered as an undoubted advantage of this method, because this is how you can get new varieties of gladioli, with different colors and shapes of flowers. You can learn how to grow Wisteria from this
- through “babies” (tuber buds) obtained from mother bulbs;

With its help, by autumn you can grow not only a strong, healthy bulb, from which an excellent flower will grow next year, but also several more “babies” suitable for subsequent planting. You can learn how to grow which will also perfectly decorate a flower garden from this article.
One healthy corm of a variety of industrial importance per season can produce on average up to 25-30 tubers, of which the most valuable are well-ripened, fully formed “babies”.
- through the corm.

Landing date and place
Many novice gardeners often wonder: when to plant gladioli? This usually happens in mid-spring: in the second half of April - early May. As a rule, the specific time of planting depends on how much the soil has warmed to a depth of about 10 cm. The temperature of the earthen ball should be at least +10 ⁰C.

This flower most loves well-lit areas, protected from winds and drafts, with loose sandy loam or loamy soils that have a slightly acidic reaction. When growing gladioli in regions with a hot climate, it is allowed to plant them in areas with partial shade. In any case, they should not be planted in the same place all the time. From time to time the landing site needs to be changed. When planting this flower, never use unrotted organic fertilizers. But sand added to the planting holes, on the contrary, will be very appropriate, as it will help prevent rotting of the bulbs.
Preparing for landing
In order for gladioli to “feel good” at the planting site and delight the eye with their lush and long-lasting flowering, their bulbs must be prepared accordingly:
Preparation and germination of bulbous material
In all regions of our country, gladioli are cultivated as an annual crop that needs to be dug out of the ground in the fall. This is due to the reduced winter hardiness of this flower, which cannot tolerate negative temperatures.
When positive temperatures are established, about a month before planting, gladiolus bulbs are taken out of storage and inspected.
It is worth mentioning separately how to obtain high-quality planting material from them in the spring:
- the optimal storage temperature should be no more than + 8 and no less than – 2 ⁰С;
- they should be in a dark place with low relative humidity.
Proper storage of gladioli in winter will be indicated by the absence of roots and shoots on their corms. Keep in mind that the storage of planting material of different varieties with different flowering periods should be separate, since each of them requires preparation for planting “in its own time.” 
“Awakening” of representatives of the late variety should be done in early March, early ones - somewhere in the middle. To do this, the bulbs are laid out on a flat surface covered with clean paper in one layer. This should be done in a warm, bright room with a dry microclimate.
Remember that gladioli tubers should not be kept near heating radiators! This can cause them to dry out.
A few weeks before planting (2-3), the scales covering them are removed from the bulbs. At the same time, they should develop shoots approximately 8-10 cm in size, as well as swollen tubercles, from which roots will subsequently develop. For the purpose of prevention, after removing the “shirt,” the tubers can be treated with a dark pink solution of potassium permanganate, soaking them in it for 2-3 hours and drying well.
To achieve faster plant growth, its corms are prepared as follows:
- remove the dry scaly layer from them and immerse them in a weak warm solution of potassium permanganate at a concentration of 0.02% for 12-14 hours (temperature 35...40 ⁰C);
- At the same time, a complex of fertilizers is added to it in the following proportions (per 10 l):
- copper sulfate – 3 g;
- cobalt nitrate – 0.3 g;
- boric acid – 2 g.
- With the buds facing up, the tubers are placed in two layers in boxes and placed in a greenhouse for several days for germination at a temperature of +25..+28 ⁰C.
After the root tubercles swell, the bulbs can be planted in the ground.

Soil preparation
When planting and caring for gladioli in open ground, proper preparation of the soil in which they will grow is of great importance. This is done as follows:
- In autumn, the earth is dug up to a depth of about 30 cm, after which lime and humus are added to it.
- In the spring, the flowerbed is dug up again with the application of fertilizers: ammonium nitrate in a proportion of 15-20 g per m2 and double superphosphate in the same amount.
The optimal soil acidity for planting gladioli is from 5.9 to 6.2 units.
Planting work
This process consists of several operations performed in sequential order:
- A groove for the bulbs is dug about 10 cm deep (or 3 times the height of the bulb).
- Clean sand, peat or rotted compost is poured onto its bottom.
- Planting material is placed in the groove at a distance of approximately 10 cm from each other (for small bulbs) and 15-20 cm for larger ones. The same distance must be maintained between the rows.
- The trench with tubers is carefully covered with earth and slightly compacted.

Rules and frequency of feeding
Gladioli need to be fed four times per season:
- The first feeding should consist of nitrogen group fertilizers. This can be ammonium nitrate, urea or ammonium sulfate. They are introduced when two or three true leaves appear.
- The second time the gladioli are “fed” when the sixth true leaf is present, using nitrogen, phosphorus and potassium fertilizers.
- The third feeding is carried out during the development of flowering shoots. For it, superphosphates are used, scattered over the flowerbed in a ratio of 20 g per m2, after which urea diluted in 10 liters of water is added.
- For the fourth time, fertilizers are applied during intensive flowering of gladioli using potassium-phosphorus mixtures. To do this, superphosphate and potassium sulfate are diluted in 10 liters of water and the flowers are watered with the resulting solution, after which they are thoroughly shed with clean water.

Watering
To ensure spectacular and long-lasting flowering and the formation of healthy, viable corms, proper watering of gladioli is also important. The plant especially needs it in the warm, dry season, since its tubers are located quite deep underground. That is, if in normal weather watering can be quite rare, then during the dry period they should be more frequent, making them every other day, in the evening or early in the morning.
Gladioli are watered at the root, without touching the leaves and flowers, from planting to mass flowering. This is best done using shallow furrows, approximately 3-5 cm deep, made between the rows. The intensity of watering should be plentiful, but stagnation of water should not be allowed. After thoroughly moistening the soil, it is advisable to loosen it well and mulch it.
Pest and disease control
The “main enemies” of this flower include the following pests:
Gladiolus thrips
 They overwinter in the scales of bulbs, reproducing at temperatures from +10 ⁰С. During the season, several generations are hatched, sucking the juices from the leaves and flowers of gladioli. In this case, the leaves become covered with silvery-white dots, spots and yellowish streaks. When the first buds appear, they “move over” them, causing them to fall off. In autumn, when the temperature drops, they “move” to the lower parts of the plants.
Bulbs affected by gladiolus thrips dry and shrink, losing their color and becoming covered with a sticky coating. These pests multiply especially intensively in hot weather.
- early cutting of plants to “save the bulbs”;
- thorough cleaning of plant residues;
- disinfection of bulbs using water at a temperature of +50 ⁰C (soaked for 5 minutes) or karbofos solution in a proportion of 2 g per 1 liter of water (sprayed);
- treatment of tubers during storage with fluff lime or chalk;
- sowing crops that repel the pest.
Onion root mite

Damage to gladiolus bulb by root mite
Damages plant bulbs, with remaining old roots and scales, during storage. As a result, they become covered with brown dust on top and rot. After entering the ground, it infects the soil and other plants.
- careful selection of material during planting;
- disinfection using a solution of keltan (per 1 liter of water - 3 g) or karbofos 30% (per 1 liter of water - 5 g) for 5 minutes;
- treatment with karbofos 10% (per 10 liters of water - 75 g) or watering with keltan 20% (per 10 liters of water - 20 g) during the period of plant development.
Diseases of gladioli include:
Drying or yellowing
There are two types: with wilting flowers and rotting bulbs. Transmitted with infected planting material.

Drying of gladiolus, accompanied by rotting of the bulb
- sorting of planting material;
- feeding with magnesium;
- pouring garlic infusion (30 g per 1 liter of water) and after 5 days – mustard solution;
- soaking the bulbs in a solution of marigold flowers for 8 – 10 hours.
In addition, these flowers can be affected by diseases such as brown rot, hard rot, bacterial canker and gladioli mosaic.
Video
Many of us associate the time when gladioli bloom with school, the beginning of the school year, and smartly dressed students bringing luxurious bouquets to their beloved teachers. For its long and sharp peduncle, covered with lush, bright flowers, this plant is often called swordweed. It belongs to the Iris family and has more than one thousand varieties bred by flower growers and breeders from different countries.
The flowering of gladioli is determined by their varietal, planting time and the characteristics of local climatic conditions. Early varieties bloom at the end of July, mid-early and mid-late varieties produce flower stalks in late August and early September. The flowering time of late varieties is in early autumn (September-October).
The earlier the corms are planted in the ground, the faster they will delight you with their flowering. If you do this too late, you may not get flowers at all. Sometimes the weather is not entirely suitable and you have to work a little to grow gladioli.
How to prolong flowering?
To enjoy the look of bright and luxurious flowers longer, experienced gardeners recommend planting the bulbs not all at once, but at intervals of about 2 weeks.
It is necessary to take into account the varieties of gladioli and the timing of their flowering. Some super early hybrids bloom as early as June.
When should you plant gladioli?
The timing of planting corms in open ground on a site is determined by local climatic conditions and the desired flowering time of gladioli. The soil at a depth of 10-12 cm should warm up to a temperature within +8...+10°C. If you plant flowers too early in cold soil, the planting material may freeze and subsequently rot. Even if the plants survive, they will develop slowly and be stunted.
Late planting will lead to a delay in flowering, as valuable moisture will leave the soil. In this case, in order to achieve rapid emergence of sprouts, you will need to water the bed intensively. It is convenient to measure the ground temperature with a simple outdoor thermometer, which is buried in the ground for 20-30 minutes.
In warm southern regions, the time for planting gladioli most often occurs at the end of March and beginning of April. This cannot be delayed, since the hot southern sun quickly dries out the soil.
The right time for planting fennel in the middle zone is towards the end of April or in the first ten days of May. Bulbs sitting in the ground are not afraid of short-term May frosts down to -2°C.
Read also: Mock oranges - Minnesota and other popular varieties
In Siberia and the Urals, the crop is planted only at the very end of May or even the beginning of June, since harsh climatic conditions often present surprises in the form of severe returning cold or prolonged cold rains with snow. To obtain early flowering of gladioli, use the seedling method and germinate the bulbs in the sand in advance. Planting is carried out in April, approximately 3-4 weeks before the expected date of planting in the ground.
When to plant according to the lunar calendar 2018?
The following dates are considered favorable days when it is best to plant gladioli in 2018:
- April: 1-8, 12-15, 17-22, 25-29;
- May: 1-6, 10-14, 16-19, 23-28, 30, 31;
- June: 1, 7-12, 14-16, 19-27, 29.
Unfavorable dates, when planted plants bloom later and do not bloom as profusely, are considered to be the following numbers:
- April: 9-11, 16, 23, 24, 30;
- May: 7-9, 15, 20-22, 29;
- June: 3-6, 13, 17, 18, 28, 30.
When should I plant them so that they bloom by September 1st?

In order to guarantee that fennel blooms by September 1, you need to focus on the local climate and the flower variety. Depending on the time of flowering, gladioli are divided into the following groups of varieties:
- super early - bloom 60-65 days after planting;
- early – 65-75 days;
- average – 75-85 days;
- medium-late – 85-90 days;
- late – 90-100 days.
In areas with mild climatic conditions, late gladioli can be planted in mid-May, earlier ones in June.
Planting secrets
When growing gladioli in open ground, you must follow a number of agrotechnical rules, otherwise the flowering will be short-lived and not too abundant.
Corm age
It is a mistake to believe that the size of the tuber affects the quality of flowering. A large adult gladiolus bulb is not always guaranteed to produce a large and bright peduncle. The biological age of this crop does not exceed 4-5 years, then the planting material needs to be renewed. It makes no sense to expect an abundance of flowers from an old plant. The age of the skewer can be determined by the diameter of the bottom and the height of the corm. The flatter it is and the wider the bottom, the older it is.
The young bulb is almost round, sometimes its height is greater than its width. For the development of a full-fledged strong flower shoot, its diameter must be at least 3 cm. Plants developed from young tubers bloom later than their older relatives, on average 12-14 days. The shape and size of the bulbs can vary greatly among different varieties, so it is not advisable to compare them with each other.
Read also: Belamkanda chinensis is an amazing flower for your flower bed.
Choosing a landing site

Gladioli love the sun and warmth, so you need to select sunny, well-lit areas for them, protected from cold northern and northeastern winds. Large trees and shrubs should be located at a distance of no closer than 3-5 m, since their crowns will shade the flower bed, and the root system will take away moisture and nutrients from the flowers. Tall green spaces located at a safe distance will protect the long shoots of the fennel from gusts of wind and help avoid lodging of the stems.
The landing site should be sufficiently elevated and dry. The culture does not tolerate close proximity to groundwater, since increased dampness leads to rotting of the fine roots and then the bulbs.
In low damp places you will have to make a high bed, otherwise the roots will not receive enough air and the plants will die. It is recommended to pour a little sand into each hole when planting.
Skewer grows best on light, loose, well-drained sandstones and loams that are rich in humus. In heavy clay soils and poor sandy soil, it develops poorly and may not bloom at all. The bed for this crop is prepared in advance in the fall. The roots of the plant go down to a depth of 35-40 cm, and you need to dig the ground deeply. Coarse sand and compost are added to soil with a high clay content when digging. Sandstones that do not retain moisture are weighted with clay and fertilized with humus.
Gladioli prefer neutral or weak acidity, so fluff or dolomite flour (100-150 g per 1 m²) must be added to soils that are too acidic.
It is useful to add a little crushed charcoal (100-120 g per 1 m²) to the garden bed. It is not advisable to add fresh humus, as this causes excessive growth of green mass and not too abundant flowering.
During spring digging, the following mineral fertilizers are added to the substrate:
- superphosphate – 15 g per 1 m²;
- ammonium nitrate – 10-15 g per 1 m²;
- potassium sulfate – 30 g per 1 m².
You should not plant skewer in the area where asters, phlox or any cruciferous plants (cabbage, radishes, mustard, etc.) grew last year, since these crops are affected by the same fungal infections. Wireworms are the worst enemy of corms, so it is better to refrain from placing them in the place where root crops grow.
The best predecessors for gladioli are: legumes, tomatoes, garlic, strawberries, dahlias, zinnias. Calendula and marigolds planted in close proximity repel insect pests (thrips). It is recommended to change the planting site every 2-3 years.