Crocosmia: cultivation. Japanese gladiolus planting and care in autumn Flowers similar to gladioli with round leaves
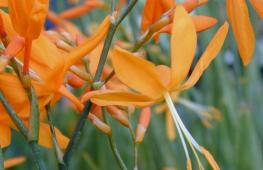
Montbrecia, or Japanese gladiolus, is a very beautiful graceful plant, it also has another name - common crocosmia ( Crocosmia). This is a flower from the family; its close relationship with them is indicated by the appearance of its hard, pointed leaves - a fan-shaped bunch. Their corms are also similar, and the bell-shaped flowers of all shades of orange-red are collected in paniculate inflorescences. Montbrecia blooms from the base to the top and, thanks to this, it retains its elegant appearance from the beginning of flowering until late autumn. The peduncle can reach 1 meter in length and can form several branches.
Crocosmia: cultivation
Crocosmia is a relatively unpretentious plant that can withstand short-term drops in temperature and strong gusts of wind, without needing support, and is resistant to various diseases. Caring for it is simple and consists of regular watering and fertilizing (once every 2 weeks before flowering). Does not tolerate stagnant moisture, loves good lighting and potassium fertilizers, prefers loose, nutritious soils.
Crocosmia: reproduction
It is propagated by seeds and children, and equally easily by both. The seeds of Montbretia are quite large, located in round seed pods, which are collected in late autumn, and next year, in February, they can be sown as seedlings. Seedlings can bloom in the second year.

Montbrecia corms are planted in the ground after the soil has warmed up a little, i.e. usually at the end of April. The soil for planting is prepared in the fall by digging and fertilizing it with organic and mineral fertilizers. Corms are planted to a depth of 7-10 cm, and the distance between neighboring plants should be 10-12 cm. By autumn, 5-6 children grow around an adult corm, planting them to a depth of no more than 5 cm, you can get flowering plants next year.

The winter hardiness of montbretia depends on the variety; there is a certain pattern that the larger the crocosmia flowers, the less hardy and cold-resistant it is. To increase the chances of a successful wintering of the montbretia, it is necessary to leave the withered leaves on the plant and additionally protect its underground parts with the help of a winter shelter - fallen leaves, sawdust, straw, shavings in a layer of at least 20 cm, and on top - a waterproof coating. Corms first planted in the fall need especially careful shelter. But on the other hand, plants that have successfully survived the winter grow stronger, more resilient and powerful. Overgrown crocosmia colonies are divided every 3-5 years before spring growth begins.

If you do not want to risk varietal montbretia with large flowers, then you need to dig them up at the end of October (not earlier, since they take quite a long time to ripen). For digging, you need to choose a clear, sunny day, cut off the stems and leaves of the dug corms, and dry them for several days. They should be stored at 4-7°C in cardboard or wooden boxes or in paper bags.
Montbrecia flowers look amazingly beautiful when cut, especially in combination with chrysanthemums and cereals. With their participation, you can create an unusual bouquet for a newlywed or an original winter composition - after all, crocosmia perfectly retains its color and shape when dried.
2010 - 2017, . All rights reserved.
A beautiful and elegant plant, Japanese gladiolus, looks great in any flower bed and is considered a “favorite” of many landscape designers. The unpretentious bulbous crop is distinguished by abundant, long-lasting flowering from early summer to late autumn. A special decoration of Japanese gladiolus are delicate and sophisticated flowers of various shades. The leaves of the perennial are no less decorative, forming thick and lush clumps. Japanese gladioli are hardy and resilient plants, planting and caring for them will not be difficult.
Japanese gladiolus, interesting facts
Japanese gladiolus has several names that are difficult to remember and pronounce. This bulbous miniature gladiolus is also botanically classified as Crocosmia, Tritonia or Montbretia.
- The name "Crocosmia" comes from the Greek words "krokos" and "osme", meaning "crocus/saffron" and "smell", respectively. This combination is explained by the saffron-like smell of dried Japanese gladiolus flowers.
- As for the more outdated name “Montbrezia”, this is the name of the famous French botanist who was involved in the selection of the garden form of the Japanese gladiolus.
- The rarely encountered name “Tritonia” is translated as “weather vane” and is associated with the spreading shape of the plant’s inflorescences, similar to a weather vane.
- Externally, the Japanese gladiolus is similar to the ordinary gladiolus that is familiar to us, but it looks more sophisticated. The inflorescences are miniature, and the clumps are thick and lush.
- A varied palette of inflorescences allows you to grow beautiful flower crops in almost any landscape. Graceful branches look great both in a flowerbed and in a bouquet. Moreover, the flower stalks can remain cut for 2 to 4 weeks, remaining just as fresh and graceful, and gradually opening buds.
- The dry inflorescences of Japanese gladiolus also look original, and are often used to create winter bouquets or ikebana. Indispensable companions for bouquet arrangements with Japanese gladioli are cereal plants.

- Planting mini-gladioli looks impressive both as an independent “bright spot” on the green background of the lawn, and in combination with other plants in the flower bed.

Japanese gladiolus, plant description
- The miniature gladioli looks more graceful and delicate compared to the ordinary representative of the gladioli species.
- The bulbous plant, Japanese gladiolus, belongs to the Iris family and has been cultivated in many countries since the 19th century. South Africa is considered the historical natural habitat of gladiolus.
- The main decoration of the bulbous plant is small, up to 5 cm in diameter, star-shaped flowers, shaped like a funnel. Lush paniculate inflorescences open gradually, from bottom to top, leaving behind equally decorative pods with seeds.

- The loose, thin panicles of Japanese gladiolus are similar in appearance to iris flowers. It is surprising that on one gladiolus bush the palette of colors can be very diverse: from bright scarlet to soft purple. There are varieties with flowers in orange, yellow, and red shades.
- Flower growers love the culture for its long and abundant flowering, starting in July and ending in September-October. And a pleasant subtle aroma fills the garden with magical notes of “false saffron”.

- The corm of the gladiolus is small in size, covered with several layers of a protective mesh shell. One adult bulb “produces” an average of 3-4 peduncles and forms several replacement bulbs during the season.

- The root system of gladioli is two-tiered. First, the roots of the planting bulb (mother) grow, and then (during the formation of “baby bulbs”) roots appear between the mother and replacement bulbs. The roots develop until flowering occurs, after which they stop growing.
- The narrow and sword-shaped leaves of Montbretia grow up to 60 cm in length, gathering at the bottom (at the root) into a fan-shaped rosette. Based on the structure of the foliage, the perennial is often compared to fennel (common gladiolus). Long green leaves give the plant a special attractiveness and charm.

- The branched thin stem can reach a height of 1-1.5 meters. This feature sharply distinguishes montbretia from the usual, thickened “arrows” of gladioli.
- Resistant to a variety of climatic conditions, the hardy Japanese gladiolus, in the harsh conditions of central Russia, is still not able to winter in open ground. Corms are dug up for the winter and stored in a cool place. In the southern regions, the plant is left to overwinter in a flower bed, providing additional shelter.

Japanese gladioli, where to buy
You can purchase planting material for exotic gladioli in specialized flower shops, botanical gardens or nurseries.

- If you buy plant bulbs, it is important to pay attention to their appearance. It should not be a very large (old), but not very small corm. Ideally, the bulb should be medium in size, without visible damage or rotting.
- If the bulb exceeds 4.5 -5 cm in diameter, it is an old bulb, unsuitable for planting. On average, each bulb is productive for no more than 4 years, after which it can only be used for collecting seeds and their further germination.
- If the purchased onion has a clean, small bottom, it is the main onion and you can try to separate it. To do this, the onion is peeled and “opened” along a noticeable dividing line. As a rule, two sprouts will be noticeable on such bulbs - this means two peduncles will form. Along the furrow lying between the sprouts, the main bulb is divided into two full-fledged planting bulbs.
- You should not buy corms that are too dry; they may turn out to be “dead”. If the bulbs are overdried, you can try to “reanimate” them. To do this, they are placed in a box with peat or moss and left in a cool place (for example, on the bottom shelf of the refrigerator).
- When choosing a variety of Japanese gladiolus, it is important to pay attention to its key characteristics: frost resistance, color of inflorescences, height of the bush. For example, the height of a plant can vary from 50 cm to 1.5 m and, in the latter case, a perennial garter will be required.

Japanese gladiolus, popular varieties
The most popular and widespread varieties in our country are the frost-resistant small-flowered forms of Montbrecia.
- Japanese gladiolus "Lucifer".
A frost-resistant variety that can tolerate frosts down to -30 0 C. With additional shelter, it overwinters in open ground. Tall gladiolus, reaching a height of up to one and a half meters. Among flower growers, the variety is recognized as one of the brightest and most beautiful. The inflorescences are a rich, bright red color, the stem is stable and erect.

- Japanese gladiolus 'Mason'.
The variety is highly frost-resistant and hardy.
- Japanese gladiolus 'Emily Mackenzie'.
The variety is characterized by good frost resistance and a relatively late flowering period. The decorative form of gladiolus is distinguished by symmetrical spike-shaped inflorescences of orange-brownish tones with a bright red splash in the center of each flower. The plant reaches an average height of about 60 cm.

- Japanese gladiolus "His Majesty".
The variety means "His Majesty". It has weak frost-resistant qualities and, as a rule, does not overwinter in open ground.
- Japanese gladiolus "Potsa".
The variety is distinguished by its tall stems, reaching a height of up to 1 meter, with narrow smooth leaves and soft pink small-flowered inflorescences. Moisture- and light-loving, unpretentious, quickly adapts to new climatic conditions.

- Japanese gladiolus 'George Davison'.
Gladiolus has amber-colored inflorescences and grows no more than 80 cm in height.
- Japanese gladiolus 'Masoniorum'.
The tall variety reaches a height of 1-1.5 m and is characterized by small orange inflorescences and sword-shaped corrugated leaves. Flowering is abundant and long-lasting, occurring in mid-summer. The variety is characterized by high winter hardiness.
- Japanese gladiolus "Babylon".
Low-growing (up to 50 cm), stable and compact gladiolus bush with orange inflorescences.
- Japanese gladiolus "Star of the East".
The perennial received its beautiful bright name thanks to its unusually large (up to 10 cm in diameter) and very beautiful star-shaped flowers of a bright orange color. The tall variety reaches a height of up to 1 meter and is considered one of the most beloved by landscape designers and flower growers. Poorly frost-resistant.

- Japanese gladiolus "paniculate".
An early flowering variety with inflorescences of bright orange shades. Flowering occurs early in June, and is distinguished by its extraordinary showiness and abundance. It can reach up to 1-1.5 m in height.
- Japanese gladiolus "Canary Islands".
It stands out for its yellow buds, reaching a height of no more than 60 cm. A decorative form of Japanese gladiolus, widely used in decorating landscape areas.
- Japanese gladiolus "Paniculata".
A plant with medium-sized orange buds and ruffled bright green leaves. The variety is considered to be early flowering and highly frost-resistant, reaching a height of 1-1.2 m.

Features of growing Japanese gladiolus
Growing an exotic type of gladiolus on your site is not at all difficult. For this you will need seeds, the so-called. “babies” or full-fledged corms of the plant.
- Planting with adult bulbs allows you to see a flowering Montbretia plant already in the year of planting, which cannot be said about the seed method of planting a perennial ornamental crop. In the best case, gladiolus planted with seeds will bloom only 2 years after sowing.
- Planting is carried out in spring or autumn. Taking into account the heat-loving nature of the bulbous crop, it is best to plan planting outside of winter. The most favorable period is the second half of spring, when the soil finally warms up and there is no risk of return frosts.
- Group plantings of Japanese gladioli planted in several rows look most impressive. As they grow, the bushes become lush and dense, and flowering becomes abundant and long-lasting. Flower growers successfully use such advantages to decorate flower beds, park areas and other landscapes.
- Japanese gladiolus tolerates any neighborhood well. The perennial bulbous plant grows well and goes well with many flowers: dahlias, chrysanthemums, echinacea, rudbeckia, daylily, etc.

Planting Japanese gladiolus
The technology for planting Japanese gladioli is not much different from planting an ordinary gladiolus or any other member of the Iris family. But, nevertheless, there are some features of planting and caring for Japanese gladioli.

Choosing a place to plant Japanese gladiolus
- A light-loving crop, Montbrecia prefers open sunny places or light partial shade. A plant planted in the shade most likely will not bloom.
- It is better to choose a place for planting without drafts, so that the wind does not break the thin peduncles of the gladiolus.
- An area with shallow groundwater is well suited for planting Japanese gladiolus. At the same time, rain or melt water should not stagnate on the site, as this can lead to rotting of the corms.
- The soil for the bulbous representative should be fertile, light, loose and moderately moist. At the same time, stagnation of water is unacceptable so that the corm does not rot.
- It is better to prepare the soil for planting corms in advance, for example, in the fall. The area is dug up, fertilizers are applied (humus, rotted manure, mineral complexes and, if necessary, slaked lime) and leveled. For good water permeability and drainage of the soil, you can add sand to the planting soil mixture.
- Of the mineral fertilizers, it is best to use superphosphates, potassium chloride and nitrogen-containing complexes. Nitrogen fertilizers are applied immediately before planting, in the spring.

Agricultural technology for growing Japanese gladiolus
- Before planting, the bulbs are pre-prepared: a month before planting, they are removed from the basement, kept at room temperature, lightly peeled and separated. Dense “nests” are taken apart, sorted (separating the “babies”), roots and remaining stems are cut off.

- Sorting of gladiolus bulbs is carried out according to 3 parameters, based on the size of the bulb. Group 1 includes the largest specimens, with a diameter of 3 to 3.5 cm; to the 2nd group – from 2.5 to 3 cm; The 3rd group makes up the smallest fraction of bulbs, with a diameter of 1.5 to 2.5 cm.

- Prepared corms, incl. and small “babies”, immediately before planting, are filled with a weak (0.1%) solution of potassium permanganate. Potassium permanganate (potassium permanganate) has a disinfectant effect and stimulates rapid germination and root formation of bulbs. Wintering varieties of Japanese gladiolus are dug up and divided every 3-4 years.
- When planting, the bulbs are placed in the soil to a depth of 8 to 15 cm. The larger the bulb, the deeper it is planted. The smallest specimens – “babies” – do not go deeper than 4-5 cm. Such bulbs can bloom only after a year.
- The interval between planting bulbs is maintained at approximately 10-12 cm. Corms can be planted in different ways: in rows, randomly around the area, in a checkerboard pattern, etc.

- When planting different varieties of Japanese gladiolus in the same area, it is important to maintain a certain interval between varieties to avoid cross-pollination and maintain the purity of the variety line.
- In order for a gladiolus flower to bloom as early as possible, you must first grow it at home (in pots), and then plant it in open ground with an adjacent lump of earth.

Japanese gladiolus, care features
Montbrecia is considered an unpretentious crop, caring for which does not require special skills. Watering, weeding, loosening and fertilizing are the main agrotechnical measures for successfully cultivating bulbous perennials on your site.
Watering, loosening and tying up Japanese gladiolus
- It is necessary to water the Japanese gladiolus moderately, without waterlogging or, conversely, severe drying. Excessive watering and stagnation of moisture can lead to rotting of the corm, and dry soil can lead to wilting and falling off of the buds.
- When watering gladiolus, you need to constantly evaluate the condition of the soil: it should be slightly moist. Therefore, watering is regulated depending on the weather conditions and climate of the region.
- You need to loosen the soil around the gladioli carefully and shallowly so as not to damage the bulbs.
- Some tall varieties of Japanese gladiolus need staking.

Feeding and fertilizing for Japanese gladiolus
- Japanese gladiolus responds positively to fertilized, fertile soil.
- The plant can be fertilized with fertilizers several times a season: before flowering, during budding and in the summer, during active flowering.
- The first feeding (in the spring, before flowering) is carried out with a full mineral complex at an average rate of 3 g per 1 liter of water. So you can “feed” Montbretia twice a month.
- During the period of bud formation, potassium fertilizers are suitable, 2 g per 1 liter of water.
- During flowering, the bushes (twice a month) are watered with mullein infusion (1:10).

Control of diseases and pests of Japanese gladiolus
- Disease-resistant Montbrecia can occasionally be affected by diseases common to all gladioli.
- A fungal disease, fusarium, is manifested by yellowing of the tips of the leaves, which eventually turn brown and die. If the plant is not “treated” for dry rot, it can dry out completely, since the fungal spores penetrate not only the above-ground part of the plant, but also affect the corms. The development of the disease is provoked by drought, excessive waterlogging, and thickened plantings of bulbous crops. Plants affected by fusarium must be destroyed.
- A disease called “Jaundice” or “Grass disease” in the early stages is expressed in yellowing of the foliage of Montbretia and can lead to the death of the entire plant. In the later stages of infection of a crop, an apparently healthy bulb after planting “releases” thread-like thin shoots that do not grow and die over time. In this case, the corm becomes hard, but not very viable. The disease is transmitted by insects of the cycad family. If the bulbs are infected with jaundice, soaking them in hot (45-50 0 C) water for 20 minutes helps. This simple procedure completely destroys the pathogen.


Preparing Japanese gladiolus for winter
- As soon as the inflorescences completely fade and fade, the flower stalks need to be cut off, thus ensuring better ripening of the corms. The best option is to dry gladiolus branches to create winter bouquets. Dry the flower stalks by hanging them vertically from a support, flowers down. Dry inflorescences retain their shape, color and pleasant saffron aroma for a long time.
- As a rule, most varieties of Japanese gladiolus are not able to overwinter in open ground, so fully ripe corms are dug up in the fall (October-November). The procedure is carried out in dry weather, when the leaves of Montbretia begin to turn yellow and wither. You should not dig up the bulbs too early (for example, in September), since immature planting material will not be able to survive until the next season.

- If the variety is sufficiently frost-resistant, the stems of the gladiolus are cut off (at ground level), and the place where it grows is covered with a thick layer (about 20 cm) of sawdust or straw. In cold regions, the area is additionally covered with film (or spruce branches) to protect the plant from cold and dampness during the thaw period. A corm that has overwintered in the ground “drives out” a powerful, strong plant that blooms earlier, more abundantly and longer.

- A well-developing bulb “gives” about 4-6 daughter specimens per season. Having dug up the plant, cut off all the stems with leaves, leaving a short stump of 5 cm. The corms are lightly shaken off the ground and dried, without cutting off the roots, indoors for about 2 weeks.
- How to store Japanese gladioli? The dried bulbs are placed in a box or box, covered with dry peat or sawdust and placed for storage in a cool place with a temperature of no more than +4-7 0 C (basement or bottom shelf of the refrigerator, for example).
- The roots of the bulb are cut off in the spring when preparing the planting material for planting. Then the remainder of the stem is removed, cleaned of scales, daughter specimens are separated and the bulbs are soaked for 6 hours in a solution (20 g per bucket of water) of mineral fertilizer. Large daughter corms usually bloom in the first year after planting.

- Some gardeners prefer to watch gladiolus bloom, even with the onset of cold weather. To do this, the plant is not pruned in the fall, but transplanted into a pot and brought indoors. For another month, gladiolus will delight others with its buds.

Transplanting Japanese gladiolus
- Japanese gladiolus grows quickly and needs regular replanting. One bulb “gives” 5-6 daughter bulbs per season.
- As a rule, Japanese gladiolus bushes are planted every 4-5 years in early spring.
- Unthinned (dense) clumps of Montbrecia quickly weaken, flowering decreases, and the decorative appearance of the plant is lost.

Reproduction of Japanese gladiolus
- The simplest and most common way to propagate Japanese gladiolus is to separate the daughter “babies” from the mother bulb. The separated small bulbs grow quickly, gain strength and within a year turn into a full-fledged flowering bush. In spring, daughter bulbs are separated from the mother bulbs, sorted and planted in open ground. Small specimens do not go very deep into the soil; a hole (or groove) 3-5 cm deep will be enough.

- The seed propagation method is just as simple, but flowering will have to wait about 1 year longer (compared to daughter bulbs). In addition, as is known, seeds may not fully reproduce the characteristics of the parent individual. Gladiolus seeds are brown in color and quite large in size. The seeds are collected in late autumn, so in cold regions the seeds simply do not have time to ripen. It is better to sow in winter (in February), so that by spring the seedlings will have grown a little and be ready for transplanting into open ground. For sowing, use a ready-made soil mixture or mix turf soil with humus, sand and peat in a ratio of 2:2:1:1, respectively. Containers with sown seeds are placed in a bright, warm place, for example, on a windowsill. Growing seedlings are planted in pots or boxes and gradually hardened. Approximately in May, seedlings with a root ball of soil are transplanted into the garden bed.


Using Japanese gladiolus in landscape design
- Dense clumps of Japanese gladiolus fit perfectly into various flower arrangements and decorative landscapes.
- The best partners for Montbrecia are perennials such as echinacea, kniphofia, yarrow, rudbeckia, dahlia, salvia, etc.
- Planting Japanese gladiolus with ornamental grasses or cereal plants looks impressive.

- Most often, bright perennials are planted in cascades, near ponds, near gazebos or along garden paths.
- Long-flowering montbretia are usually placed against the background of low-growing plants, in the first rows of mixborders.
- Japanese gladiolus looks exotic in tropical, “dry” and gravel gardens, against the backdrop of green lawn grass.
- The fact that a perennial bulbous crop can grow greatly in a short time is used by gardeners to fill large areas with ground cover crops.

Conclusion
Japanese gladiolus is an unusually attractive flowering crop, widely used in the design of flower beds, garden areas and other landscapes. The bulbous plant has gained such popularity due to its unpretentiousness in care, ease of planting and rapid reproduction rate.
The perennial crop does not require frequent watering, is disease-resistant, quickly grows into true flower “colonies,” and blooms profusely and for a long time.
Lush clumps of narrow long leaves and a varied palette of colors of the paniculate inflorescences of Montbrecia “conquered the hearts” of many flower growers and landscape designers.

Japanese gladiolus, photo


Video: "Japanese gladiolus, planting and care"
Now gardeners in our country have the opportunity to grow many wonderful exotic plants on their plots. One of the most decorative representatives of tropical flora is Montbretia or Crocosmia. The flower's homeland is hot Africa, but at the same time it can be grown quite safely in the conditions of our middle zone. The plant is bulbous and has wonderful picturesque flowers of various warm shades.
Despite the fact that Montbretia comes from the tropics, it is not too demanding to care for, and its cultivation is accessible even to a novice gardener. In the article we will consider the question of how to grow Montbrecia in open ground. Let's find out how to care for this beauty, and which species are most suitable for breeding in our climatic conditions.
Description and types
The plant is sometimes also called "Japanese gladiolus", for its some external resemblance to this bulbous plant. Montbrecia has very decorative flowers, shaped like lilies. But, unlike lilies, in this case the flowers are small and are collected in inflorescence groups.
The plant can reach a height of one and a half meters: but this is in its natural habitat, in its native tropics. In cool climates, the plant reaches a height of 40 cm to a meter.
The specifics of its cultivation are almost the same, so for most gardeners it will not cause any difficulties.
The plant is a relative of saffron, crocus, iris, snowdrop, freesia and gladiolus, resembling all of them at the same time. Montbrecia looks ideal in open flower beds in a general composition with plants such as lily, echinacea, canna, and salvia. The tropical beauty also behaves well when cut: it can stand well in water after being separated from the mother bush for up to two weeks.
The best varieties
Montbrecia golden
This type of plant reaches a height of one meter and is distinguished by wonderful thick and decorative leaves. The flowers are golden yellow in color and approximately 5 cm in diameter.
Montbrecia golden
This type of crocosmia is recommended to be grown in shaded areas of the garden, since in nature it grows in tropical forests. It blooms in autumn, and usually the wonderful inflorescences are used to make prefabricated bouquets. But how this happens is described in this article.
Montbrecia massonorum
This type of plant can reach a height of 80 cm, is distinguished by large bulbs and interestingly shaped leaves. The flowering of this type of crocosmia is very long, but the flowers themselves have a small diameter.

Montbrecia massonorum
Montbrezia Posta
This is the most unassuming type of plant: Montbretia Posta is able to survive even under the most unfavorable external circumstances. The plant has long narrow leaves and small, but very decorative, flowers.

Montbrezia Panicula
This type of crocosmia begins to bloom in early summer and continues until frost. Its leaves are corrugated, and the plant itself can even safely survive light frosts.

Montbrezia Panicula
This is one of the most popular hybrid crocosmia varieties. The variety has a wide variety of colors, which makes it possible to decorate the garden in the most picturesque way. Widely used in landscape design for flower beds, flower beds, and also to create picturesque garden compositions.

A mix of different varieties of crocosmia is also often planted, which is a particularly picturesque sight. But this will help you understand how to make a plastic flowerbed for your garden.
The video shows everything about the planting of Montbrezia:
Preparing for landing

Montbrecia is grown in open ground by analogy with other bulbous plants. But, unlike many other representatives of bulbous plants, in this case the planting material must be prepared several days before it is directly placed in the ground.
The bulbs must first be inspected for defects and damage. If such specimens are found, they should not take part in planting. Then all selected planting material must be dried by keeping it in a warm room for several hours.
After drying, the bulbs are soaked in a weak solution of potassium permanganate, thereby etching and protecting the adult plant from pests and diseases.
At the beginning of May or even at the end of April (depending on the climate zone), the bulbs are planted in open ground. In this case, you need to ensure that the minimum soil temperature is not below + 5 degrees. It is enough to check this at a depth of 10 cm.
Soil preparation

You can place a flower on a green lawn, and even decorate an alpine hill with it. Or you can create a composition of montbretia and shorter plants. It is important to prepare the soil for spring planting of bulbs in the fall.
To do this, the soil is dug up and fertilized with superphosphate. Fertilizer calculation is as follows: per 1 sq. m of land - 30-40 grams of dry superphosphate.
If the soil is not fertile, it is recommended to add nitrogen fertilizers and potassium chloride. If the soil is too clayey and heavy, the situation is corrected with the help of small pebbles or crushed stone. And to ensure good soil drainage, peat and river sand are added to it. But how the perennial ground cover Phlox is planted and cared for, and how it looks in the photo, can be seen in this
Landing
In order for the plants to feel good, the distance between the bulbs should not be less than 15 cm. A mixture of sand, peat and compost must first be added to each prepared hole: the layer of this nutrient substrate should be about 15 cm.
The bulbs are laid out in the hole on top of the nutrient layer, and first sprinkled with sand, and then only with soil. Large bulbs are deepened by 10 cm, and small ones by 5.
Care
In general, the plant is unpretentious, so no special manipulations are required. Let's find out what the most important points to keep in mind when caring for a plant.
Three times a month, crocosmia must be fed with mineral complex fertilizer, alternating with watering with manure water. The first time feeding is carried out with the appearance of leaves on the plant. And in the fall it is necessary to add potassium fertilizers to the soil.
If the plant is of sufficient height, then it is recommended to tie its stems to pegs, which will protect them from fracture and deformation. To ensure that the plant receives the full amount of nutrients, do not forget to cut off dried flower stalks.
The video shows the landing of Montbrezia:
If your Montbrecia belongs to frost-resistant varieties and spends the winter in the ground, do not forget to dig up the plant bulb every three years for division. A successfully endured winter, by the way, has a beneficial effect on the plant, as it contributes to its hardening. After each winter experienced, Montbrecia becomes stronger and stronger.
If the plant has large flowers, then it is better to dig it out of the ground for the winter. It is recommended to do this after mid-October, when the children are already fully mature. After digging, the bulbs must be dried in a sheltered room and then placed in boxes with peat or moss. In this case, the children must spend the winter on the mother's bulb: in this way they will be protected from drying out.
In the video - wintering Montbrezia:
The storage temperature of planting material should not be higher than + 10 degrees, otherwise the bulbs may begin to germinate. If you cannot provide such conditions, then storing the bulbs in the vegetable compartment of the refrigerator is allowed. Boxes with bulbs can also be overwintered in the basement: the main thing is to ensure they are dry and at a suitable air temperature.
If the plant overwinters outside, then in the first winter it is necessary to protect them from frost, and in subsequent years you can gradually make the layer of shelter thinner, since the plant will already be sufficiently hardened.
A plant that has successfully overwintered in open ground acquires a more powerful root system, also becomes more powerful, and begins to bloom earlier.
Reproduction

Montbrecia can be propagated either vegetatively or by seed.
If you choose the seed method, then before sowing in open ground, you must first prepare seedlings in pots indoors. And seedlings are planted in open ground no earlier than mid-May, and then when the possibility of night cold snaps has already been completely eliminated. It should be borne in mind that Montbrecia, grown from seeds, begins to bloom only in the second or even third year after planting.
If you want to propagate the plant by bulbs - vegetatively, then you need to separate the babies from the mother bulb after wintering and plant them immediately in open ground. Such specimens will begin to bloom in the second year. But this will help you understand how propagation by Heuchera seeds occurs.
Pests and diseases
Most often, the plant is susceptible to damage by thrips and mole crickets.
Mole crickets are very dangerous for the tropical beauty: these pests gnaw the plant's bulbs, which is why the plant begins to hurt and may die. They fight mole crickets with the help of drugs:
- medvetox;
- grizzly;
- thunder.
Attention: often when buying bulbs in a store, gardeners notice that it is quite difficult to find high-quality planting material. Many stores do not comply with the storage conditions of tropical plant bulbs, which is why the bulbs lose their viability and become unsuitable for further propagation. Therefore, be more careful and carefully inspect the planting material before purchasing it.
We looked at the features of growing such an interesting tropical plant as Montbrecia. Despite the exotic nature of its origin, it is quite possible to grow Montbrecia in our climate. The tips given in the article will help you “tame” this tropical beauty and decorate your garden with wonderful decorative flowers.
Planting and caring for montbretia in open ground will not cause any difficulties for amateur gardeners. The plant takes root easily. It is unpretentious and tolerates drought well. With minimal effort, you can enjoy the lush flowering of the original perennial. Bright, exquisite flowers will complement the landscape design. They will be the highlight of any type of flower bed. Dry inflorescences will delight you with a pleasant sweet-tart aroma with a slight bitterness, reminiscent of the smell of saffron. This similarity is due to the relatedness of the plants. Montbrecia and saffron belong to the Iris family.
Characteristics of the plant
Despite belonging to the Iris family, Montbretia looks like a miniature gladiolus. Narrow, pointed, sword-shaped leaves are collected in a basal rosette. Thin flower stalks rise above them, reaching a height of 1.5 m. At the end of June and beginning of July, the first buds appear on them. They bloom alternately, giving the plant an attractive appearance throughout the entire flowering period (from July to September).

At the same time, 4-5 flowers similar to stars are revealed. They can be colored pink, white, golden yellow, rich orange or scarlet. The diameter of the flowers reaches 5 cm. They are collected in dense paniculate inflorescences.
Due to its resemblance to gladiolus, Montbretia is called Japanese (or Chinese) gladiolus. The plant is a corm hybrid obtained by crossing Crocosmia Potts and Crocosmia aureus. Flowers are native to South Africa.
Montbretia has small, flattened corms, similar to gladiolus roots. Their diameter is about 2-2.5 cm. The corms are covered with several layers of mesh membranes. During the warm period, several new replacement bulbs develop.

Caring for the plant differs little from the agricultural technology of ordinary gladiolus. Its corms are also recommended to be dug up and stored indoors during the winter under certain conditions.
Choosing a place to plant a flower
For montbretia you need to choose an open place, well lit by the sun. You can plant the plant in areas that receive direct sunlight only part of the day. It is better that the flower is not shaded in the morning. It tolerates partial shade with diffused light well.

If there is insufficient lighting, the plant will stretch out excessively, lose its brightness of color and bloom sparingly. In deep shade conditions it will not produce inflorescences.
Near the Japanese gladiolus there should be low-growing plants or a lawn. Montbrecia needs extra space as it is spreading. Its inflorescences will hang above the ground, taking up additional space. The plant should be planted at a distance of at least 40-60 cm from the path.
Flowers should not be in a draft. It is advisable that they be protected from prevailing winds, especially cold ones. At the same time, there should be good air circulation in the area.
You should not plant such a flower in a lowland where rain and melt streams will collect. You should also avoid places where groundwater is close to the surface of the earth. Like other bulbous plants, Montbrecia does not tolerate stagnant moisture. However, choosing the highest area is also not recommended. The soil on it will dry out quickly. Although the plant is drought tolerant, it feels most comfortable in moist soil.
Montbrecia loves loose acidic soils with a pH of 5.8-6.4. You can identify an area with acidic soil by the plants growing on it. Among them will be horsetail, horse sorrel, moss, sedge and woodlice.

If you plan to plant several types of plants, you need to select different areas for them. The minimum distance between specimens of different varieties is 80 cm. If planted closer together, the flowers will be cross-pollinated and lose their decorative qualities.
Planting bulbs
The soil in the selected area should begin to be prepared in mid-autumn. It needs to be dug up and fertilized (20 g of potassium chloride, 100 g of slaked lime, 2 buckets of humus and 40 g of superphosphate per 1 m2).

The easiest way to plant Japanese gladiolus is with bulbs. They are immersed in open ground when it warms up to a temperature of +6. +7°C (late April or early May). Before planting, the bulbs need to be brought into a warm room, separated from them and the layers of dried shells removed. 2-3 hours before placing them in the ground, they must be soaked in a warm (+25. +30°C) solution of potassium permanganate. The concentration of potassium permanganate should not exceed 0.1%. Soaking is necessary to disinfect the bulbs, as well as stimulate the growth of the root system and stems.
Until the soil warms up well, the plant will form a root system. After this, it will begin to build up the ground part. If the bulbs are planted too late, Montbrecia will immediately begin to grow upward without wasting resources on the formation of the root system. Plants with poorly developed roots have low decorative qualities.
Before planting, you need to add nitrogen fertilizers to the soil (30 g per 1 m?). The soil needs to be loosened, breaking up large clods, and moistened. Large bulbs need to be deepened into the ground by 8-10 cm. Small planting material is placed at a depth of no more than 4-5 cm.

It is necessary that there be a distance of at least 6-12 cm between plants. Rows should be spaced at a distance of 25 cm. The more space there is, the more magnificent the bush will be and the taller the flower stalks. They can be cut to create stunning bouquets. Planted flowers should be watered and protected from direct sunlight for 2-3 days.
To make Chinese gladiolus bloom earlier, the bulbs can be planted in pots. The sprouts are transferred to open ground in May or June. The babies will bloom only in the second year.
Planting Japanese Gladiolus Seeds
You can plant Montbrecia seeds. Large grains with a brownish-red tint are located in the seed box. They need to be collected when the fruit dries and opens. But it is better to purchase planting material in the store. Plants grown from independently collected seeds may not have the decorative qualities of a hybrid.

In the last days of February or early March, planting material should be soaked in water at room temperature. It must be changed every 6 hours. A day later, the seeds are planted on the substrate at a distance of 2-3 cm. The soil should contain leaf soil, peat, humus and sand. The components of the mixture must be taken in equal parts.
The container with soil is covered with film and placed in a well-lit place. When the first shoots appear, the film is removed. The sprouts need to be watered as the soil dries and loosened. To prevent plants from being affected by fungal diseases and their roots from rotting, the soil should be slightly moist.
When 2-3 leaves appear on the sprouts, they are picked (moved into separate pots). For the last 10-14 days before planting, containers with seedlings should be taken outside daily, gradually increasing the duration of stay in the fresh air. This will allow the plants to more easily adapt to new conditions after planting in open ground.
Seedlings should be planted at the same time as the bulbs (late April-early May). For each plant, you need to dig a hole 5-7 cm deep. It should be wide enough to fit the entire earthen lump of the sprout. You should not remove soil from the root system. It will help protect it from damage.
Plants grown from seeds will bloom only in the second or third year.
You need to water the flower 2-3 times a week. On hot days, the frequency of moistening is increased, preventing the soil from drying out excessively. To prevent a crust from forming after it, the soil must be loosened regularly. At the same time, weeds must be removed. Regular weeding and loosening will provide the plant's roots with oxygen.

Poor soil must be fertilized regularly. As soon as the first leaves appear on the surface, they need to be watered every 2 weeks with nitrogen fertilizers (2 g per 1 liter of water). Fertilizing will enhance plant growth. In summer, it is better to fertilize the soil with mullein diluted in water in a ratio of 1:10. When the first buds appear on the gladioli, fertilizers rich in potassium should be added to the soil.
When Japanese gladioli finish blooming, their stems and foliage need to be cut off. Then the flowers will spend all their resources on the development of bulbs.
Caring for bulbs in winter
In the southern regions of the middle zone, montbretia does not need to be dug up for the winter. The plant needs to be mulched with fallen leaves, bark, spruce branches, straw, grass clippings or sawdust. The mulch layer should be at least 15-20 cm. It is covered with a film on top. In the spring, after the temperature has reached above zero, the film and mulch must be removed so that the sprouts can safely appear on the surface. The leaves of a plant that will overwinter in the ground need to be cut off.

If the Japanese gladiolus tolerates winter well, it should be dug up once every 3-5 years to separate the children from the bulb. If you don't do this, the plants will be too close to each other. They will become small and bloom sparingly.
In regions with colder winters, the bulbs should be dug out of the soil in mid-October, before the first frost, when the plant's leaves turn yellow. If you do this earlier, the children will not have time to mature. The stem of the dug plant is cut at a height of 5 cm from its base. The bulbs are dried together with a lump of earth in the fresh air in the shade or in a well-ventilated room at a temperature of 10°C.
They should be stored in boxes with sawdust, moss or dry peat in cool rooms at an air temperature of +5. +8°C. A basement or cellar is best suited for this purpose. If it is not possible to keep the bulbs in such a room, they can be placed on the bottom shelf of the refrigerator, wrapped in clean cotton cloth or paper.
The bulbs are removed a few days before planting. They are warmed indoors at room temperature.

Experienced gardeners recommend leaving some of the bulbs in the ground, even in relatively cold climates. Some of them can survive the winter safely. Surviving specimens become more resilient and viable. They throw out powerful flower stalks and bloom longer and more abundantly. In case of failure, you can plant the planting material dug up for the winter.
Disease and pest control
Chinese gladioli are affected by diseases common to gladioli. If a plant's leaves dry out, its stems become bent, its flowers become deformed and their color changes, it is infected with fungal organisms that cause fusarium. Fungicides (antifungal agents) are used to treat the disease.

Yellowing and drying foliage may be a sign of grass. This viral disease is spread by leafhoppers. Such a plant needs to be dug up and burned.
With excess water, Montbrecia can be affected by bacteria that cause gray rot. A sign of the disease is a gray coating on the bulbs and an unpleasant odor. You can cure the plant by reducing the frequency of watering.
If the castings dry out, the stems become twisted, and the flowers fall off, the Japanese gladiolus may be infested with thrips. Pests leave colorless stripes or spots on it. They are fought with Karbofos, Confidor or Agravertin.
Mole crickets can destroy flowers. They eat their bulbs. To get rid of insects, dig a hole 50 cm deep and pour manure into it. Towards the end of autumn, the hole is dug up and the mole crickets that have settled in it for the winter are removed.
Leaf fall can be caused by the activity of spider mites. The pest sucks out the juices of the plant, causing its death. It can be destroyed by any insecticide.
And a little about secrets.
The story of one of our readers, Irina Volodina:
I was especially distressed by my eyes, which were surrounded by large wrinkles, plus dark circles and puffiness. How to completely remove wrinkles and bags under the eyes? How to deal with swelling and redness? But nothing ages or rejuvenates a person more than his eyes.
But how to rejuvenate them? Plastic surgery? I found out - no less than 5 thousand dollars. Hardware procedures - photorejuvenation, gas-liquid peeling, radio lifting, laser facelift? A little more affordable - the course costs 1.5-2 thousand dollars. And when will you find time for all this? And it's still expensive. Especially now. Therefore, I chose a different method for myself.
www.moimirdizaina.ru
Why don't gladioli bloom? Possible reasons

On flower forums, questions like “Eight gladiolus bulbs didn’t bloom this year are often asked. Why?" It is impossible to answer in such cases without asking clarifying questions. Look how many possible reasons there are. Choose which one best suits your situation.
Wrong choice of planting material:

Wrong choice of landing site:
- Crop rotation is not observed; bulbs are planted in the same place for several years in a row. In this case, already in the third year the bulbs tend to get sick, bloom worse, or not bloom at all;
- In the shade, all varieties bloom later; gladioli in the middle and late flowering periods do not have time to form a peduncle at all.
- Planting in unventilated areas of the garden increases the risk of developing fungal diseases, which also affect flowering;
- A rainy “unlucky” year combined with a soil composition that is not optimal for gladioli;
- In too hot and dry summers, lack of moisture can affect flowering. In this weather, abundant watering at least once a week is advisable. With persistent heat, evening watering may be required, the purpose of which is not only to moisten, but also to cool the soil;
- If you plant adult and juvenile bulbs (in the second year of life) “mixed”, the former will inhibit the latter. It is better to plant gladiolus bulbs individually. It is advisable to plant old bulbs with a wide bottom in a separate flower bed;
- Planting bulbs too deep. Correct, not interfering with flowering, to a depth of 4 bulb diameters on light soils and 3 diameters on heavy soils;
- Lack of nutrients. For example, on light soils it is advisable to give not only root, but also foliar (leaf) fertilizers, they are better absorbed;
- Gladioli will benefit from good soil aeration: after watering, it is advisable to loosen the soil. Without this, weakened bulbs may not bloom;
- Mulching will help preserve soil moisture. You can also plant gladioli on ridges covered with black film;
- Incorrect cutting of flowers. When cutting, for normal ripening of the bulb, it is advisable to leave at least four leaves on the plant. Otherwise, there is no outflow of nutrients, and a weak replacement corm is formed.
- Babies bloom too early. “Children” that have reached a diameter of 1.5 cm or more can bloom. Another thing is that you should not let such a baby bloom, as this delays its development and next year it is unlikely that it will be possible to get a good full flowering. It is recommended to pluck out the peduncle of a blooming baby.
- If the bulbs have been gnawed by wireworms (larvae of the click beetle), you should not expect them to bloom.
- Currently, thrips, which were introduced with imported planting material, have become a disaster for gladioli. They especially harm corms during winter dormancy, significantly weakening them. This may also be the reason why gladioli do not bloom.

Adverse weather conditions:
Incorrect landing:

Incorrect agricultural technology:
Presence of pests:
www.supersadovnik.ru
Gladioli
among the people gladioli aptly with a sword nicknamed: its long, warlike leaf really looks like a sword. But despite their outward “belligerence,” gladioli flowers have a gentle soul and respond reverently to your care! Perhaps that’s why growing gladioli requires not only a sea of patience, but also an ocean of love?
I know firsthand that gladioli are welcome guests in every garden. Some flower gardeners are crazy about such many-sided, bright flowers, while others adore them for their long life as a cut flower and long flowering.
And also growing gladioli– this is a sport that is full of excitement, adrenaline and pleasure from the blossoming “victory”! In this article you will learn about how to properly plant and care for gladioli, how to store them later, how to obtain strong planting material (children of gladioli) and how to become a professional among professionals. Interested? Well, let's begin then!
Planting gladioli
When to plant gladioli? The flowers are heat-loving, before May 15 they have nothing to do in the open ground, but before... In early April, we take the bulbs out of storage (basement, refrigerator, etc.), soak them in a pink solution of potassium permanganate and send them for germination in sand (a cardboard box with moistened sand or sawdust). Water carefully as the sand dries. Usually, the bulbs quickly respond to their new home and immediately begin to grow. In mid-May, when our flowers have already grown by 8-10 centimeters, it is time to plant them in the garden.
Place for gladioli it should be fairly moist and light, but not sunny. Partial shade is just right.
. Gladioli are extremely sensitive to moisture deficiency, especially during the period of bud ripening. Lack of moisture leads to poor rhizome development and poor flowering.
The soil. Before planting, the soil should be amended with manure. Deepen the gladiolus bulb by 10 centimeters, the distance between them should be at least 20 cm. It is better to plant flowers in rows, this makes it easier to care for them. The distance between rows is at least 30 centimeters.
Gladioli: cultivation, care
Feeding. Like no other, gladiolus is the king of your garden, and it should be looked after like a king. Careful care and a caring attitude are the main factors of success. Water regularly, loosen the soil, remove weeds and, of course, feed. The plant requires a lot of energy to bloom. For brighter colors, it is good to feed them with chicken manure (rotted) in a ratio of 1:10. Dilute the manure with water, let it sit for 3-4 days and generously feed the flowers.
Watch the dosage, do not add more manure than normal, otherwise the delicate roots will get burned and the flowers may die.
The frequency of fertilizing is also important: the first is carried out after the appearance of three or four leaves, the second - already at the moment of budding, and the third - after the opening of the first flowers. Before fertilizing, water the gladioli thoroughly so as not to burn the root system (this also applies to kobea, campsis, verbena, cosmos, honeysuckle, delphiniums and other garden plants).
Support. You know very well that gladioli grow over a meter, so don’t forget to tie them to stakes. If there are a lot of flowers, you can stretch twine, mesh or wire along the row, you can plant them in wicker baskets, they are quite tall and stable. It will turn out both beautiful and practical.
Watering. As mentioned earlier, gladioli are real water-drinkers! Water them in the evening, so the moisture will stay on the ground longer. To prevent a hard crust from forming on the surface, loosen the soil more often. After the gladioli have bloomed, gradually reduce watering: dry soil promotes the ripening of the corm.
Bouquets of gladioli. Depending on the chosen variety, the flowering of gladioli ends after 3-4 weeks. For cutting, use plants that have barely opened two or three flowers. Ideal time for cutting: early morning or late evening. In this case, it is better to leave 5-6 leaves on the branch. This is necessary in order to protect the bulb from diseases. If the plant remains to bloom in the garden, then it is better to periodically remove faded flowers, which will also prolong flowering somewhat.
Gladioli last a long time in a vase and decorate any home! They can often be seen in summer bouquets. It's funny when a little first-grader gives a bouquet to his teacher that is almost the same height as himself. But, according to the rules of etiquette, gladioli are masculine flowers, and it is customary to give them to our strong representatives.
Storing gladioli
The most important moment is coming – storage of gladioli. The future harvest depends on proper wintering. There are many options for storing bulbs, I offer you the most interesting, simple and proven from personal experience.
Method No. 1. After flowering, in early September, it is time to dig up the bulbs. In clear, dry weather, we dig up the bulbs and trim the leaves, leaving 15 centimeters from the base. Do not touch the roots until the bulb is completely dry. We clean it of scales and dirt and lay it out in a bright, dry, ventilated room to dry. Then you can store it in a cardboard box or in egg trays, covered with a dry cloth. Periodically look through the gladioli bulbs so as not to miss a “sick” one. Children are stored in the same way; in the spring they are planted in the ground. If someone suddenly decides to bloom (from the kids), we cut off the peduncle so that it grows healthy and strong. This method allows you to obtain strong planting material by the end of the next season.
Method number 2: “Paraffin shirt”. This method will be useful for residents of city apartments. Very often, in a city apartment with central heating, onions become affected by diseases or dry out. Yes, you can send them to the garage or basement, but where is the guarantee that they will not be affected by rot or mold? How can we preserve gladioli bulbs? Dress them in a “paraffin shirt”!
Initially, you should dry the onions well, then peel off the scales. Next, something will happen... Melt paraffin from purchased candles in a water bath, and carefully lower each bulb into it. When the paraffin has cooled, put them in boxes and place them in a traditional storage place.
Bulbs in paraffin clothes will be perfectly preserved, will not lose their elasticity, and in the spring they will hatch together and quickly begin to grow! The advantage of this method is that diseased gladioli bulbs will not be able to occupy healthy ones, which reduces the risk of loss of planting material. Try it, maybe this method will suit you best?
Method number 3. Each of us has a pantry in which we can find a few extra centimeters. There we put boxes with gladioli bulbs. We make holes on the boxes for ventilation. If there are not many onions, you can put them in the bottom tray of the refrigerator. But.
Do not place gladioli planting material in basements where vegetables and fruits are stored. They release moisture, which can cause gladioli to rot.
Method number 4. “Storage in a stocking.” I recently found some interesting advice; it is suitable for those who have a glazed loggia. After digging the onions, place them in nylon stockings and pickle them in a disinfectant solution against thrips. Copper oxychloride should also be added here. Carry out the treatment as soon as the bulbs have been dug up. After processing, dry the gladioli well near the fan heater without removing them from the stockings. When they dry (sign: they begin to rustle), take them to a glassed-in loggia (with a temperature of about 13-15°C) and store until spring, maintaining a range of temperatures. The main rule: store gladioli in a cool, dry place in small batches with regular ventilation.
I think I said a lot about storage, if I missed anything, I’m waiting for your advice in the comments :)). Now it’s time to “cover” the topic of raising children.
Children of gladioli: planting and care
What is the key to successful cultivation of tulips, crocuses, lilies, freesias, decorative onions, irises and those same gladioli? In good planting material! Read on to learn how to grow a corm with a diameter of 3 centimeters from a baby that was only 6-8 millimeters a year ago...
Planting children. So, in the spring, along with the “adults,” the kids also go to the ground. We first disinfect them for 1.5-2 hours in a solution of potassium permanganate, after which we plant them in a pre-prepared, well-fertilized bed and cover them with film. Dig grooves 4-6 centimeters deep (as for planting onions), a distance of 20 centimeters. We plant the children, keeping a distance of 10 centimeters, sprinkle them with soil and water them with diluted mineral fertilizer with microelements. With a scheme of 20*10 per 1 sq. meter you can plant about 48 children.
Caring for baby gladioli the most common: watering, loosening the soil, removing weeds. We will feed regularly, every 10 days. In August and the first half of September we feed only potassium-phosphorus fertilizers. Remove all flower stalks mercilessly; the children do not need this yet. At the end of September you can dig up the corms, which have become strong and strong, and have grown very, very much!
Note to the gardener: 5 secrets of growing gladioli
- Gladioli corms are best planted in a row. Both in the garden and along a hedge or fence. This is how it is better to care for flowers, and the better the care, the more beautiful the gladioli flowers will be, the larger the bulbs will grow and produce even more children. Gladioli flowers planted in a row are easier to tie up, which is important when growing large “plantations” of these magnificent flowers.
- When planting directly, add a little sand to the bottom of the groove. The bulb sits better in the sand, plus the sand prevents the bottom from rotting with frequent watering. The deeper you plant the bulb, the better quality the flowers will be, but for propagation the rule is the opposite - shallow planting allows you to get more children, but the flower stalks are not as expressive.
- Do not plant anything in the clearings between flowers - the lower leaves should be well lit. Which, again, affects the quality of the corms.
- You need to cut flowers for a bouquet very carefully, with a sharp knife and in such a way as to damage as few leaves as possible. The remaining stump should nourish the corm, NOTCUT peduncle at the very base.
- It is better to plant the children a little earlier than the corms themselves. As soon as the ground warms up by 5-8°C, planting can be carried out.
I wish you, my readers and subscribers, success in growing gladioli! Remember that results are achieved only with strong desire and incredible perseverance!
cvetochnie-motivi.ru
Gladioli: description and cultivation techniques

The gladiolus flower (Gladiolus) is popularly called the sword flower, as its tall peduncle resembles a sword pointing upward. In order to imagine what a gladiolus looks like, you just need to go to any school on September 1, because it is one of the most common flowers in the bouquets of students going to classes after the summer holidays. There are many ways to propagate gladioli, and you will learn about each of them in this material.
What does gladiolus look like: description of the plant
There are many legends about gladiolus. Among the Romans, it was considered the flower of gladiators. Traditionally, gladiolus is a masculine flower, reminiscent of chivalry, the real “king of victories.”
As one legend says, gladioli grew from the swords of Thracian warriors captured by the Romans. The Romans won the war between the Romans and the Thracians, and their cruel commander captured the Thracian warriors, ordering them to be turned into gladiators. Two captive young men, Sevt and Teres, united by longing for their homeland, the humiliating position of slaves and the pain of irretrievably lost freedom, became strong friends. Noticing this, wanting to have fun and entertain the audience, the cruel Roman forced the two faithful friends to fight each other. The reward in the battle was freedom and return to their homeland. Many curious citizens came running to watch the fight. Trumpets sounded, calling the gladiators to battle, but Sevt and Teres refused to fight for the amusement of the public. They simultaneously stuck their swords into the ground and hugged each other tightly, preparing to accept death. The indignant crowd buzzed, trumpets sounded again, announcing the duel, but the friends refused to fight. They were put to death, and as soon as the warriors' bodies touched the ground, their swords took root and blossomed, turning into tall, beautiful flowers. In honor of the noble gladiators they were called gladioli. And to this day these flowers are a symbol of friendship, nobility, fidelity and memory.
Today, gladiolus occupies one of the most popular, leading places and is valued for its high decorative qualities. The flowers are different in shape, size, colors, duration of flowering, and are preserved well and for a long time when cut. The peduncle can reach a height of 50 to 1.3 m. They say that gladioli protect the garden plot from troubles.
Translated from Latin, the word “gladiolus” means “sword”. Indeed, the description of the gladiolus flower resembles a sword, dagger, sword. This flower is known not only to professional flower growers - it is well known to amateur gardeners and everyone who simply loves flowers, cares for them or, coming to the store, buys them as a gift to their loved ones. It will not be an exaggeration to say that every gardener has either tried to grow or grows gladioli in his or her area. For many, having planted them once, I can hardly refuse this miracle of nature - especially now, when every year new varieties and hybrids appear, striking in their richness of shapes and colors.
Gladiolus stems are single, straight, do not branch, reaching a height of 50-150 cm.
Gladiolus leaves are alternate, arranged in the same plane, sessile, xiphoid or linear, their length is 50–80 cm. The veins on the leaves are parallel. The color of the leaves is green; if there is a waxy coating, they can be bluish-green. The content of a large amount of sclerenchyma tissue in the leaves makes them more durable.
The root system of gladiolus is a corm, which is a transformed shortened stem in which additional nutrients accumulate. The corm is formed due to the growth of the lower internodes. The shape of the corm is round, it is renewed every year, the old corm transfers the supply of nutrients to the young bulb, and then dies. The corm is surrounded by membranous scales, the color of which can range from white to dark cherry.
Gladioli differ from other bulbous plants in that the initiation and union of reproductive organs does not occur in the year the replacement corm appears, but the following year. Regardless of origin, all gladiolus buds are called growth buds. From each such bud a plant can develop.
Gladiolus has three types of leaves: vaginal, corm and stem. The length of the leaves can be from 30 to 140 cm, and the width from 2 to 8.5 cm.
After the dormant bud awakens, the development of vaginal leaves begins. This type of leaf has an open tubular base, the lower part of which is wider. The vaginal leaves are located at the bottom of the developing replacement corm, so they also perform a protective function.
Corm leaves are located at the base of the replacement corm, which form it. Every year, adult plants form a constant number of corm leaves, a certain number of which is characteristic of each variety. The bulk of the leaf surface of gladiolus consists of corm leaves. When the corm leaves stop developing in length, their leaf blade continues to grow in width, due to which the photosynthetic surface area increases significantly.
The number of stem leaves can be 4 or 5. The base of the stem leaves is attached to the flowering stem. In the axils of the leaves, a bud is formed, which has the rudiments of a branched peduncle. The axillary buds of most varieties of gladioli, as a rule, are constantly in a dormant state and do not develop. Only if the central inflorescence is damaged can the axillary buds begin to grow. There are also varieties in which developing axillary buds are their morphological feature. If the central inflorescence of such varieties has lost its decorative effect, then the lateral inflorescences begin to develop and bloom, of which there can be from 1 to 5 on one plant. The development of such inflorescences is much weaker than the main one; 7-13 buds are formed on them. If several lateral inflorescences develop, the decorative value of the plant increases to 35 days.
Varietal features include the number of buds developing in the inflorescence, the ratio of opened flowers and buds. The peduncle increases in size as each new flower blooms; the growth of the peduncle ends after the last funnel-shaped flower opens. The structure of the gladiolus flower includes six fused corolla petals. Flower size can vary from 3.5 to 26 cm.
The gladiolus fruit is a membranous capsule, cracked on top. The box is filled with winged seeds. The number of seeds can reach 250 pieces. Seeds do not have a period of physiological dormancy. If you immediately sow the seeds after collection, then after 2-3 weeks they will already germinate.
The inflorescence of gladiolus is a loose one- or two-sided spike; in dwarf varieties, the size of the inflorescence can reach approximately 25 cm, and in large-flowered varieties - 120 cm.
Currently, there are approximately 5,000 varieties of gladioli. The average lifespan of each variety is about 10 years. This is explained by the fact that during vegetative propagation, DNA defects are transferred from the parent flower to the young plant. In this regard, the viability of the variety decreases, and old varieties are constantly replaced by new ones. But there are also long-lived varieties that have been grown for about three decades.
Varieties of gladioli: photos, names and descriptions of flowers
The most popular are tall hybrid varieties of gladioli with large flowers (11 cm or more in diameter). There are varieties of gladioli, which, depending on the shape of the flowers, are divided into butterfly and primrose. Butterfly-shaped gladioli look elegant. Their flowers are located close to each other, and their throat has an original color. The color range of gladioli is varied. They can be white, yellow, pink, black, all shades of red, as well as lilac-blue and many other transitional colors.
Primrose gladioli grow up to 60–80 cm. Their flowers are located on the stem at a distance from each other. The upper petal of flowers with a diameter of 8 cm hangs like a hood over the rest. Low hybrids (no more than 50 cm) with small flowers with a diameter of no more than 5 cm are similar to primrose gladioli.
Small-flowered forms include:
Cezanne(this variety of gladiolus has light red flowers with a dark spot and a yellow pistil), Leviathan(there is a dark spot on cream flowers),
Focus(cherry spot on bright yellow flowers), Blériot(on light pink flowers there is a yellow spot with a dark red smear),
Orchid Lailek(on lilac-pink flowers there is a cream spot and purple specks).
Medium-flowered gladioli are represented by the following varieties:
America(light pink flowers with a purple spot), Arabian Knight(burgundy-raspberry flowers),
Albite(white flowers with a greenish spot), Ilse(flowers cream with a yellow spot),
Polaris(white flowers), Rose van Lima(light pink flowers with white spots and strokes, as well as crimson specks),
Elegy(flowers dark cherry, velvety).
Among the large-flowered varieties of gladioli, the following are popular:
Amethyst(pink flowers with dark red spots and streaks), Velvet(dark burgundy flowers with cream strokes and strokes),
Berolina(red flowers with a creamy spot), Canada(the flower includes purple and red-orange paints, with a red stroke),
Don Quixote(flowers dark cherry, velvety), J. S. Bach(flowers light red, with a creamy spot),
Peacock's eye(lilac-raspberry flowers, with a dark red spot and white strokes), Minerva(flowers are pink-orange with a red stroke).
Here you can see photos of gladioli varieties, described above:
Vegetative propagation of gladioli: growing from children
Gladioli are propagated by seeds, sowing corms, or dividing corms.
Vegetative propagation of gladioli is very useful for cultivated gladioli, since in its process all the morphological qualities of the variety are transmitted.
The signs of vegetative propagation differ in different varieties of gladioli. Some varieties can produce about 100 tubers on one plant, while others have only 10–15. The size of the tuber buds can also vary; some varieties have rather large tuber buds - up to 1 cm in diameter, while others have a tuber bud size of no more than 0.5 cm.
The number of tubers and their size largely depend on the growing conditions of the plant: soil moisture, temperature conditions and the duration of the growing season. Late varieties produce small tubers, while early varieties produce larger ones.
The tuber develops in about 90 days. It begins to form when the 4-5th leaf develops on the plant, which occurs even before flowering. The formation of the corm ends when the seeds begin to ripen, at which time they can be easily separated from the corm.
Tubers are a shortened stem that is covered with one continuous scale. At the beginning of spring, root tubercles form at the bottom of the tuber.
Solid hard scales have a protective function, protecting the tuber from drying out and other negative influences. The scales help the tuber bud maintain its viability for several years, but also does not allow it to germinate quickly.
Some varieties, usually late ones, produce one corm; others, especially early varieties, may develop two or three replacement bulbs.
The size of the replacement corm depends on the size of the planted one. If you plant large corms, then, as a rule, they form large corms, the size of which can be 3–6 cm; small corms grow small corms 1.5–2 cm in size.
The tubers developing on the plant have different sizes. In any harvest, regardless of the variety, there can be both large and small children. Their difference lies in different germination rates and rates of development. Tuber buds measuring from 0.6 to 1 cm have faster and better germination. From such tubers, gladioli develop, having 7–8 leaves. More than 70% of developed plants form buds and half begin to flower.
To increase the yield of corms and increase the size of replacement corms, it is best to remove inflorescences on young plants.
When growing gladioli, it is recommended to plant children in early spring, using boxes with a removable bottom or with a net, from where they are then moved to open ground beds. The peculiarity of growing gladioli is that with this method of propagation, the growth period of the plant increases, which eventually forms large replacement corms. The same can be achieved if you use peat briquettes, peat humus pots or eggshells for growing, from which the children are also then planted in open ground without damaging the root system. To grow gladioli from children, you can use larch needles and sphagnum moss.
If the soil is well supplied with water, then dry children can be planted in early May. To propagate gladioli by children, create grooves 5 cm deep into which the children are lowered, then they are covered with peat, watered abundantly, and plastic film is spread over the surface immediately after watering. To prevent it from being blown away by the wind, the sides of the film must be sprinkled with earth. For sowing in 5 strips of 5 beds located at intervals of 5 cm, a film 3 m wide is used. After about a month, the sprouts reach the surface of the film and then it can be removed. Throughout the summer, the sprouts need careful care, which consists of regular watering, loosening, removing weeds and fertilizing. By the end of the growing season, most of the plants that have developed from medium and large children can already bloom. At the end of September, the grown plants are dug up.
Method of propagating gladioli by dividing the bulb
In addition to 1-2 central buds, the corm also has several more lateral buds. As a rule, these buds do not germinate, because the central bud is growing. But if it is damaged, then the lateral buds begin to grow, and replacement shoots appear from them. The propagation of corms is based precisely on this property. The central buds are broken out, the root bulb is planted upside down or on its side, and cut into pieces. Thanks to these techniques, not one central bud germinates, but many lateral ones, so several replacement corms are formed, which, however, are smaller in size than one sprouted central one.
If planted upside down or on a side, germination slows down, flowering is delayed for several days, and the number of inflorescences becomes smaller, but the number of corms doubles. It is recommended to plant young corms in this way.
Many cosmetic products contain rose extract, which helps moisturize the skin, soothe and rejuvenate it, restore elasticity, and promote regeneration.
Corms are cut from varieties that usually develop one replacement corm with a small number of corms. It is best to cut the corm vertically into two parts; this method is considered the most reliable and simplest. To propagate gladioli, you can make a larger number of parts by dividing the bulb, but then each part should have one dormant bud and part of the bottom with the root system. But plants develop faster from halves than from small parts of the corm; in addition, when cutting into two parts, the risk of infection is reduced. Cutting is carried out 1–3 days before planting. To do this, use a sharp knife; after each cut, it must be disinfected. Before planting, the cut shares must dry for several hours, then the cut must be filled with a highly concentrated solution of potassium permanganate or covered with crushed charcoal, which can be mixed with sulfur.
If you cut the source material into two parts, you get 2 times more corms, and the number of tubers obtained increases by about 2.2 times.
Gladiolus corms are divided into 3 types:
The highest quality plants with strong, beautiful inflorescences are obtained from bulbs of varieties I and II.
The gladiolus corm dies every year, and in its place a new replacement corm is formed, at the bottom of which children are formed.
Based on flower size, gladioli are divided into 5 main groups:
The most popular are large-flowered hybrids 90 – 140 mm.
Propagation of gladioli: how to grow seeds
Seed propagation for wild species is the main one, so many species reproduce in this way rather than vegetatively. In harsh conditions, seed propagation of cultivated varieties may not be used due to the fact that the seeds do not ripen; then vegetative propagation is used, thanks to which the plant adapts to survival.
Propagation of gladioli by seeds is carried out primarily during breeding work. If you grow gladioli from seeds, the characteristics of the parent will not be transmitted to new plants, so this type of propagation is used extremely rarely in floriculture practice.
Most often it is used in the southern regions, where it is very profitable, as it allows one to obtain quality corms in one year.
For this type of propagation, it is recommended to collect seeds from varieties that have the same color and grow very close to each other. In this case, the seed offspring will also have more or less the same color, and next year you can get a full-fledged cut from it.
Before growing gladioli seeds, a substrate is prepared in February, which consists of one part river sand and two parts leaf humus. Before sowing, the seeds are soaked for 2–3 hours in a 0.01% solution of sodium humate or 0.1% heteroauxin. After this, they are planted in a greenhouse in a prepared substrate.
With the arrival of spring, the crops along with the box are buried in the ground or placed in a greenhouse. If you take good care of the crops, frequently fertilize them, and water them regularly, you can get young corms whose diameter will reach 0.8–1.5 cm.
Features of growing gladioli from bulbs: planting and care in open ground
Mature bulbs for three years allow you to grow gladioli with abundant flowering. Then they are rejected and replaced by children.
Old bulbs can be distinguished from young ones by their flattened shape and concave bottom with a diameter of 1–3 cm. They are not suitable for growing flowers and it is better to discard them immediately.
In order for gladioli to bloom well after planting and care in the open ground, the planting material must be prepared in a special way. 2 weeks before planting, the bulbs are sorted and those selected are cleaned of surface scales. This must be done carefully so as not to damage the sprout at the top. Bulbs with signs of disease are not suitable for growing gladioli. If the bulbs have minor damage, they are cut off with a sharp knife and the cut area is treated with a solution of brilliant green. Next, the bulbs are laid out sprouts up on a tray and germinated in a warm place with good lighting (Fig. 17).
Before preparing gladioli for planting, the bulbs are soaked in water at room temperature for 48 hours before planting, inspected again and treated to protect against pests and diseases. For this purpose, special preparations are used that can be replaced with garlic infusion. To prepare it, 300 g of chopped garlic is poured into 10 liters of water and left for 2 hours. You can use a 1% solution of potassium permanganate to disinfect planting material. Peeled onions are immersed in it for 15 minutes. Immediately before planting, gladioli bulbs are soaked in growth stimulants.
Flowers are planted in spring, usually in mid-April. Sometimes, due to weather conditions, planting is postponed to May. By this time the soil has already warmed up, but there is still enough moisture in it. During the formation of beds, fertilizers are added to the soil. The bulbs are embedded in the soil to a depth equal to three of its diameters. Young bulbs are planted at a depth of 3–5 cm. Mature bulbs are planted at a distance of 15–20 cm from each other, and children are planted at a distance of 5 cm from each other in a row and 15 cm between rows. To create optimal conditions for growing gladioli, beds with gladioli are covered with lutrasil or spandbond.
Propagation of gladioli by cuttings
Gladioli can also be propagated by cuttings, but this is a very labor-intensive method; it is most often used for propagating valuable varieties of gladioli. In other cases, propagation by children or corms is used, since these methods are much simpler.
The agricultural technology for growing gladioli in this way is as follows. Before sprouts appear on the tubers, a cutting approximately 15–16 cm long is cut or broken off, then placed in water for roots to appear. After this, the cuttings with young roots are planted in a greenhouse or greenhouse in a layer of coarse river sand prepared for it. You can also plant each cutting in a separate pot. The top of the cuttings is covered with plastic wrap. When the shoot takes root, it forms inflorescences and a replacement corm.
Conditions for growing gladioli and how to prepare them for planting
Good flowering can be obtained only in open sunny areas with sufficiently moisture-absorbing fertile soil; the planting site should be protected from the winds to avoid bending of the flower stalks.
The site should be open so that the sun illuminates it all day, and there should be protection in the form of buildings from the north. It is not recommended to grow gladioli near trees, as these moisture-loving flowers will lack moisture and nutrition.
Before growing gladioli bulbs, you need to cultivate the soil. It is best to prepare it in the fall. First, the soil is dug up to at least 40-50 cm, then to 1 square meter. m add up to 4-5 kg of compost or humus, as well as 2 tbsp of mineral fertilizers. spoons of superphosphate and potassium sulfate. It’s a good idea to add wood ash at the rate of 3 tablespoons per 1 square meter. m. In the spring, the bed is dug up again to the depth of a bayonet shovel and holes are made. Before planting the bulbs, additionally add 1 tablespoon of organic fertilizer “Berry” and a deoxidizing agent to each hole. Fresh manure is not applied to gladioli, as this leads to the development of fungal diseases in the plant and the bulbs are poorly stored in winter. The landing site is changed annually. Gladioli should return to their original place no earlier than after 3 to 4 years. They are grown in crop rotation after cucumber, onion, and garlic.
Before planting gladioli, the bulbs are freed from scales and sharp roots 2-3 weeks before planting, and then inspected. Having discovered dark spots, cut them out to healthy tissue and lubricate the wounds with Oxyx solution or Hom solution (10 g per 2 liters of water).
Immediately before planting, the corms are first soaked in the “Zaslon” solution: 2 caps per 0.5 liters of water, or in a dark solution of potassium permanganate, or in a solution of the “Hom” preparation (40 g per 10 liters of water), the duration of each treatment is 10-20 min.
Watch the video “Growing gladioli outdoors” to better understand how to care for these plants:
How to grow gladioli: how to plant bulbs and care for plants
Planting of gladioli corms begins as soon as the soil at a depth of 10 cm warms up to 8-10? C, i.e. at the end of April - beginning of May. If planting is delayed, rooting conditions and further development worsen. Corms are planted in rows. The distance between the bulbs should be 12–15 cm for early varieties, 20–25 cm for middle and late varieties, which form larger plants.
Planting depth is from 10 to 15 cm, depending on the size of the corms and the mechanical composition of the soil. With deeper planting, flowering occurs several days later. In cold summers, with deep planting, the damage to corms by fungal diseases increases.
When caring for and growing gladioli, remember that these plants are demanding of soil moisture and are very sensitive to its lack during budding, i.e. in the phase of the 4th – 5th leaf and especially in the phase of inflorescence formation. Lack of moisture during these periods leads to deformation of the inflorescence and poor development of the root system.
When watering gladioli, taking into account the depth of their occurrence, the soil is loosened to a depth of 3–5 cm by hilling.
In the process of caring for gladioli, do not forget about feeding.
The first feeding after planting gladioli bulbs when caring for plants is carried out after the appearance of 2 - 3 leaves: 1 tablespoon of urea and liquid fertilizer "Agricola - Rose" are diluted per 10 liters of water. Spend 1 liter per plant.
The second feeding is carried out after the growth of the fourth leaf: 1 tablespoon of nitrophoska and “Agricola for flowering plants” are diluted per 10 liters of water.
The third feeding is carried out during the budding period, i.e. in the 5-6 leaf phase: dilute 1 tablespoon of Agricola-7 and organic fertilizer “Flower” per 10 liters of water.
The fourth feeding is carried out during the period when the first flower appears on the inflorescence: 1 tablespoon of potassium sulfate and Agricola-Rosa liquid fertilizer are diluted per 10 liters of water. Spend 1-2 liters per plant. This solution increases the duration and intensity of flowering, promotes the enlargement of flowers and peduncles.
Depending on the variety and weather conditions, flowering of gladioli can last for 3-4 weeks. When gladioli are cut and standing in water, all flowers bloom - from the bottom to the top. In order for flowers to retain their attractive appearance longer, it is necessary to periodically pick off fading flowers. It is better to cut gladioli inflorescences early in the morning or late in the evening in the initial flowering phase, when 2-3 flowers have fully opened. Flowers stand in water for a long time until the last bud blooms. To ensure the ripening of the replacement corm, at least 5-6 leaves are left on the plant when cutting the inflorescences. Watering after flowering is gradually stopped, since dry soil will promote the ripening of corms.
Cutting gladioli for bouquets results in stronger bulb formation. Next year it will grow into a lush flowering plant. After the flowers wither, gladioli in flower beds are recommended to be cut off. This must be done before the fruit sets, so that the plant’s forces are directed to the accumulation of nutrients in the bulb. It is necessary to cut flowers in such a way that 4 leaves remain on the plant.
Gladioli need to be tied to a support. To do this, use stakes whose height exceeds the height of the flowers by 6 cm.
Many gardeners complain that gladioli change color over the years and turn either white or pink. This raises the question: do these plants cross-pollinate? Is it possible to plant flowers of light and dark shades next to each other? The answer is clear - it is possible. Gladioli do not cross-pollinate. What happens to the bulbs, why do the inflorescences grown from them become the same color?
The thing is that even a varietal bulb can degenerate. If you receive planting material from one bulb from year to year, then over time it loses its original properties. But if you work a little and every year grow new planting material from children, which can be seen in large numbers around the new bulb, you will always have an abundance of your favorite varieties of gladioli.
When to dig up gladioli and store the bulbs
Gladioli of early and medium varieties are dug up 3-4 weeks after the end of flowering in mid-October. You need to dig up gladioli as carefully as possible, by hand. In this case, the stem is cut immediately after digging to no more than 1 cm above the corm to prevent infection of healthy corms by diseases and pests. For well-ripened corms, you can immediately remove the old mother corm; for newly dug plants, it easily breaks off. Corms are also cleaned, during which roots and dirty bulb scales are removed, and at the same time diseased plants are rejected, which should be immediately discarded to avoid the spread of disease. Corms are treated with fungicides and pickled for 30-60 minutes in a solution of “Oxyx” or “Hom”. After this, the bulbs are dried indoors for 3 weeks. After drying, remove the mother corm along with the roots. In properly dried corms, it is removed easily and without damage, the fracture surface is smooth.
How to store gladioli bulbs to get beautiful flowers next year? Corms are stored without removing the covering scales, which protect them from drying out. Since most diseases manifest themselves on the corm primarily in the bottom area, you can remove only the lower covering scales that cover it in order to improve ventilation.
To preserve gladioli bulbs as best as possible, you need to ensure a temperature of 6-10 ° C and a humidity of 70%. The corms should not be allowed to become damp, otherwise they will quickly begin to grow. During storage, corms must be inspected regularly.
Gladioli are affected by fungal diseases - fusarium, sclerotinia (or dry rot), septoria (or hard rot), botrytis (or brown heart rot), and rust.
The most dangerous pests are gladiolus thrips and root bulb mite. During the growing season, gladioli are treated before flowering 2 times for diseases: the first time in the phase 2 - 3 leaves per 10 liters of water, dilute 20 g of Oxychoma, the treatment is repeated for 10-12 days. Against pests: treatment with the insecticide “Confidor” is effective against thrips: dilute 1 ml per 10 liters of water. Solution consumption 1 liter per 10 sq. m. Treat against ticks with the drug “Agravertin”: 2 ml per 1 liter of water. Solution consumption per 10 sq.m.
How to beautifully plant gladioli flowers in the garden (with photo)
In any landscape design, flowers must be used as one of the main decorative elements. They have bright colors, long flowering periods and fill the air with a pleasant fragrance. Thanks to these properties, flowers can be planted in almost any area. Special places are allocated for flower beds, which can be located in front of the house, along fences and paths, near ponds, or they are laid out against the background of a lawn. You can create a flower garden of any size and shape, it all depends on the size of the plot and the imagination of its owner. If you choose the right flowers and place them in the flower garden, they can delight the eye with their blooms from early spring to late autumn.
There are two types of flowers: annuals and perennials. Sometimes flowers from different groups are grown in one flower garden. Before you start creating a flower garden, you need to think about how it will fit in with the rest of the landscape design elements.
Before beautifully planting gladioli, you should think in advance about the color scheme of the flower garden, which can be single-color, contrasting or mixed. Flowers of the same color look great in the recreation area, and contrasting and mixed compositions will stand out favorably in the front area of the site.
When choosing a location for a flower garden, several factors must be taken into account.
First you need to select the main vantage points from where the flower garden will be clearly visible. Such points include the entrance to the site, house windows, gazebos, paths, garden benches. You can plant a flower garden in such a place that it can be seen from almost anywhere on the site. But at the same time, it is necessary to ensure that the magnificent flower garden does not block the rest of the picturesque corners of the garden.
Next, you need to decide what type of flower garden you are going to create in each specific area of the site. Each species has a specific purpose, which determines the location of the planting, as well as the choice of plants for the flower garden.
Gladioli are the most beautiful in group plantings. In flower beds they are usually planted in the background or in the center. Lower plants are planted in front of them to hide the soil and lower part. Often these flowers are planted along fences, which serve as a background and support for them.
Look how beautiful the gladioli flowers are in the garden in these photos:
Gladioli are combined with lower Houston ageratum, marigolds, phlox, and dahlias. Flower beds in which gladioli grow next to plants that have silvery leaves, such as wormwood, look beautiful.
Crocosmia is a beautiful decorative flower that will decorate any flower garden from summer to autumn. Crocosmia is otherwise called Montbretia. Crocosmia is great in single and group plantings. This plant also makes beautiful bouquets. For its splendor, showiness and unpretentiousness, the culture is very fond of flower growers and landscape designers. 
The photo shows red crocosmias blooming profusely.
In its natural environment, the plant grows in southern Africa. This bulbous crop belongs to the Iris family. It gained its fame back in the 19th century. From Latin, the name of the flower is translated as “the smell of saffron.” This is due to the fact that when dried, the flowers of the plant emit an aroma similar to that of saffron.
In spring, leaves appear on the stem in large quantities, and buds appear by mid-summer. They are collected in spike-shaped inflorescences. The funnel-shaped clusters of flowers are yellow, orange or brown in color. Flowering begins in mid-summer and ends in September. Depending on the variety, the height of the flower can reach 150 cm.
Kinds
The genus has about 50 species. Among them are:
- Golden (Aurea) is a variety characterized by bright yellow flowers with a golden hue. It grows naturally in southern Africa. The buds are collected in inflorescences that are shaped like brushes. Height can reach 80 cm;
- Masonorum- frost-resistant variety. Long flower stalks with bright orange buds are framed by a rosette of green leaves with a silver tint;
- Pottsii- This species grows in swampy areas of South Africa. The long leaves have a smooth surface. The inflorescences consist of small orange flowers.
Varieties
Varieties that are easy to find on sale in Russia are described in detail:
The variety in the title photo is Lucifer- This is the brightest varietal variety of Montbrecia. This is a tall plant. Height can reach 150 cm. Peduncles are erect. The flowers are red with an orange tint. This is a frost-resistant plant. The variety can withstand temperatures as low as -4 degrees, and can survive harsh winters under cover. Lucifer blooms from July to mid-autumn. This is a light-loving crop that prefers soil rich in humus.


Mistral- the variety visually resembles wild gladioli, but their flowering is much more magnificent and abundant. These flowers look original and elegant both in the garden and in bouquets. This is an unpretentious and frost-resistant variety. Paniculate inflorescences contain about 10 bright orange funnel-shaped flowers.

Mistral
Fire King- another bright variety. They can be planted in single or group plantings. Distinguished by its love of light. Abundant flowering lasts from July to September. The flowers are bright red. Height is about 60 cm. The plant is also ideal for drying and cutting.


Glow - Ember (Emberglow)- These are beautiful and unpretentious flowers that resemble gladioli in appearance. Their height does not exceed 60 cm. The flowers are red, collected in inflorescences. Looks great both in the garden and in bouquets.

Photo selection of other modern varieties

Coleton Fishacre with profuse golden flowers

Another yellow-flowered variety, Paul’s Best Yellow

George Davidson variety

A variety with flowers of a very deep shade of red - Twilight Fairy Crimson

The Limpopo variety has large flowers in a shade close to salmon.

Another photo of the Limpopo variety

Orange-red variety Babylon

Very juicy, hard to see in the photo dark orange flowers of the Prince of Orange variety.
Landing
Reproduction of Montbretia is possible by three methods:
- Bulbs;
- Seeds;
- Children.
Brown crocosmia seeds are large in size. It is necessary to sow seeds from March to February. You can keep the crops in a well-lit window or in greenhouses. When the seedlings grow, they need to be planted in separate pots.
In mid-May, the seedlings are dug out along with a ball of earth and planted in open ground.
When planting with seeds, flowering can be seen only in the second or third year, and when planting with children - in the second.
Important! Typically, in the middle zone, bulbs are planted in open ground along with gladioli, that is, from the end of April to May. To avoid cross-pollination of different varietal varieties of Montbrecia, they must be planted in different areas.
The areas where the bulbs are planted should be light. The soil should not be subject to stagnant moisture. If there is too little light, the crocosmia will stretch out and may not bloom at all.
Before planting the bulbs in open ground, they need to be kept in a warm place for a short time. Then they need to be soaked in a weak solution of potassium permanganate. They need to be deepened into the soil by about 5 cm.
The flower prefers loose and moist soil, which is enriched with humus. It is advisable to prepare the place where the plants will be planted in the fall. If the soil has poor drainage, add a little sand to it. The distance between the bulbs should be about 10 cm. If you want the plant to bloom earlier than usual, the bulbs should be planted in pots in advance, and then dug up together with a lump of earth and transplanted into open ground. 
Care
These are unpretentious flowers. They require a minimum of care. Watering should be infrequent, but very plentiful. After rain or watering, it is advisable to loosen the soil and weed out the weeds.
In order to tie up flower stalks of plants, you can install small stakes.
To speed up growth, crocosmia can be fed with fertilizers high in nitrogen. In summer you can feed the flower using mullein infusion. Mineral fertilizers that contain potassium are also suitable.
At the end of flowering, the flower stalks need to be trimmed. This is necessary for better ripening of the bulbs, which will contribute to their better storage both in the ground and dug up.
Important! In order to prepare an infusion of mullein, which is a very good supplement, you need to take one part of mullein and ten parts of water.

Wintering
For the winter, the bulbs can be dug up, or the plants can be covered. It will be especially difficult for hybrid varieties of crocosmia in winter. How to cover flowers?
- It is necessary to mulch the plants with compost;
- Place an insulating layer on top. Leaves, bark, straw or spruce branches are perfect.
Shelter is especially important in winters with little snow.
However, many gardeners still prefer to dig up bulbs for the winter. The plants are dug up in one layer along with the soil, without separating them into individual bulbs. They can be stored underground.
If the region has a mild climate, and crocosmias overwinter in the ground throughout the winter, then it is advisable to cut off the old leaves only at the end of the winter period before the period of their active growth.
Application in landscape design
This exotic flower looks great in large group plantings. In flower beds, it is better to plant Montbrecia in the background or in the central part, since the flower is very bright and tall.

In mixed flower beds, the plant can be planted in combination with perennial crops that bloom at the same time. 


Crocosmia partners can be:
- Salvia;
- Cannes;
- Rudbeckia;
- Echination.
Preparing for winter
Gardener Nadezhda Chernenko talks about how to prepare crocosmia bulbs (Japanese or Chinese gladiolus) for winter.