Where to start replacing electrical wiring in an apartment. How to replace old electrical wiring in a house
Do you want to change the wiring in your apartment yourself? - It's possible! To do this, it is not necessary to have a valid electrician's permit or an electrician's diploma. It is enough to be an electrician at heart, and have a little technical education and understanding of what you are dealing with. If you don’t have enough practical experience, but you really want to change the wiring yourself, this article is for you.

Calculations and diagram

Single-line diagram according to GOST
First you need to draw wiring diagram for your apartment. To do this, you don’t need to be an engineer, because you don’t need a complicated linear diagram according to GOST. It is enough to draw a schematic drawing by hand. An electrical wiring diagram is needed in order to correctly distribute the cable throughout the apartment, and calculate its approximate amount, as well as determine the load on each future line.

Wiring diagram
Draw where you will have sockets and switches. At the same time, take into account what household electrical appliances you will include in them, how many and what kind of lamps you will use.
It is not recommended to hang more than 8-10 sockets on one line. Since all sockets in the line are pass-through, then with each subsequent socket there is a possibility of weakening the contact. Especially do not make many sockets on one busy line, for example in the kitchen; it is better not to save money and extend two lines to the kitchen.
Determine the required number of lines and the expected load on them. It is better to divide the lines into zones, for example: kitchen sockets, corridor sockets, bathroom sockets, room 1 sockets, lighting, etc.
Cable selection
In order for electrical appliances to operate without overloading the network, the cable of each line must be of the appropriate cross-section. And if there are several consumers on the same line (for example to the kitchen) (and there will be), then it is necessary to calculate their total power and leave cable safety margin, that is, select the desired cross-section (wire thickness). The power of all household appliances is always indicated by the manufacturer. For example: an incandescent lamp is 40W, and a hob is 6000W, etc.
In order not to bother with calculations, follow one simple rule. — For outlet lines, use a copper cable with a cross-section of 2.5 sq. mm, for all lighting 1.5 sq. mm, and for a hob or instantaneous water heater 4 sq. mm - and everything will be fine!
Each device (consumer) has its own declared maximum power, measured in Watts.

Simplified power formula

The cable must be three-core (phase, neutral, ground). Zero is always blue, ground is yellow or yellow-green, phase is any other color. If you change the wiring, do not skimp on the material - always take a cable with a third core (with grounding), because all modern devices have an additional protective terminal, and automatic protective equipment only works using grounding .

To replace electrical wiring, it is best to use a VVG-ng cable. You can, of course, use NYM or PVS, but the advantages of the VVG cable over others are obvious. Firstly, VVG does not need to be crimped with sleeves (soft ones need to be crimped). And secondly, it is smaller and flat, which allows you to make smaller grooves, and it is possible to insert the cable into a thin slot (3mm for a three-core cable with a cross-section of 1.5mm)

Uncrimped wire with sleeve
Always take only cable in accordance with GOST! For example, an excellent cable is the Gostov VVG ng cable. This is a very important point in preparing to replace the wiring! You can save on automation or sockets (they can always be replaced), but don’t skimp on the cable - get a good one.
Marking
Determine at what height the sockets and switches will be located; the easiest way is to measure the lines of sockets and switches from the ceiling, because the floors in apartments are most often crooked. For example, if the height from floor to ceiling after renovation will be 250 cm, and you want to raise the sockets by 30 cm, measure 220 cm from the ceiling. If there are several sockets and switches in one group, draw a horizontal line along the level and place a mark every 7 cm (socket box size 71mm), the same applies to vertical groups.
For lovers of standards, so that it is “like everyone else” or “how they do it” - remember they don't exist! There are requirements for children's institutions, kindergartens and schools, where sockets and switches are installed at height not lower than 160 cm.. Everything else, especially in your home, you can do as you please. For example, some make sockets in window slopes or even in the floor.

Preparing for gating
Typically, wiring in apartments is carried out either on the floor or on the ceiling. There are other options, such as laying cables under baseboards or ducts.
Lighting lines, in any case, are laid behind a suspended or suspended ceiling; if these are not planned, then the ceiling needs to be chipped. And since, monolith of ceilings Ditching is strictly prohibited, you need to apply a layer of plaster to the ceiling, which will allow you to hide the cable without damaging the monolith. We strongly do not recommend ditching the ceiling yourself, since you need to know the technology for correct gating so that the whole house doesn’t collapse someday.
In cases where plastering of the ceiling is not planned, experienced craftsmen find voids in the monolith slab with the old cable, and tighten a new one in its place.
Using a 70mm or 68mm concrete crown (attachment for a hammer drill), holes for the socket boxes are drilled. Using a wall chaser or grinder, grooves are cut out for laying the cable. There should be grooves in the walls strictly vertical, not horizontal or diagonal. The lines from the sockets to the panel are laid in the floor screed or along the ceiling.
If the ceilings are not wooden, then according to the PUE (electrician's bible), cable laying without corrugation is allowed! There is also no need for a corrugated floor screed; the most important thing is a high-quality cable with good insulation in accordance with GOST! Save on corrugation; if you don’t have drywall or wood (or other flammable materials), then you don’t need corrugation!
Noisy work
When you start hammering walls, don’t forget about the law. You can only make noise with a hammer drill in apartment buildings at strictly defined times; each region of the Russian Federation has its own rules. For example, in Dagestan you need to get permission from the elder, in Moscow they simply call the police without talking, and in Taganrog they start beating in response. It's better to start work on weekdays from 9 to 19, with a break for lunch from 13 to 15.
Grilling
Before you start dabbling, it is highly advisable that the walls and ceilings be plastered with a leveling layer of plaster. Firstly, you will not have any further problems with the final installation of sockets, since everything socket boxes will be flush with the wall, and not recessed into it (which happens when they are installed before the walls are plastered). And secondly, gating will occur much faster, since in some places it will not be necessary to saw the monolith.

Check in advance the places where you will be trenching so as not to touch communications, such as old wiring and plumbing pipes. If you can't determine where the old wiring goes, call an electrician, or simply turn it off in the shield (if you are going to change it all). For ease of work, make yourself a temporary carrier (extension).
The hole for the socket boxes is drilled to the full depth of the crown. To quickly drill a hole in concrete, mark a circle with a crown, then drill the maximum possible number of holes around the circumference with any drill, no less than the depth of the crown. After which, the cutting with a crown will go noticeably faster, one might say – it will go like clockwork. If it gets on the reinforcement, it is best to use another crown; in extreme cases, you can knock it off with a spatula. It’s better to use a hammer drill for help (don’t forget about neighbors and the police).
Working with a wall chaser or grinder
Grooves for laying cables go from the socket box to the floor or ceiling. You need to lower the groove down so that the cable lies quietly in the screed and does not stick out in the corner, so you need to know the thickness of the future screed, the same with ceilings. It is best to have a wall chaser with a vacuum cleaner for these tasks, but in extreme cases you can get by with a grinder and a diamond disc for stone. In the case of an angle grinder, take care of your health, wear a respirator and goggles. Close all windows and doors to prevent dust from entering adjacent rooms.

Cabling
Laying the cable on the floor is not difficult; it is enough to hold it to the floor in any way so that it does not float up when they make the screed. Usually they lay the cable along the walls (at a distance of 10-15 cm from the wall) so that later they know exactly where the cable goes.
It is worth noting that it is better not to lay cables under doorways! To lay the cable along the floor, it is better to make through holes between the rooms. Otherwise, there is a possibility of damaging the cable when installing the interior thresholds.
Laying the cable in the groove is also not particularly difficult. You can secure the cable in the groove using dowel clamps or ordinary alabaster (construction plaster). Alabaster hardens quickly, so it is also convenient to use for installing socket boxes. But before you smear the grooves with it, you need to remove dust from them and moisten them with water.
If the cable is securely fastened in the groove and does not stick out anywhere, the grooves can be covered with ordinary plaster mixture; this will save a lot of time.


About junction boxes
Junction boxes (or distribution boxes) are necessary for switching (connecting) wires in them and branching lines, for example, for a switch.
Today, professional electricians will tell you that There is no need to install junction boxes in existing apartments! They can play a cruel joke on your wiring. In the event of a short circuit, tearing, flooded neighbors, etc., you will need access to this very junction box. It’s easy to give up junction boxes - do all the switching in the socket boxes! For this you need DEEP socket boxes, in which all switching for lighting will take place. Typically, deep socket boxes are made for light switches, but if switching is needed to branch out socket lines, then deep socket boxes are also installed under the sockets.

Electrical panel installation
The most budget option is to install all the circuit breakers on the staircase in a common panel, where your old circuit breakers and meter are already located. To do this, it is necessary to route all the cables into the access panel. If you want a shield in your apartment, then you need to choose a suitable place for it.
Built-in or overhead shield is up to you. The built-in one looks more aesthetically pleasing, but the overhead one is easier to install. All lines from the apartment go to the panel, and from it one thick cable goes to the entrance panel, the cross-section of such a cable must be at least 6 mm, that is, a three-core cable, for example VVG 3 * 6.
Installation of circuit breakers
Each individual line is equipped with its own circuit breaker, with a rating depending on the cable cross-section. According to the rules, you cannot insert more than two lines into one machine; if you are trying to power more than three lines from one machine, you must install a special branching bus.
Today there are many ways to protect electrical wiring, even at the household level. The most necessary condition is the installation of circuit breakers for protection against overloads and short-circuit currents (conventional single-pole circuit breakers). It is also recommended to install an additional residual current device - RCD (current leakage protection).
It is best to install RCDs on the lines of high-risk areas: wet rooms, children's rooms. There is no need to install one common RCD for the entire apartment! They install one common RCD only for the purpose of saving. The consequences of such savings are a complex diagnosis of a fault in the event of a leak, + the entire apartment is left without light when it is triggered. On some lines, for example, lighting or street lines, an RCD is not installed.
Installing additional types of protection is already a luxury: thermal relay (protection from cable heating), lightning protection, stabilizer or protection against voltage surges (saves from 380V), fire alarm, etc.
Shield assembly
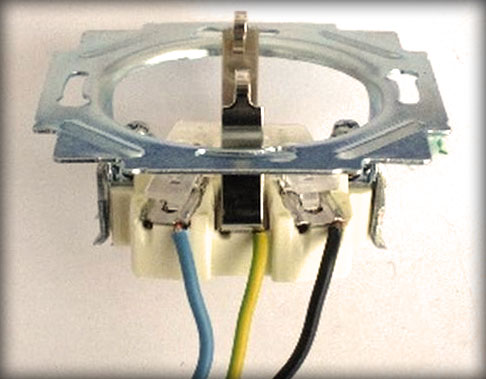
One of the most crucial moments is assembling the shield. If you are using a soft cable, then before inserting the wire into the machine, it must be crimped (to increase the contact area). Only phase wires are inserted into single-module machines (phase marking L - can be any color except blue and yellow), all others (zero N blue, ground PEN yellow-green) are inserted into their busbars. When using RCDs or difavtomats (automatic and RCD “in one bottle”), the neutral wire is inserted into its groove (marked N - neutral, blue. The common phase connects all the machines to each other, for this, instead of jumpers made of wires, it is better and more reliable to use special combs.
For all connections in the switchboard, it is very important to use wires of the appropriate cross-section, that is, it is best to separate the phases and neutrals across the circuit breakers using a cable with a cross-section of 4 sq. mm or 6 sq. mm. Also, after tightening all the cables and combs in the machines, it is necessary to check the reliability of their clamping. Since it often happens that the wire simply does not fit into the clamp, or does not hold well in it.

Final installation. Sockets and switches
Sockets and switches are installed last, after clean finishing (painting or wallpapering). The most important rule of good installation is good contact!
Most of the outlets in your apartment are pass-through, that is, through them the cable goes in a loop to each subsequent outlet. To avoid problems with wiring in the future, firstly, do not buy cheap sockets (for example IEK), they have a very poor (to put it mildly) clamp and subsequently such sockets and switches can simply burn out. And secondly, pull all connections a second time! Check each pinched or twisted wire by tugging on it. If the wire jumps out of the clamp, it means you did not clamp it properly or the clamp was defective.
Among professionals, it is believed that the best clamps in sockets are produced by LeGrande and Schneider.
To ensure that the frames lie flat and tight, install a group of sockets or switches level, joint to joint, and screw them to the socket boxes with small self-tapping screws on two opposite sides, close to the wall. Then tighten the spacers inside the socket (if any). It is important not to touch the wires inside the socket with spacers or screws!
Monitor the position of the cable in the socket so that it does not fall on the spacers. Also, do not use screws that are too long, as they may touch the wires.
At each stage of repair, it is necessary to check the lines for operability, since after the final finishing it will be impossible to fix anything without damaging the finishing.
If you decide to make repairs in your place of permanent residence, then replacing the old wiring in the apartment should become a must for you. After all, houses that were built back in Soviet times were not designed for modern loads.
Therefore, if, after completing the repair, you did not pay due attention to the electrical wiring, it can become a serious headache in the future.
Selecting a wiring option
The chosen version of the electrical wiring diagram for the apartment largely depends on the method of its installation you have chosen. At the moment, there are two main types - open and hidden. A hidden method of laying electrical wiring involves laying the wire inside the walls and then plastering them.
The advantages of this method include:
- Saving free space in the apartment
- Complete concealment of all live parts that do not spoil the appearance of your room
- No need for additional protection of wires from mechanical damage
- Higher load and overload tolerances for any hidden wires
The disadvantages of the hidden wiring method include the following parameters:
- Difficulty and labor-intensive work on laying wires
- Difficulty in identifying faults and repairing hidden wiring

The second way to replace electrical wiring is the open method. Conventionally, it can be divided into laying wiring in baseboards and laying in cable ducts.
Of course, there are still other methods of laying open wiring, but they are used very rarely in apartments due to their ugliness.
The advantages of replacing electrical wiring with your own hands using an open method include:
- Relative ease of installation
- Ease of identifying damage locations and repairing wiring
- Ease of installing additional wiring for new power supplies, as well as making changes to the apartment’s power supply circuit
But there are also a lot of disadvantages to the open wiring method:
- Stealing the free space of our already small apartments. When installing furniture, additional boxes can get in the way
- If the method of laying wiring in baseboards is used, then the number of possible wires is very limited. This introduces significant restrictions on the options for choosing a power supply scheme
- When laid open, wires require additional protection from mechanical damage and isolation from each other and from flammable surfaces for fire safety purposes. Because of this, the price of such electrical wiring is slightly higher.
- For open wiring, the maximum permissible load and overload parameters are slightly lower due to their worse cooling.

Choosing an apartment power supply scheme
At the next stage, replacing the wiring in the apartment involves choosing a power supply scheme.
At the moment there are two main options:
- The first, which was probably used in your Soviet-built house, is the laying of one main wire from which all the wires of the apartment’s electrical receivers depart. This method does not adequately protect your apartment's electrical network. After all, if even one area is damaged, your entire apartment will lose power.
- It should also be noted that according to paragraph 6.2.2 of the “Rules for Electrical Installations” (PUE), group indoor lighting networks must be equipped with a circuit breaker of no more than 25 A. This imposes certain restrictions on the total power of electrical appliances in the apartment.
Therefore, it is recommended to use such a wiring diagram only for one-room apartments or with an open method of laying wires in baseboards. After all, laying a large number of wires in the baseboards for power supply according to a different circuit will be extremely problematic. - The so-called “European” power supply scheme is now more common. It implies the presence of a distribution panel and the presence of automatic switches for each individual consumer.
This could be one room or one type of consumer in a room. It all depends on the expected load, your wishes for the safety of the power grid and your financial capabilities.
Sometimes you can find the use of mixed wiring diagrams. This is a fairly rare case, but it also has a right to exist. It all depends on the nature and type of load.
Electrical wiring calculation
Since it is impossible to replace the electrical wiring in an apartment of a panel house or any other place without an accurate calculation, at the next stage we proceed to the calculations.
Attention: First of all, we need to determine the possible loads on each section of the electrical network protected by a circuit breaker. Based on these loads, not only the wire is selected, but also the circuit breaker itself.
So:
- To determine the load we use the formula; where P is the rated power of the electrical appliance, and U is the rated voltage of the electrical network. Based on this formula, for a 220V network it can be assumed that 1 kW of electrical appliance power is 5 A of load for the wire.
In this case, it can be simplified to assume that a copper wire with a cross-section of 1 cm2 passes a current of 10A, and an aluminum wire with the same cross-section passes 5A. This is, of course, a very simplified calculation, but in most cases it is sufficient.
Let's pay attention! To accurately calculate the required wire cross-section, you should use paragraph 1.3 of the PUE. Here you will find correction factors depending on installation conditions, installation methods, number and cross-section of wires laid nearby, correction temperature and overload factors, as well as design parameters for wires with different insulation structures.
- We will immediately warn you against the most common mistakes. First of all, please note that the cross-section of the wire of one of the connections cannot be greater than the cross-section of the input wire. Circuit breakers must comply with the maximum permissible connection current.

Note! When calculating, you should not take into account the operation of all electrical appliances at once, otherwise this will lead to a significant increase in the cost of your electrical network. Remember, any electrical wires allow short-term overload of up to 10 - 15% for 1 hour per day.
Replacement of electrical wiring in an apartment is carried out only in compliance with the PUE standards and basic rules. It is quite difficult to list all of them, so below we will present only the most common mistakes made by non-professionals, which can lead to problems during operation.
So:
- It is prohibited to install automatic switches and fuses in neutral working and grounding conductors.
- The wiring of the 220V network must be carried out with a three-phase wire, where 1 wire is phase, 1 wire is neutral and 1 wire is ground.
- According to clause 7.1.37 of the PUE, the installation of sockets in bathrooms and shower rooms, as well as bathhouses, is not allowed. And, according to paragraph 7.1.39, it is prohibited to install switches in these rooms.
- The wires must be connected by soldering, crimping, welding or bolting.
- At the places where the wires are connected, it is necessary to provide a margin to ensure reconnection.
- Metal elements of electrical wiring (ducts, trays, corrugated hoses) must be grounded.

In addition, replacing electrical wiring in an apartment requires compliance with basic rules:
- Wiring should be done strictly vertically or horizontally. Otherwise, the likelihood of subsequent damage to the wire increases sharply.
- Switches and sockets should be located at the same height.
- Crossing wires should be avoided.
- Avoid placing sockets and wiring too close to heating equipment and water supply systems.
conclusions
Our simple instructions for carrying out work on replacing electrical wiring will allow you to complete the work in full compliance with the requirements of the PUE. At the same time, having made the right choice of the circuit and method of laying the wire, you will certainly be able to cope with all the work in the shortest possible time and at minimal cost.
Most often, the thought of changing the wiring in an apartment arises when planning a major renovation. Moreover, replacing wiring is one of the most complex and expensive jobs. The features of replacing wiring and the difficulties that lie in wait along this path will be discussed in the article.
Purposes of electrical wiring replacement
Replacing old wiring in an apartment or house is based on three circumstances:
- Removing aluminum wires and installing copper ones. Aluminum wires were widely used several decades ago due to the low cost and environmental safety of the material. However, later it became clear that aluminum is not the best material for wires, since over time, under the influence of loads, it loses its qualities, becoming brittle. In addition, aluminum wires are destroyed due to electrocorrosion, soldering of this metal is difficult, and aluminum strands quickly weaken.
- Changing the electrical power supply circuit (from solidly grounded neutral to protective grounding).
- Refusal from a scheme that involves branching wires in favor of creating groups with dedicated branches. The old wire branching scheme has been a forced solution since early Soviet times, when there was a shortage of non-ferrous metals when it was necessary to quickly electrify the country. In the 90s of the last century, a new standard for electrical supply was adopted - TN-C-S, which ensures greater consumer safety.

Electrical wiring installation steps
Replacement of electrical wiring in an apartment is carried out in several stages:
- Creation of an electrical supply diagram.
- Development of a wiring plan and its approval.
- Arrangement of a temporary repair shed.
- Wiring.
- Installation of elements (automatic machines, switches, residual current devices) and stationary electrical devices.

The figure above shows a single-line electrical supply diagram, where kWA is the electricity meter. Slashes crossing out the wires indicate the phase (L) and zero (N) wires located nearby. The protective conductor (PE) is not crossed out, as it is routed separately. If we are talking about a three-phase system, then there will be three dashes on the diagram.
Note! Drawing up a diagram requires qualifications: it is not easy to do this work on your own, so it is better to entrust the plan to a specialist.
Power planning
When laying electrical wires, it is necessary to proceed from the power consumption. For cottage villages, the consumption limit is usually from 10 to 20 kW per house, but for housing in an apartment building such figures are unrealistic. With such power, it is impossible to avoid constant knockouts of the machine or even failure of the house wiring, since the maximum limit for a residential unit rarely exceeds 2 kW.
However, it should be taken into account that the total power of electrical household appliances in a home can significantly exceed the actual current consumption. This is due to the fact that all household appliances almost never work at the same time.

For an apartment measuring 50 - 100 square meters, you should proceed from the following data:
- Main circuit breaker for 25-32A. The recommended safety factor is 1.3 – 1.5.
- Residual current device - 50A.
- The kitchen requires two branches of wires (cross-section - 4 square millimeters for each). For both branches, a 25-amp circuit breaker and a 30-amp RCD are used. The bathroom is powered by wires coming from the kitchen.
- Air conditioning: a branch of wires with a cross-section of 2.5 square millimeters, automatic - 16A, RCD - 20A.
- Socket circuits and lighting circuits: one for each room (except the bathroom and toilet). The wire cross-section is 2.5 square millimeters. There is no need for an RCD, since a general apartment device is used.
Circuit drawing
As a base, you can take the wiring diagram shown in the figure above. Its upper part can be left unchanged, but the numbers need to be changed in accordance with specific tasks. The model of the residual current device is not important - you can install any one. Designations can be found in reference books (appendix to the PUE) and GOST (in this case we are talking about GOST 2.755-87).
Note! When creating a drawing, you should observe the dimensions of the symbols of the elements, since their scaling is unacceptable.
Preparing a plan

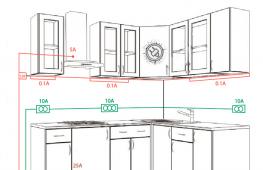
The picture above shows the electrical wiring layout.
Explanations for the plan:
- In all rooms, at least a couple of wire branches (lighting and sockets) must be routed from the electric meter.
- Since a standard apartment has one bathroom, there is no need for an additional potential equalization system. This branch of wires is indicated by a dotted line.
- In the bathroom you only need to specify a waterproof ceiling light and a boiler.
- Wire branches to connection points and stationary electrical appliances must be determined. Stationary means devices that are rigidly mounted into supporting structures or powered through permanent connections.
- You should not overload the circuit with trifles such as LED ceiling lighting.
- Branches of wires going to a balcony or loggia are not allowed - this is against the regulations of the PUE.

- We take a residential plan from the DEZ or BTI.
- We scan the received plan.
- In Photoshop, we remove the old symbols of electrical wiring, stationary devices and connection points. After this, we apply new designations based on the compiled wiring diagram.
- We print the resulting diagram.
Electrical equipment of premises
In order to correctly draw up an electrical power plan, it is necessary to determine in advance the number of connection points and the composition of stationary equipment located in the house.
Bathroom
The bathroom is characterized by high air humidity and a splashed floor, which makes it necessary to take special electrical safety measures. In addition, a body steamed in hot water has a radically reduced resistance to electricity: the circuit current in this case can exceed 5A, which is deadly. The severity of electric shock depends on the time of contact and an RCD will not help in this case.
At the same time, the bathroom contains powerful consumers of electricity, including a washing machine and a water heating tank. The operating rules for electrical installations allow the installation of sockets in the bathroom using an isolating transformer or RCD, however, to ensure complete safety, it is recommended to take the following steps:
- Electrical wires from the water heater and fan must be replaced with longer ones. The length of the cords should be sufficient for them to pass through the hole in the wall and reach the sockets in the adjacent room (most often the kitchen). The boiler does not come with a cord, and in the case of a fan, re-equipping the device only risks losing the warranty, which is of little importance due to its low cost. The wires must contain three cores and a protective conductor.
- Buy an extension cord without a cord, but with a grounding switch for three sockets. The extension cord is equipped with a three-core cord.
- Wires from electrical household appliances are supplied with European standard plugs. The cords are placed in a polyvinyl chloride casing.
- The water heater plug is permanently connected to the outlet.
- The extension cord is fixed in the bathroom with self-tapping screws.
- The washing machine is connected via an extension cord on a permanent basis. The remaining sockets can be used for local lighting, hair dryers and other small household appliances.
- The extension cord in the next room is switched on as needed.

So, with these simple steps you can avoid the presence of exposed wire ends in the bathroom, which will significantly increase the safety of residents.
Toilet
Like the bathroom, the toilet only needs a branch of lighting wires to the lighting fixture. Bathroom and toilet lamps can be connected in series to a single branch. In this case, there will be no claims from electricians.
Kitchen
Based on the above, the kitchen needs a couple of wire branches: from the bathroom and your own. Wire cross-section - 4 millimeters. You will need a circuit breaker. For your own branch of wires in the kitchen you need not one, but two triple sockets. They can be connected to a dishwasher, oven, small kitchen appliances, and lighting fixtures.
The extension cord coming from the bathroom is plugged into a separate outlet. The refrigerator operates through an additional group socket, which is installed on the opposite wall. It is recommended to install the sockets of the main group and the bathroom behind the kitchen furniture - just below the countertop, but as far as possible from the sink.

Hallway and corridor
Here you will need a couple of wire branches: for the socket and for the lighting fixtures. A long corridor requires at least two lighting points. The closest point to the outlet can be made in the form of a sconce and power can be supplied from it. The distant point will be a ceiling light powered by a branch.
Children's room
Regulations on children's premises require that sockets be located at a height of at least 180 centimeters from the floor. This requirement applies only to specialized children's institutions, therefore in private housing this norm is advisory in nature. If desired, the socket can be equipped with a protective disk or other similar device.
Living spaces
For living rooms, the 2N+1 scheme is used, where N indicates the number of rooms. As an example, consider a two-room apartment:
- Living room - 1 branch of wires for the main group of sockets, 1 - additional, 1 - for lighting devices.
- Bedroom - 1 main branch of wires, the other - lighting. The additional group is connected to the additional living room group.
- An additional kitchen group can be connected to an additional bedroom group.

In a 2-3-room house, 10-15 branches of wires can be used, including for the air conditioner. The branch of wires for the air conditioner ends with a socket, despite its stationary nature.
Height of sockets
The ideal height for the location of sockets is 25 – 40 centimeters from the floor. In this case, it is convenient to turn them on, they do not spoil the interior and do not interfere with the installation of furniture.
The socket for the air conditioner should be located higher, since the equipment is located under the ceiling, and the cord should not spoil the appearance of the wall.
Note! Excessive number of outlets reduces wiring reliability.

Tools and materials
To replace the wiring, you need the following tools:
- a hammer drill equipped with a concrete drill, a core drill, a chisel and a set of drills;
- grinder with a stone circle;
- soldering iron;
- indicator with phase indicator;
- multimeter;
- pliers;
- screwdrivers;
- flashlight;
- level and cord;
- putty knife;
- electric portable lamp.
You will need a certain set of materials:
- Terminal blocks. This option for replacing wiring in an apartment does not involve any twisting or soldering. The electrical wiring is resistant to getting wet. Wire connections are made in the input panel at the terminal blocks and final points. Terminal blocks can be purchased section by section - 5 pairs with 10 contacts. 3 – 5 sections are required.
- Socket boxes. The boxes must contain projections so that they can be secured with alabaster.
- Cable. The best option is Russian brands VVG or PUNP. These cables can even be used in wet concrete. Both types of cable are single-core, which allows you to save money when laying them.
- Channels for wires. Old pipes must be removed and metal corrugation used instead.
- Input panel. It is selected based on the need to place 4 circuit breakers, 4 residual current devices and 4 terminal blocks.
- Insulating tape.
- Conductive paste.
- Alabaster.

Instructions for replacing wiring
The work is carried out in several stages.
Creating a temporary shelter
First you need to provide electricity to the working tool. We install a socket and a 16-amp circuit breaker with a wire with a cross-section of 4 square millimeters on a piece of board or plastic. In addition, you will need an extension cord.
Then we turn off the electricity in the home. To do this, remove the plugs and turn off the machine. We remove the dose and release the wires from the electric meter outside. We connect a temporary structure to the wires through a tight twist. We thoroughly insulate the joint areas with wire and fasten the temporary structure to the wall. We connect the power supply to the apartment and begin the installation.
Creation of grooves and installation of socket boxes
The channels must be straight, horizontal or vertical. We lay horizontal grooves 50 centimeters from the ceiling.
For convenience, you can use a stand (for example, a stepladder) with reliable support. First, we use a grinder for slitting, and then a chisel (for deeper penetration). We make niches for socket boxes with a crown (if we are talking about concrete - only with a chisel).

Laying wires
We cut off suitable pieces of corrugation and wire. We lay the wire in the corrugation. After this, we install the socket boxes in the niches and fix them with alabaster. Next, we install the corrugation in the grooves, and put the ends of the wires in the socket boxes. We insert the lead-in part of the corrugation into the junction box and apply conductive paste. Using a tin clamp and a screw, we create a connection to the grounding terminal block of the shield. We turn off the electricity and temporary shelter. We run the wires into the panel from the electric meter.
Wire color
For the neutral, blue or light blue is used, for the protective wire - yellow with a green stripe. Phase wires can be white, brown, red or black.
Connecting wires of only one color is allowed. It is impossible to transfer a phase to zero or a phase to a phase; switching the switch with a zero break is excluded.
Now you need to apply a layer of plaster near the socket boxes and glue wallpaper (or other decorative material).

End of work
After applying the plaster and wallpapering, you need to restore access to the socket boxes. To do this, we cut the socket boxes along the contour. After removing excess plaster, you can begin installing sockets, switches, lighting fixtures, and a water heater.
When the sockets are installed, we proceed to assembling the electrical power supply circuit on the terminal blocks of the input panel. However, we leave the input from the electric meter unconnected for now.
Note! We test all wire branches for short circuits before sending them to the terminal block.
We temporarily connect the power supply and use the indicator to find the phase and zero on the wires coming from the electric meter.
Turn off the power supply, connect the phase and neutral wires to separate terminal blocks. We check them again for short circuits with the machines running.
Conclusion
Replacing electrical wiring in an apartment with your own hands is an extremely difficult task for a non-professional. Before starting such work, you should soberly assess your knowledge and practical skills.
If confidence is not enough, it is best to invite specialists, since unqualified replacement of wiring can cost much more, and not only in a financial sense.
It would be irrational to replace old wiring without accompanying major repairs, especially if we are talking about its hidden type. These are large expenses for materials, payment for electricians and repairmen. However, you can save a lot of money on paying someone else's labor. To do this, you need minimal knowledge of electrics and a lot of free time. You will find the time, and we will tell you how to change the electrical wiring yourself.
All work on replacing electrical wiring must be performed one after another, without changing the sequence. Otherwise, you may end up buying too little or too much material, making the wrong cable connection, or running the wire in the wrong place. To prevent this from happening, perform the work in the following order:
- Determining the scope of work;
- Drawing up a diagram;
- Calculation and purchase of materials, preparation of tools;
- Dismantling or cutting old wiring;
- Marking new wiring;
- Installation of new wiring;
- Control check.
If the wiring check was successful, then the overhaul can be completed. However, it has nothing to do with replacing the old wire.
When is it time to change the wiring? And what part of it?
Depending on the scale of work, wiring replacement can be:
- Partial;
- Full.
Partial replacement is justified in cases where:
- Only one line of non-old wiring was damaged mechanically or by fire;
- The load on one or more lines has increased significantly, and the wire cannot withstand it, while the distribution panel and the rest of the wiring are still suitable for use;
- There is not much time left before the planned overhaul, and the wiring needs fixing right now. This only applies to old wiring in cases where it is impossible to start repairs at the moment and you need to wait.
Signs indicating the need to completely replace the old electrical wiring:
The wiring in Khrushchev especially needs replacing. This apartment has been in use for more than 50 years. In the last century, all wiring was made of aluminum wire, not protected by corrugation. But at that time it was enough: how much do a lamp, a stove and a TV need? Today, washing machines, dishwashers, microwave ovens, vacuum cleaners, kettles and other household appliances have been added to them. Therefore, in Khrushchev-era apartment buildings with old wiring, a fire hazard situation is created and traffic jams are constantly knocked out.
Wiring diagram
Before you change the wiring in your apartment with your own hands, you need to draw up a diagram of the new one. And it does not have to coincide with the old one, which often contradicts fire safety requirements.
The diagram is drawn up arbitrarily using symbols. You will need to recognize the markings for outlets, switches, junction boxes, and junction boxes. You come up with the designations for them yourself. But mark the route along which the wire will be laid with a line. Moreover, for each wire (zero, phase, ground), come up with your own color.
It might go something like this.

The imagination that you can use when drawing up a new electrical wiring diagram is limited by the following rules:
- Do not connect grounding socket contacts to water supply and heating pipes or to a common wire. For this purpose, a grounding cable must be provided;
- The electrical wiring route is laid only vertically or horizontally, angles of only 90 degrees are allowed;
- The wires should not intersect, and at least 0.3 cm should be left between them;
- The distance from the route to the floor/ceiling should not be less than 15 cm, and between it and the door/window opening - 10 cm;
- Switches on the outside or inside of the room, but always on the handle side.
- Switches and sockets are placed in a row at the same level;
- Old standard: installation of sockets at a height of 0.8-0.9 m, and switches - 1.5 m. New standard: everything at a level of 0.8-0.9 m, but in the kitchen there must be a set with a distance of 10 cm from the tabletop. Sockets are allowed at a distance of 15 cm from the floor;
- For a room, there is 1 socket for every 6 squares. For the kitchen - 1 socket for every 2 squares;
- In adjacent rooms, place sockets and switches opposite each other.
The rules for drawing up the diagram are clearly presented in the figure below.

Devices and materials
According to the diagram you will see what materials and in what quantity you will need them. But buy 20% more. This way you will protect yourself from inaccurate calculations and possible damage to materials during work.
You will need:
- Distribution panel – 1;
- Cable. For complete replacement of any wiring - copper. For partial replacement of copper wires - also copper, and for partial replacement of aluminum wiring - aluminum. In most cases, copper with a cross section of 2.5 square meters is chosen. mm for sockets, 4 sq. mm for the stove and 1.5 sq. mm for lamps. The optimal conductor cross-section can be selected using the table below the list;
- Protective automation(residual current device and circuit breaker) to prevent overload, electrical leakage and short circuit. You can buy a “2 in 1” device: a differential machine. For the lighting line, the automation is taken at 16A, for socket families - at 25A, and for powerful consumers - 32A. The input RCD should operate at 62A, and the circuit breaker – at 50A. For each line - an RCD and a switch, or just a circuit breaker;
- Distribution boxes(round ones are easy to install, but square ones accommodate more connections). Their number corresponds to the number of wiring branches;
- Sockets. Preferably with grounding, and for the bathroom - with an RCD;
- Switches;
- Terminals for connecting cables.

Additionally, you may need corrugation (for hidden wiring) or cable channels (for open wiring).
For electrical installation work you need the following tools:
- Hammer or drill with three operating modes;
- Various hammer drill attachments;
- Grinder or wall chaser (optional, as you can use a hammer drill for this);
- Standard electrician's kit (nippers, pliers, scissors, electrical tape, screwdrivers, hacksaw and knife);
- Multimeter with dialing function.
These are tools for hidden type electrical wiring. For the open type, you will need another long wire about 1.5 mm thick. With its help it is convenient to pull the cable through the channel.
Getting rid of old wiring
Attention! From this stage, all work is carried out after the entire apartment has been de-energized!
New wiring in the apartment is installed with your own hands only after removing the old one. For this:
- Look around the walls for old wire routes. Since cable installation starts from the distribution boxes, you need to find plastic covers or protrusions under the wallpaper in the walls. The cover needs to be removed. In the case of open wiring, the search is simple;
- Disconnect the cables in the junction boxes;
- Pull the wires out of the grooves.
Sometimes dismantling old electrical wiring requires serious damage to the walls or floor if it ran under the floor covering. In this case, it is possible to maintain the finish, but then the wires are cut and their ends are carefully insulated. However, the markings of the new wiring should not coincide with the old circuit, otherwise you will have to destroy everything. This method is relevant when the floor has an expensive coating that lasts for decades. Then the new cable is laid along the wall.
How to make markup?
The marking is carried out according to the drawn up diagram using a ruler or tapping cord. It must be smooth and accurate: it is along it that grooves will subsequently be made or cable channels will be laid.

To make a line with a cord, you need to attach its free end to the starting point of the wire route and stretch it to the extreme point. In it, you need to pinch the cord with your finger, and with your free hand, pull it in the middle, and then quickly release it. It will hit the wall, leaving a clear line on it.
Installation of new wiring
Now directly about how to change the wiring in the apartment yourself. The new cable can be laid in two ways: openly and hidden. But regardless of the type of electrical wiring, the first step is to install a shield.
We install the distribution panel
In modern apartments there is a special place for the distribution board in the form of a niche to which the power cable fits. Then all the trouble comes down to fixing the shield in it and installing circuit breakers and RCDs connected to the cable into it.
In Soviet apartments, the shield is mounted in a place that is chosen independently. It should be easy to access. Since the power cable is not connected to the apartment, it is necessary to drill a wall in the selected location to pull the cable through, which is used to connect to the access panel. For these purposes, only VVGng 5*6 is suitable.
Typically, the insides of the shield are arranged as follows:
- Below is the earth;
- Above - zero;
- Between them are machine guns.

The input cable must be cleaned and the blue wire connected to zero and the yellow wire to ground. The white wire is connected to the machine contact on top, where an additional jumper will be installed leading to the machine next door.
Cables VVGng 3*2.5 and 3*1.5 are connected according to the diagram: the phase conductor is to the lower circuit-breaker terminal, and the neutral to the ground is similar to the first wire. If you have provided for the installation of an RCD, then first the phase with zero is connected to it. They are connected to the terminals of the machine through a disconnect device.
We mount it hidden
Replacing the wiring in a panel house with your own hands is a simple matter. The panels already have grooves for wires. And you don’t need to ditch anything. In other apartments you will have to work hard:

Attention! The work of making grooves is very dusty. Therefore, you need to protect yourself with a respirator and special glasses.
We mount openly
Open wiring is rarely done in apartments, so it cannot be completely ruled out. And it is mandatory to do it in offices and other public places. It may not be very aesthetic. But it has an important advantage - the ability to work with it at any time, regardless of repairs, since dismantling does not require damage to the wall finish.
In the case of open wiring, everything is simpler: there is no need to make grooves. You just need to stretch the cable along the wall according to the markings. As for distribution boxes, everything is the same. Only they are not installed inside the wall, but are fixed on its surface.

If you want aesthetics, cable duct is for you. Today they are colored even to match natural wood. Then the cable must first be pulled through the channel, and then secured to the wall according to the markings.

Wiring check
After laying the cable, use a multimeter with a continuity function. Having called each cable and found no errors (the zero should not be connected to the phase and ground, the ground should not be connected to the zero and phase, and the phase to them) in the electrical wiring, you can begin checking the operation of sockets and switches. If everything works, it's time to seal the grooves. A putty mixture is suitable for this. When the composition dries, the walls can be finished with any material.
Improper electrical wiring has caused many fires and deaths. Therefore, before you replace the wiring in your apartment with your own hands, think carefully about whether you can handle it? If there is even the slightest doubt, entrust the matter to a specialist. Safety costs more than the cost of qualified assistance from an electrician.
If the apartment was purchased in a new housing stock, then there is no need to talk about replacing the wiring. But in the case when the purchase of an apartment is carried out from the secondary housing market, in order to reduce the fire hazard situation, it is still recommended to completely replace the electrical wiring in the entire apartment. Thanks to this, you can safely connect modern household appliances to the network and not be afraid of heavy loads on it.
Where to start replacing old electrical wiring?
First, you need to decide on the choice of wires for the main electrical cable, that is, what type of wiring will not spoil the interior of the room, and at the same time ensure sufficient reliability of use.
Open wiring in retro style
If the overall interior design of the apartment is made in a rustic style, then modern electrical wiring will be striking and will disrupt the entire composition of the style. Therefore, in this case, preference is given to the open type of wiring. Its essence lies in the fact that the electrical cable is not hidden in the wall, but is placed on its surface.

But the wires are not fixed to the wall itself, but small rollers are installed under them. In appearance, the rollers resemble small weights for Soviet scales. These rollers are made of glass or ceramic.

When installing electrical wiring in this style, the cable ends up suspended in a small space from the wall surface. This creates visually additional comfort in the apartment.


Typically, for open-type wiring, single-core copper wires are chosen. These wires are twisted and attached to the rollers, through a small, uniform gap, using thin wire.

Replacement of exposed electrical wiring is carried out without gating, which is convenient and easily accessible.
Installation of wiring in cable channels
For a modern interior, installation of an open type of wiring is possible. But so that the wires do not hang in a common heap, they are placed in special cable channels. Cable channels are not a wide plastic box where wires are laid. The top of the box is closed with a lid, which prevents moisture and dirt from getting inside.

The appearance of cable channels is produced in a wide range of colors.
Today, decorative skirting boards are produced for the floor, in which there is space for placing electrical wiring.

This type of wiring makes it easier to access for connecting switches and sockets, as well as for subsequent replacement of wiring in old cable ducts.

Installation of hidden wiring
But sometimes the design of the room does not allow open wiring. And then they use hidden wiring, that is, the cable is laid inside the wall.
- Inside the concrete slabs from which high-rise buildings are built, special steel pipes and open junction boxes are placed for hidden wiring.
- If you decide to replace the hidden wiring yourself and do not know the location of the old wires, then you can drill the channels yourself.
- Construction stores sell electric wall chasers that can be used to make these channels.
- Wires are laid in the resulting channels. It is better to place them in open cable channels or corrugated plastic tubes. The top is covered with plaster and the surface of the wall is leveled.


Instructions for replacing old wiring
The old wiring is completely replaced: from the circuit breakers in the panel to all sockets and switches. When installing hidden wiring, old cables must be removed. When laying an open-type electrical cable, it is enough to de-energize the previous wires and cover them with plaster.

All upcoming work can be divided into five main stages:
- The first step is to develop a diagram of the electrical organization of the apartment.
- Then a wiring plan is drawn up, approved and registered along with the power supply diagram.
- Organization of temporary repairs.
- Installation of electrical wiring.
- Connecting electrical levers, sockets, and large electrical appliances.


Before starting all work, you need to install a grounding wire.
Drawing up a project to replace electrical wiring
Before starting all work, it is necessary to develop a wiring restoration project. It is usually applied to the apartment plan.
On this project, the location of electrical components is noted, and the required cable length is also calculated. The choice of wire type is based on the total load on the electrical network. To do this, take into account that when turning on household appliances with motors, the load on the network may increase for a short time. Therefore, machines should be selected taking into account voltage surges.


Incoming switches are installed taking into account the summed power of the total number of electrical devices that are supposed to be used in the apartment.

The general set of cables and switches for an individual operating circuit is selected separately, depending on the expected load on it.

The working design must include 2 neutral cables. Functional neutral cable and safety neutral cable (for connecting metal lighting fixtures and neutral contact of sockets). Approximate projects for replacing electrical wiring can be found in photographs from the Internet.


Distinctive points when replacing open wiring
The initial steps when replacing this type of wiring are overhead electrical components. The beginning of all nodes is attached to the wall using dowel nails. Then cable channels are laid along the electrical network.

The wire for the electric stove must be complete, without connecting nodes. An exception is possible if you plan to transport the slab over a long distance.

The connection must be made securely and closed using a sleeve or heat shrink tube. Otherwise, during operation of the stove, the joint may heat up and lead to a fire hazard. The 3rd strand of the wire goes to connect the plate to the apartment's grounding wire.


Special points when replacing closed-type wiring
If it is necessary to replace closed-type wiring, no matter wholly or partially, work begins with preparing new channels for laying hidden electrical components.
The chipping is carried out using a hammer drill and a set of round concrete drills. You can use a special wall chaser, but it will result in cramped channels. If wider channels are needed, then a hammer drill with a chisel is used.

Distribution boxes are fixed in the resulting channels. For fixation, it is better to use quick-drying solutions. The same solutions are used to fix the cable in the channels, which are laid to the connection points.


Inside the junction box, the supplied wires are fastened with any twisting method. Then they are either soldered or crimped, and always covered with insulating tape.

As a result, if the process of replacing the wiring is correctly divided into stages and carried out step by step, then the procedure for installing a new electrical cable will be successful.

Photo of the wiring replacement process