Frame assembly diagram for an acrylic bathtub. Installing an acrylic bathtub with your own hands: detailed step-by-step installation instructions
The need to install a frame for an acrylic bathtub is due not only to its stability, but also to maintaining the integrity of the bowl, ensuring its durability and the possibility of maintenance. Therefore, normal operation of a plastic bathtub is impossible without a durable and correctly installed frame.
Frame for an acrylic bathtub and its features
Due to its physical and technical properties, acrylic polymer material allows manufacturers to produce bathtubs of almost any shape and size. But at the same time, plumbing products made from acrylic have a significant drawback: they are elastic and can bend greatly under the influence of the mass of accumulated water and the weight of a person. This especially applies to the bottom and bottom of the side walls of the bowl.
In order to avoid such problems and improve the quality of products, manufacturers apply several layers of fiberglass to the outer walls and bottom. As a result, the side walls of the bathtub acquire sufficient rigidity, but its bottom may still one day not withstand large weight loads, especially if exposed to elevated temperatures. In most cases, placing a bathtub on the floor is impossible, since an air gap is required to install a drain siphon and sometimes lay pipes.
The second problem is the poor stability of these lightweight plumbing products. This especially applies to large corner bathtubs in which, when filled with water, the center of gravity not only rises, but also moves away from the walls. It is impossible to secure the support legs, as is done on cast iron ones. And you need to raise the bathtub above the floor and fill it with water too.
Possible solutions to the problem
To solve the issue of maintaining integrity and stability, it is necessary to install a supporting frame for the bathtub. In this case, the bottom of the bowl should rest as much as possible on this structure, and the frame itself should be strong and stable.
With the advent of the first bathtubs, craftsmen made frames from wood and independently welded them from metal profile pipes. Such installation of the bowl was quite troublesome and expensive. In addition, the structures were often so monumental that there was practically no access under the bathtub to service the siphon and hoses, and in case of necessary repairs or cleaning it was necessary to remove the bathtub and put it aside.
Now, when purchasing a bathtub, almost every plumbing store will offer you a metal structure manufactured in a factory. The most versatile in this case is a metal frame for acrylic bathtubs 170x70 mm. It fits most rectangular bathtubs. However, the cost of such products can be more than 2000 rubles. Sometimes a load-bearing frame structure comes complete with a bathtub, but most often these are expensive imported models.
For corner installation bowls, most manufacturers have been manufacturing and supplying a reinforced frame for a long time. Especially for expensive models with hydromassage, heating and water circulation. They immediately come assembled and attached to the bathtub.

Such designs optimally distribute the weight load from the bathtub, ensure complete water drainage and can be adjusted in height for installation in case of an uneven floor. In addition, the factory frames for bathtubs are designed in such a way that you can securely attach a decorative panel to them, blocking the side view of the bottom, without any problems.
Choice of frame design
The frames for such bathtubs are made of rectangular steel profiled pipe and coated with anti-corrosion powder paint. You can also find more expensive, galvanized or stainless steel models. The frame design of an acrylic bathtub consists of the following elements:

It is from these parts that the supporting frame for the acrylic bathtub is correctly assembled. The presence of additional ribs is mandatory. If the bathtub is simply suspended inside a rectangular frame, then sooner or later a crack will appear in it.
When choosing a frame model, first of all, carefully look at the model offered by the seller. If you are offered designs with a large number of additional ribs and support points, then the store is trying to play it safe by offering you a low-quality bathtub. For a normal bowl with a length of 170 mm, three additional ribs are enough, and for very good bowls, two will be enough. In addition, complex designs are more expensive. Try to buy a collapsible frame. Welded products may be stronger, but they are less convenient to install and you can forget about their adjustment, if necessary, forever. Also pay attention to the quality of corrosion protection. Serious manufacturers apply powder paints to metal or coat pipes with zinc. The legs of the frame must have supports that will not damage the tiles in the bathroom during installation.
When you get the bathtub home, turn it upside down. Assemble the frame for the acrylic bathtub and place it on the upside-down bowl if you did not do this in the store. Look carefully at how well the shape of the metal structure matches the profile of the contours of the bathtub. If there are serious discrepancies, take the frame back. The seller is obliged to accept it or replace it with a more suitable one. The fact is that factories produce steel frames for bathtubs only for serial models. A universal design has not yet been invented.

If everything is in order, remove the assembled frame from the bowl and install it in the bathroom. Using a building level, check the horizontal position of the upper support frame, as well as the height of its installation. The height should be such that there is at least 80 mm of clearance under the bottom. This is necessary to install the outlet siphon and ensure the slope of the sewer outlet pipes.
Before installing the bowl on a metal structure, screw the siphon and overflow pipe onto the outlet holes. If so, then it’s easier to install it now.
Together with an assistant, take the bathtub and carefully insert it into the middle of the supporting frame of the frame. Connect the sewer pipes and check that the water flows completely through the holes.
How often do you call a plumber?
Poll Options are limited because JavaScript is disabled in your browser.
When carrying out renovations in an apartment with a complete replacement of plumbing, its owners quite often have to deal with the problem of securely fastening the equipment installed in the bathroom. This is especially true for the work procedures for installing a new bathroom, the specific installation of which is determined by many factors, including the material of the product and its texture. Thus, a traditional cast-iron bathtub, which is distinguished by its considerable weight, is best installed according to a long-proven method, which involves its reliable support on the height-adjustable legs included in the kit.
For lighter acrylic bathtubs, for example, additional fastening will be required to ensure its reliable fixation and uniform distribution of loads throughout the body. In our article we will consider in detail the installation features of each of the samples of this plumbing product.
Methods of fixing bathtubs
For anyone who wants to figure out how to strengthen a bathtub so that it doesn’t wobble, we advise you, first of all, to decide on the material from which it is made, since this largely determines the method of its installation.
When choosing a product, you most often encounter the following options:
- classic cast iron bathtub;
- steel bathtub.
For each of the samples of these products, a special, only suitable method of fastening must be used, which also takes into account the peculiarities of the relief of the walls of the bathroom itself.

Cast iron bathtubs are sufficiently stable due to their significant mass, so their installation is permissible anywhere in the room. Typically, such bathtubs are installed on standard legs that are included in the delivery of the product and are securely fixed to its body using special steel wedges or bolts. As an additional fastening, a pre-laid brick base or corners fixed to the wall can be used (in the case of a brick base, its body may not be located close to the walls).
It is best to place a steel bathtub on several support points, so it should be located directly against the wall. Since the legs included in its kit do not provide the required reliability of fixation, a special brick podium is often used to increase the stability of the product.
The following techniques can be used to secure a steel bath:
- use of polyurethane foam, which seals the junction with the wall and at the same time strengthens the contact area;
- installation of special metal profiles on the walls to provide additional support;
- and finally, a regular wall insert.
To securely fasten and ensure uniform distribution of loads, it is best to install an acrylic bathtub on the same brick podium or use a special metal frame for these purposes.
Let's consider each of the methods of attaching bathtubs discussed in this chapter in more detail.
Polyurethane foam

Using polyurethane foam to fix a bathtub is the simplest and most affordable method of simultaneously fixing it to the floor and walls. When implementing this method, the bathtub is first adjusted in place and height using adjustable legs so that there is a gap of about 0.75–1.5 cm at the walls, and then it is filled to the brim with water.
After this, you can begin to seal the gaps between the bathtub body and the adjacent walls of the room, as well as between its legs and the floor using polyurethane foam.
Sealing foam tends to expand when it dries, so its use must be strictly dosed. Otherwise, unwanted deformations of the structure are possible, reducing the reliability of its fixation. Despite the fact that the “setting” time of the polyurethane foam is about 12–35 hours, work on finishing the walls can begin in about 6 hours.
Application of brick frame

A brick frame is most often used in cases where you decide to fix the bathtub without the help of legs and ensure even distribution of loads along the entire perimeter of the support. With this installation method, it is possible to lay out the frame both along the bathroom and across it.
In the case of a transverse arrangement, the bathtub must rest directly on the brick, which will require additional fastening of the frame to the walls using metal corners (steel or aluminum). In this case, the pre-prepared corners are fixed with dowels on the wall so that the free edges of the bathtub have additional support and it does not wobble when pressed.

When laid longitudinally, something like a trough is formed, into which the installed bathtub product is placed. The gap or cavity formed between the walls of such a base and the bathtub itself must be sealed with polyurethane foam, which also helps to increase the reliability of its fastening. In the case of laying out the front wall to the very top, it is possible to completely hide the body of the bathtub, thus preparing the base for subsequent tiling with ceramic tiles.

When performing this work, it is imperative to provide a small inspection hole necessary to provide access to the siphon. When finishing, this hole can be closed with a piece of drywall or by installing a small plastic door. In the case when you plan to decorate the walls with ceramic tiles, a ready-made screen can be used as the front panel of such a base.

This method of fixing bathtubs is mainly used when installing acrylic products, the kit of which, as a rule, already includes a ready-made steel frame (if it is not available, this accessory can always be purchased separately or made independently). During the installation of such a bathtub, the installation or guide strips of the frame are first attached to its bottom using self-tapping screws (note that they are fastened in places specially designated for this purpose, which have thickenings). And then the included legs are installed on the guides secured in this way using a bolted connection.

After securing the legs, the bathtub will need to be put in place and the points where its body will touch the walls of the room must be marked, after which special strips will be installed at these points to provide additional support.
It is necessary to leave a small gap between the bar and the side (no more than 2–4 mm), taking into account the expansion of the bath after filling it with water.
Inserting a bathtub into a niche

In small-sized apartments, a situation very often arises when a bathtub is placed with great difficulty in the space allocated for it, which, on the one hand, significantly complicates its installation, and on the other hand, provides the possibility of rigid and reliable fixation in a bathroom niche.
To insert and rigidly fasten the bathtub, you will need to prepare grooves in the wall on each of its sides according to the thickness of the edge of the product (for these purposes, you can use a hammer drill or grinder). The edges or flaps of the bathtub should be inserted into the grooves prepared with their help with a slight “tightness”, which guarantees maximum rigidity of the fastening due to the complete absence of play.
If the legs supplied with the kit are not sufficiently rigid, you can further strengthen the fastening of the bathtub by using special transverse profiles that serve as supports for its flaps.
Video
How to install a bathtub in a groove, see below:
The appearance of acrylic bathtubs on the plumbing market has become a real gift for connoisseurs of original products. Acrylic bathtubs have different geometries and sizes; thanks to their unique technological characteristics, they can be manufactured into very complex configurations.
The comfort of using a bathroom depends on two equally important conditions: the quality of the product and the correct installation. Before describing the process of installing acrylic bathtubs, it is advisable to familiarize yourself a little with the features of production technology and the strengths and weaknesses. Such knowledge will help to avoid annoying mistakes; during installation, due attention will be paid to preventing problems from arising during operation.
Today there are two types of bathtubs on the market:
- made from pure cast acrylic;
- from acrylic-netrilbutadiene styrene and polymethyl methacrylate in various proportions.
The former have increased strength, but are somewhat limited in the ability to create shapes. The latter are more plastic, which facilitates the manufacturing process, but are noticeably inferior in strength to the former. The cost ratio is the same. Which bathtub to choose is up to each user to decide for themselves. But there are several general recommendations that allow you to choose the best option for yourself.
What to look for?
| Index | Short description |
|---|---|
| The larger the acrylic bathtub, the thicker the material should be. For standard bathtubs, the thickness of acrylic can start from 6 mm; for large bathtubs, the minimum thickness starts from 8 mm. It is better to buy products made from cast acrylic. | |
| Acrylic bathtubs can only be mounted on legs, on legs and special metal frames or on masonry materials. The most durable option is the third, the cheapest and simplest is the first. If the bathtub is designed to carry a lot of weight, then choose only those options that have metal frames included. | |
| High-quality goods are produced by both foreign and domestic manufacturers. The only condition is to buy bathtubs only from well-known brands. | |
| White color is considered not only traditional, but also universal. If you want to create unique bathroom interiors, you can buy products in various colors. |
acrylic bathtubs
Among all the possible methods of installing acrylic bathtubs, the fastest and cheapest option is considered to be one with legs, and we will dwell on it in more detail.
Types of preparatory work
- Completion of all construction work in the premises and installation of utility networks.
Important. Due to the peculiarities of fixation, acrylic bathtubs can only be installed on concrete surfaces. The walls must be brick; in extreme cases, the use of foam concrete is allowed. It is strictly forbidden to install acrylic bathtubs in rooms with plasterboard walls. This requirement is related to the peculiarities of fixing products.
- Cleaning up construction waste and preparing the workplace. During the work, nothing should interfere, the floor should be clean, to prevent scratches, the surface should be covered with cardboard or thick cloth.
- Preparation of tools and materials. To seal cracks, you will need a special sealant for bathrooms (it inhibits the proliferation of microorganisms and has improved performance), a set of plumbing tools, an electric drill, a tape measure, a level, a pencil or a felt-tip pen.
Before installing the bathtub, carefully check its condition and the completeness of additional fixing elements. Please remember that the manufacturer's warranty only covers manufacturing defects. Damage sustained during improper installation will have to be repaired at your own expense. Remove the protective film from the front surfaces only after all installation work has been completed.
Preparing the premises
Step 1. Seal the ceramic tile joints between the wall and floor. Use special antibacterial silicone, apply it evenly around the perimeter in those places where the acrylic bathtub will be installed.
Practical advice. It is easier to level the silicone using a thin narrow spatula or a self-made stick. To prevent excess sealant from sticking to the surface of ceramic tiles, spray them with soapy water before leveling. Dip the stick into the same solution, this will prevent the silicone from sticking to it, and the sealant seam will be smooth.
Step 2. If your bathtub drain is not located in the place where it is required, then you need to make a special liner. Assemble plastic pipes for water drainage, pipe diameter 50 mm. Measure the distance from the existing drain to the location of the bathtub drain. The pipes are connected to the existing drain using a triangle.
Important. Do not forget to slope the pipes; the height difference is enough to be a centimeter or two per linear meter.
There is no need to precisely control this parameter; check the slope with an ordinary building level.
If turns are required, then use additional elements. When connecting pipes, be sure to wet the sealing rubber; you can use ordinary soapy water.
If some pipes need to be cut, then do it with a grinder with a metal stone or a hacksaw. After cutting, be sure to remove burrs with a sharp mounting knife and make a small chamfer. Otherwise, the sharp ends may damage the rubber seals, and the system will have to be disassembled, the seals replaced, and reassembled. The chamfer is made with an abrasive disc. Hold it at an angle of 30-45° to the end of the plastic pipe and slowly turn it around. If hangnails appear, cut them off with a knife.
Burrs on the cut edge of the pipe must be cleaned with a knife or sandpaper. Otherwise, hair and threads will subsequently cling to them.
If the siphon does not have a corrugated pipe, then you need to accurately measure the dimensions; if there is a corrugation, then the work is greatly simplified. Make sure that the drain pipe does not interfere with the installation of the bathtub feet.
If there is no cold and hot water supply near the shower installation site, then this problem also needs to be solved. There are two ways: remove the ceramic tiles on the walls and make a hidden liner or install pipes along the walls. Which option to choose - decide for yourself, taking into account your needs and capabilities.
Now that the preparatory work is complete, you can begin installing the clawfoot bathtub.
Bathtub installation instructions
Step 1. Cover the floor with cardboard, turn the bathtub upside down and remove the protective packaging.
Below it should be the manufacturer's instructions; find the document and study it carefully. Check the completeness of the legs, count the number of hardware.
Pay attention to their characteristics and purpose.
The standard package includes:
- four plastic legs. They have internal threads for screwing in and adjusting the height and holes for fixing to the floor;
- two mounting channels (racks). Made from thick sheet steel, the outer surfaces are coated with a layer of zinc to protect against corrosion processes. Fastening is done using holes;
- four studs. On one side, plastic legs are screwed to them, and on the other side they are fixed to the supporting channels;
- nuts With their help, the legs are adjusted in height and fixed in the desired position;
- self-tapping screws Used for fastening load-bearing channels (planks);
- metal grips. Serve for attaching the sides of the bathtub to the wall;
- dowels for fixing the grips to the wall.
Most bathtubs have siphons with overflow. If they are not available, then these elements must be purchased separately.
Step 2. Find the place where the strips are fixed. If the instructions do not indicate their location, then they should be mounted at the maximum distance from each other. But subject to a very important condition - all self-tapping screws must be screwed only into a special thickened place on the bottom. The slats should be parallel to each other and perpendicular to the longitudinal axis of the bath. Install the elements using a tape measure and a square.
Step 3. Using a thin pencil or felt-tip pen, mark the places where the slats are attached to the bottom. Select the screws according to the length and secure the strips. Make sure that the length of the screws is approximately 0.5–1 cm less than the thickness of the bottom of the bathtub. Otherwise, mechanical damage to the front surface of the bath may occur. Tighten the screws carefully, do not allow them to turn. It is better to work with an ordinary screwdriver; it is difficult for beginners to control the tightening torque of a screwdriver.
What to do if the screw has turned? You cannot leave hardware in this condition. Unscrew it completely, insert matches into the hole, lubricate them with sealant and repeat tightening. To make the matches fit more tightly, you need to sharpen the ends a little. This method allows you to increase the strength of the connection, but the reliability will be less than fixing it the first time.
Important. The diameter of the holes being drilled should be 1.5–2.0 mm less than the diameter of the screw. Be sure to monitor the drilling depth.
You can do this in two ways:
- use a special stop ruler, it is sold together with the drill;
- Measure the depth of the hole on the drill and wrap a little electrical tape or tape at this distance.
You can try fixing the screws without first drilling the holes. Make your decision after practical experience. Screw in a smaller self-tapping screw in any free space on the bottom. If everything went well, the acrylic and the insert are not cracked, then you can fix the planks using the same method. This greatly increases reliability and reduces the risk of damage to the inner surface of the acrylic bathtub.
Step 4. Start assembling the legs. Screw a locknut and a plastic leg onto the axle, and another nut on the other side of the axle. Insert the assembled element into the hole in the bar and secure with the top nut. Using the same algorithm, assemble and install all the legs. Do not overtighten the locknuts; do everything by hand.
Step 5. Using a tape measure, set the preliminary height of the bath; in most cases, the distance from the side to the floor ranges from 50–60 cm.
Now that the assembly of metal structures is complete, begin installing the siphon with overflow.
Siphon assembly
Step 1. Check the completeness of the siphon spare parts and their technical condition. Carefully inspect the rubber rings and gaskets; their surfaces should be smooth, without depressions, sagging or burrs. If the plastic elements show signs of shrinkage of the material during cooling, you are dealing with an unscrupulous manufacturer; never buy such products. Lay out all the elements on a clean surface and study their purpose. Before doing this, read the instructions and familiarize yourself with the attached assembly diagram.
Step 2. Start assembling the kit from the largest part - the flask or other siphon seal. Pay attention to which side the cone seals should be placed; when tightening, they should enter the pipe and increase in diameter, and not be pressed against the end of the tube.
Step 3. Attach the overflow tube and replace the drain grate. Make all connections by hand, do not clamp the elements too tightly. Before installing the drain and overflow grilles, remove the protective film around the openings. Let the rest of the surface remain protected; the film is completely removed only after all installation work is completed.
Now you can install the acrylic bathtub and connect the drain.
Installing an acrylic bathtub in place
Step 1. Place the bathtub against the wall and check the position of the sides with a level.
All of them must lie strictly in a horizontal plane. If there are deviations, level them with your feet. It is not very convenient to do this; you will have to lie on the floor under the bathtub and work in this position. After final alignment, tighten the locknuts until they are secure. Check if she is standing on all her legs. Apply pressure in different parts of the bathtub; if there is any swaying, correct the position of the legs.
If the bathtub is of high quality, then the bottom has already been tilted and all the water will go down the drain. For peace of mind, we recommend checking this indicator: pour a little water into the bottom of the bathtub and see if all of it goes away.
Step 2. Mark the installation locations for the side supports.
Without them, using an acrylic bathtub is prohibited for two reasons. Firstly, the insufficient strength of acrylic can cause cracks due to heavy loads on the sides. Secondly, even minor deformations of the sides cause depressurization of the seam between the bathtub and the wall.
Marking can be done in two ways:
- measure the full height of the bath along the top edge of the side;
- from the resulting indicator, subtract the amount of bend of the side to the inner plane;
- at this distance, draw horizontal lines under the level on the walls, the upper part of the side metal grips should lie on this line;
- hold them in this position and mark the places for drilling holes for the dowels.
This method is considered theoretically correct, but practitioners rarely use it: it takes a long time and there is a high probability of making a mistake. It is much easier to place one side stop all the way from the bottom of the bathtub and mark its location with a pencil. Using a level, draw a horizontal line on two walls. Further along the line, the remaining stops are placed to take measurements for the fixation holes. This is not only easier and faster, but also completely eliminates the possibility of error.
Practical advice. If the holes fall into the joints between tiles or very close to the edges, then it is better to move them. The stops do not have an exact installation location; they can be shifted a few centimeters in any direction without any problems. And drilling holes in the joints can cause cracking of ceramic tiles; eliminating this problem is not only difficult, but sometimes impossible.
Step 3. Drill holes for the dowels.
This should be done carefully; when drilling ceramic tiles, turn off the perforation mode and reduce the speed of the chuck. The length of the holes should be 1–3 centimeters greater than the length of the plastic elements of the dowels, otherwise they will not be inserted completely; construction dust will interfere.
Step 4. Secure the side supports. The top edge of all elements must lie on the same line. If for some reason it has shifted, do not be upset. Find the dowel that is not secured correctly and unscrew it. Correct the position of the stop with one dowel; you don’t have to install the second one at all. The loads on the elements are insignificant; one fixation point is sufficient. If there is no doubt, then remove the acrylic bathtub and reinstall the problematic stop.
Step 5. Place the acrylic bathtub in place. It’s impossible to do this alone, call an assistant. The bathtub must first be slightly raised above the stops and rested against the wall, and then slowly lowered. At the same time, make sure that the sides sit in place.
Step 6. Check the position of the legs again, they should all touch the floor. Before final adjustment, you need to loosen the locknut a few turns and lower the plastic part of the leg until it touches the floor. As soon as the load appears, stop increasing the length and firmly fix the position.
It must be remembered that the side stops perform two very important functions: they do not allow the sides to deform and keep the bathtub from moving horizontally. If you do not fix the sides to the wall, then the legs will have to be fixed with dowels to the floor coverings.
Connection to sewerage
We recommend checking for leaks very carefully. To do this, place sheets of paper under the joints, let them stay there for 5-10 minutes, drops of water are clearly visible on them. Don't rush to close off the space under the bathtub. Leaks during operation are difficult to detect, and prolonged exposure of building materials to conditions of high humidity and temperature is fraught with very unpleasant consequences.
Practical advice. You can independently significantly improve the performance of acrylic bathtubs by reducing thermal conductivity. To do this, after installing the siphon with foam, cover the product with foam on the back side. You don’t need much, 5–6 centimeters is enough, and the water in the bathroom will maintain a comfortable temperature for a long time. Before foaming, it is recommended to moisten the bath with a spray bottle - on wet surfaces the foam hardens faster. In addition, the adhesion coefficient of materials increases significantly.
Step 8 Seal the gaps between the tub and the walls with caulk.
We described how to do this correctly in this article above. The algorithm is no different, only a little more care and accuracy will be required, use only high-quality materials. After a few months, cheap ones will begin to peel off a little, the seal is broken and water gets under the bathtub. It is very difficult to remove leaky sealant from an acrylic bathtub without damaging visible surfaces. You will have to increase the width of the new layer and hide problem areas in this way.
This completes the main installation work. But you can’t leave an acrylic bathtub in this state; you need to close the space under it. Decorative screens are used for this; they can be purchased or homemade, made of plastic, fiberboard or masonry building materials. Which option to choose is up to you. Just remember that screens made of masonry materials (bricks or blocks) are considered the most reliable. But making such screens is time-consuming and expensive, and it will require certain skills in performing construction work.
![]()
Video - Installation of an acrylic bathtub
This is a simple, but very important process, since there are many different nuances that should not be neglected when installing a bathtub. Comfortable bathing during water procedures will directly depend on them. In addition, its service life depends on compliance with the technology.
DIY acrylic bathtub installation should include the following steps:
- Preparing the site for future installation
- Product assembly.
- Product installation.
Acrylic bath installation price can grow several times if you are not careful when installing it. The material with which the product is covered is easy to scratch. At the same time, you should not delay the start of the process, since the bath may lose its original shape during long-term storage. In general, the cost of installing an acrylic bathtub, if you decide to order it from some organization, can vary greatly depending on the type of installation. For example, mounting and installing an acrylic bathtub on a frame can cost approximately 3,000 rubles, and installing a bathtub on bricks can costs 15,000 rubles. It all depends on the size of your bathroom and the installers’ prices.
Acrylic bathtub installation video shows all stages of its implementation. But even if the work is performed by third-party specialists, it is better to find out what the technology for installing the product is.
- Video, assembly and installation of an acrylic bathtub.
Tools necessary for assembling and installing acrylic bathtubs
- Screwdriver or drill
- Phillips screwdriver
- Drill 3.5mm,6mm,8mm
- Wrench for 14,17,19
- Silicone sealant (preferably antifungal).
- Bathroom border tape
Installation options
The video of installing an acrylic bathtub demonstrates the detailed process. However, what installation options are used today? The main methods are as follows:

This approach is considered the simplest, since the manufacturer provided special legs with the product. In addition, instructions are provided along with the bath, which describe the entire process in detail.
Usually the latter comes complete with the product.


This option is used when the product does not come with legs. Installation on bricks has a number of advantages compared to a factory design, since such a bathtub base is much stronger.
4. Combined installation method.

Today it has become used quite often. In addition, on YouTube, installing an acrylic bathtub using a similar method is described in some detail. The corresponding videos show several options for combining the frame and factory legs. Also shown is the installation of an acrylic bathtub under tiles and much more.
- Important! It is worth noting that, regardless of the installation method, the legs serve to level the bathtub, so additional supports must be installed under the supporting structure of the bathtub. (except for the combined method and the method of installation on bricks)
It is worth noting that most manufacturers provide only one installation option for such products. For example, if the bathroom comes with a metal frame, then it is extremely necessary to use it, without replacing it with bricks or legs.

During the preparation of the bathtub for installation and during the installation process, protect the polished surface of the bathtub as much as possible from contact with construction debris and other abrasive materials, because This may result in scratches, abrasions, and dulling of the surface of the product.
- After transportation in cold conditions, be sure to allow the product to warm up to room temperature within 3 hours.
- Before installing the product, the room must be cleared of construction debris and dust. The period of quality operation of the product depends on the cleanliness of the room.
- When installing a bathtub, it is necessary to provide for the possibility of dismantling the equipment if the need arises.
- Disconnect the power supply in the room.*
- Install moisture-proof sockets for hydro and air massage equipment.*
- If there is a mixer in the bathtub, turn off the water supply to the water supply system.
- Remove packaging material.
- If the bathtub has a built-in mixer, install the mixer, spout, shower switch and shower head using flexible hoses. The mixer assembly diagram is individual for each individual type of mixer.
*- for an acrylic bathtub with hydro and air massage systems.
Installation of an acrylic bathtub with legs
Installing a bathtub with legs is the easiest and fastest way. You can perform such an installation without having specialized skills and without calling specialists. Each bathroom in this configuration must be supplemented with instructions that describe in detail all stages of installation:
- Screwing the legs to the product.
- Adjustment of legs.
- Installing the bathtub by level.
Sometimes when installing on legs you have to make additional holes in the bathroom. To drill the product, you need to purchase a wood drill and set the drill to low speed. Or use a screwdriver; assembly will be faster and easier.
At the initial stage of installation, you need to make sure that there are seats on the bottom of the bath. Determining the presence of the latter is quite simple. They are often marked with special marks. They also contain holes for attaching the legs or indicate points for drilling.
It is important to note that the assembly of the bathtub should be carried out according to the instructions. That is, if holes are provided on its lower part, there is no need to additionally drill the product. In cases where holes are nevertheless made in places not intended for them, their appearance can lead to the following consequences:
- Violation of the distribution of load created by water. As a result, deformation occurs and, as a result, damage to the bathtub.
- Cracking of the product. The finished bath has points of increased metal stress. Therefore, drilling new holes in the wrong place may compromise the integrity of the product.
- You can determine the places intended for drilling holes as follows:
- By guide elements that indicate where the legs should be placed.
- By the characteristic thickening of the lower part of the bathtub body.
So, if you are installing a bathtub on legs, then you need:

2) Install two frame strips as shown in the figure. Or if there are seats on the bathtub, then place the slats in these places.

3) Screw the strips to the bathtub with a drill or screwdriver, using the screws included in the kit.
- Attention! Do not confuse the screws; roughly compare them in length. Otherwise, you risk breaking through the bathtub.
4) Screw the plastic legs onto the threaded rod (if they are not screwed on).

5) Insert the studs into the holes on the frame bar, and secure them with nuts and a 17-19 wrench.
6) Screw the overflow drain to the bathtub.
7) Turn the bathtub onto its legs.
8) Place the bathtub in its designated place. Level and connect to the sewer.

- Video, example of installing an acrylic bathtub on legs
If you have a panel for the bathtub, then by rotating the legs, adjust (using a horizontal building level) the position of the bathtub, taking into account the height of the decorative panel, ensuring a gap between the floor and the panel (about 5 mm). Adjust the position of the bathtub to prevent the formation of volumes of water that cannot be drained when draining the bathtub.
If for some reason installation on legs is not possible, the bathtub can be placed on bricks. They provide reliable support and uniform distribution of the load created by water.
Almost all legs allow you to adjust the position of the bathtub. To do this, you need to have a level on hand. First, you should move the bathtub close to the wall and set the desired height. Next, you need to put a level on the side of the product, after which you can begin adjusting the product in the horizontal plane. Once both steps have been successfully completed, the legs should be locked in the chosen position. Special nuts are provided for this.
If necessary, the bathtub can be secured more securely if special hooks are screwed into the wall before installing it. The latter can be made of plastic or metal. In expensive bathtubs, such hooks are usually included.

It is worth noting that the fasteners should be screwed into the wall before the final installation of the product at an equal distance from each other. They must first be aligned with each other in a horizontal plane.

Measure the distance from the floor to the side.

Draw a line at the required height where the bathtub is installed. Attach additional fasteners to the mounting location and mark the drilling locations. Drill Ø 6 mm. Drill the holes, insert the dowel and screw the mount to the wall.

Install the bathtub side into the mount. The bathtub should not hang.
Frame mounting
Such installation is carried out either on a factory or on a homemade frame. The first option is considered the best, since the manufacturer selects design elements in accordance with the shape and size of a particular product. Installing an acrylic bathtub on a frame with your own hands is possible only after the owner of the bathtub has first studied the attached instructions.
The assembly process is quite simple. It can be divided into the following stages:
- The bathtub is turned upside down and placed on paper or high-density fabric previously laid on the floor. This approach will avoid scratches.
- According to the instructions, the frame is assembled, after which it is fixed to the bathtub.
- At the end, the bath is turned over, installed in the designated place and secured.
In most cases, if the bathtub is installed on a supporting frame, then additional fastening of the product to the wall is not required. It is important to note that the process described above is an example. In each individual case, the assembly procedure has its own characteristics.
So, the stages of installation and assembly of the frame:
1) Turn the bathtub upside down and place it on a flat surface that will not damage or scratch the bathtub.
2) Install the frame frame as shown in the photo

- Attention! The frame should not protrude beyond the edges of the bath.
3) Secure the frame with self-tapping screws

4) In the places where the frame is attached to the bathtub, using self-tapping screws, drill holes Ø 4.2 mm in the frame. (If there are none)
- Attention! To avoid damage to the bathtub, before drilling the frame, it must be removed from the bathtub.
5) On the side where the front panel will be installed, screw the mounting bracket with self-tapping screws

- Attention! The corners are attached only in four places where there are mortgages.

6) There are through holes along the edges of the frame; attach 4 posts perpendicular to them with self-tapping screws. The holes in the frame must coincide with the nuts on the posts


7) Use bolts to tighten the frame with the racks

- Attention! Tighten the bolts until they touch the frame, then tighten them with the bottom nut. Screw the leg onto the stud and two nuts; insert the leg into the hole in the frame; secure the leg with the third nut. Adjust the legs using a level.

8) To the frame posts, on the side where the front panel will be installed, screw the panel mount (flags) and secure with nuts

9) Install the front panel in the corners.

10) In two places where the panel meets the flags, drill two Ø 8mm holes on the front side of the panel. Insert decorative plugs into them and tighten them to the flags with self-tapping screws

11) Screw the drain and overflow to the bathtub
12) Place the bathtub in its designated place and connect it to the sewer system.
- Video, example of installing an acrylic bathtub on a frame
By rotating the legs, adjust (using a horizontal building level) the position of the bathtub, taking into account the height of the decorative panel, ensuring a gap between the floor and the panel (about 5 mm). Adjust the position of the bathtub to prevent the formation of volumes of water that cannot be drained when draining the bathtub.
Installing a bathtub on a homemade frame

Quite often it happens that a support is not provided with the purchased bathtub model. Therefore, you have to either assemble the frame yourself or buy ready-made structures. The first option is preferable, since the owner of the font has a better idea of its shape and size. Moreover, there are a lot of videos on the Internet of installing an acrylic bathtub on a frame with your own hands. As a result, you can get a structure that will be stronger than the factory one. True, you need to understand that making a frame is a long and labor-intensive process.
Most often, aluminum profiles are used to create such structures, and the bath itself is installed on bricks. To create such a frame, you need to prepare the following components:
- metal profile of the required size;
- cement mortar intended for strengthening bricks, and an appropriate container for it;
- sealant for sealing seams;
- self-tapping screws for installing the frame.
The frame should be assembled with extreme caution, as acrylic is easily scratched. It is recommended to cover the bathtub with film or thick paper before starting work. Otherwise, any accidentally dropped object may damage it.
The video of installing an acrylic bathtub on a frame shows that at the first stage it is necessary to mark the height of the future structure on the walls. Next, the level of the brickwork is determined. To do this, you need to measure the distance from the floor to the mark on the wall, and then subtract the height of the bathtub from the resulting figure.
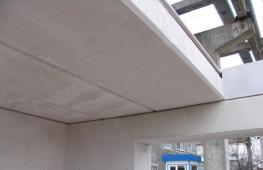
At the next stage, the frame is formed. It will support the bath. The profile is installed on the dowels so that the metal runs along the lower edge of the font along the entire perimeter. Next, brickwork is done using cement mortar.
It is worth noting the following important nuance: after all the steps are completed, the bathtub must be held by the metal profile. Its lower part can only lightly touch the brickwork. To attach the bathtub to the wall, a sealant is used, which additionally protects the structure from leaks.
At this point, the installation of the frame can be considered complete. True, the finished structure has an unsightly appearance. Installing a screen on an acrylic bathtub will smooth out this defect. To create a similar design, you can use the same metal profile. The screen not only allows you to hide the bottom of the bathtub and the sewer pipe, but also creates an additional frame of strength. Then it can be covered with tiles, not forgetting the need to organize access to the siphon and other plumbing fixtures. In addition, it will be necessary to create an additional soundproofing layer, since the void under the bathtub will increase the noise created by the water.
To create it, you will need to take regular mounting foam and apply it along the entire bottom of the font. This foam provides additional strength to the finished structure. It should be understood that such work can only be done on bathtubs of simple design. Polyurethane foam is not recommended for use when installing, for example, a Jacuzzi.
Installation of a bathtub on bricks
This method of installing a bathtub is used when your bathtub does not have a frame or legs. And also, if you want to have an unusual design for your bathroom in your apartment. If you decide to do such an installation at home, then you need to stock up on bricks or foam blocks, as well as mortar for laying them out.

- It is necessary to mark the level of the bath. Draw the bathtub installation lines on the walls and floor with a pencil or marker, taking into account the required distance from the floor to the overflow drain.
- The foundation of the bathtub is laid out of bricks around the perimeter and under the bathtub. Don’t forget to immediately make a technical hole to access the overflow drain.
- After the solution has dried, we do a test fitting of the bathtub. If everything is good, then you can start tiling your foundation with tiles or mosaics.
- We install the bathtub and connect it to the sewer.

- Video of what it looks like to install a bathtub on bricks
If necessary, before installation, we make additional sound insulation inside our structure using polyurethane foam.
Combined installation of an acrylic bathtub
Combined installation of a bathtub is essentially a symbiosis of installing the original frame or legs of the bathtub with bricks or other building materials.
The stages of combined installation are similar to the stages of other types of installation

- It is necessary to screw the frame or legs that come with the bathtub to the bathtub.
- Place the bathtub in the designated place and level it.
- Draw a bathtub installation line on the wall, focusing on the lower edge of the frame or bathtub.
- Move the bathtub to the side so that it does not disturb you, and in the necessary places make podiums from brick, foam block or other suitable building materials.
- Put the bathtub in place, first check again with a level that the bathtub is in a horizontal plane.
- Attention, the legs should not hang in the air!
- Connect to sewer. If desired, you can make additional sound insulation using construction foam.
- Video of what a combined installation of an acrylic bathtub looks like
Installation of a corner acrylic bathtub

Installing a corner acrylic bathtub is practically no different from installing a rectangular acrylic bathtub. The most important thing when installing a corner bathtub is preparing the walls.
Installing a corner acrylic bathtub requires, first of all, the preparation of the walls to which the product will subsequently adjoin. They should form a clear 90 degree angle. Putty or plaster is used to level the walls. To create such an angle, it is necessary to constantly monitor the resulting result using a construction triangle when applying the finishing material.
The corner acrylic bathtub is mounted either on legs or on brackets. In the latter case, part of the load is taken by the wall. Typically, such brackets come with the bathtub.
- An example of assembly and installation of a corner acrylic bathtub
After the font is installed, you need to make sure that it is accurately aligned in a horizontal plane and fits snugly against the wall. To do this, the legs are adjusted. As is the case with conventional baths, corner baths can be installed on a more rigid base made of foam blocks or bricks. Installation of such structures is carried out using the technology described above.
Installing a screen on an acrylic bathtub

- It is necessary to install mounting brackets for the panel on the bathtub if they are missing.
- To do this, you need to turn the acrylic bathtub upside down. Using self-tapping screws of the required length, screw the corners onto the embeds located along the edge of the bathtub.
- To the frame posts, on the side where the front panel will be installed, screw the panel fasteners (flags) and secure with nuts.
- Install the front panel in the corners
- In two places where the panel meets the flags, drill two Ø 8mm holes on the front side of the panel. Insert decorative plugs into them and tighten them to the flags with self-tapping screws
- Turn the bathtub back onto its legs and place it in its place of installation.
- By rotating the legs, adjust (using a horizontal building level) the position of the bathtub, taking into account the height of the decorative panel, ensuring a gap between the floor and the panel (about 5 mm).
Adviсe
At the end of the work, it is recommended to check the reliability of the finished structure, as well as whether the plumbing is installed correctly. In the first case, you can put a little effort into trying to move the font from its place, and in the second, turn on both water taps.
Sometimes during installation it becomes necessary to cut an acrylic bathtub. For example, when purchasing a product, its owner made a mistake in the size. If the room has not yet been lined, then one of the walls needs to be grooved. After this, the side of the bath is inserted into the resulting groove. This approach eliminates shortcomings and allows for further strengthening of the structure.
- Video, example of inserting and installing a mixer in an acrylic bathtub
To cut the bathtub, it is recommended to purchase in advance a repair kit for restoring plastic car bumpers. It is made of fiberglass and epoxy resin. The fabric should be placed at a distance of 1 centimeter from the future cutting site and covered with resin, waiting until it dries completely. This must be done. Otherwise, tension may appear in the place where a piece of the bathtub is cut, which will subsequently provoke the appearance of cracks throughout the entire product. The fiberglass fabric stops the cracks from further advancing.
To cut the bathtub, it is recommended to use a hacksaw or jigsaw. For the latter, you need to purchase a file designed for fine cutting of wood. In this case, the use of an angle grinder with cutting discs is strictly prohibited. Due to the high speed generated by this tool, the acrylic begins to melt.
In our instructions section, you can see original instructions from acrylic bathtub manufacturers such as Triton, 1Mark, BAS, Polla, Bellrado and others
Thanks to the chemical and physical properties of a material such as acrylic, bathtub manufacturers can create incredible shapes, sizes and bowls of bathtubs. And most importantly, each product is replete with its beauty and grace.
But there is one small drawback: the bottom of the bathtub is not strong enough to withstand a lot of weight; it can sag due to its elasticity. And so that we don’t have to risk our own funds, each store offers to purchase an additional frame complete with the bathtub.
The frame is a reinforcing structure that is mounted under the bathtub bowl, fixing the bottom and sides of the bowl, while protecting the acrylic product from bending and deformation.
In a store, a factory frame will cost at least 2,000 rubles, and adding the cost of a bathtub, the sum is not so attractive. Therefore, we would like to invite you to assemble this structure with your own hands.
Bath frame
Purpose and design features
Plumbing manufacturers recommend purchasing a frame frame with the bathtub, on which the bathtub will be mounted directly. The product is designed to optimally distribute the load throughout the bowl and completely prevent all kinds of cracks and deflections of the body.
Most retail stores offer mass-produced frames designed for specific types of bathtubs, often the ones they sell. As practice shows, universal models, unfortunately, are not available for sale.
The corresponding frame is a square metal profile, which is necessarily coated with anti-corrosion powder paint.
Frame frame
The product frame consists of the following parts:
- supports for the bowl itself, mounted in each corner of the bath;
- additional stiffeners;
- main legs adjustable in height.
It is these components that determine the strength and reliability of an acrylic bathtub. Without such a frame, operating the bathtub will be impossible and even dangerous.
Note: some consumers believe that installing the legs will be enough. However, this is not true. The legs only level the acrylic bathtub above the floor level, but do not hold its walls and bottom in any way.
Indeed, the product is made from high-strength fibers, but they tend to deform under high temperature and pressure. Neither the walls nor the bottom of the bathtub can withstand the weight of a person and the water pressure at the same time.
If you are the owner of an acrylic bathtub with a complex configuration: a bowl in the shape of an oval, circle or polyhedron, you will need a special platform frame. A regular frame will not be reliable and will not be able to simply attach the bathtub to the wall. Such models of acrylic bathtubs will be even more stable than ordinary ones, because such products have fairly wide sides, which allows them to easily lie on the platform.
Choice
When buying a frame for an acrylic bathtub, experts recommend paying special attention to the frame model that the seller recommends along with the bowl.
Bath stands
Carefully inspect the frame design: if the frame offered to you has a large number of support points, this is a sure sign of low quality of the bathtub itself. Most likely, the model is made of a thin layer of acrylic, unreliable and easily deformed.
The all-welded frame also indicates the poor quality of the sanitary ware.
If the seller offers you a kit in which the frame has only four support points, you can judge the good quality of the acrylic bathtub.
As practice shows, for your own faith and saving money, it is better to assemble and install the frame of an acrylic bathtub with your own hands.
Experts note several types of structures:
- brickwork that completely follows the shape of the bathtub; this option is quite complicated; only a builder, a master of his craft, can complete it, especially in the case of an asymmetrical bowl;
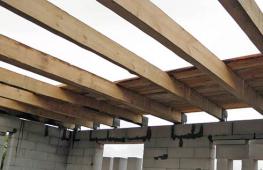
- frame made of plywood and timber: an excellent option for making it yourself; few materials are needed, only plywood with a specific marking, timber of a specific section, screws and drying oil;
- metal frame: you will need profile pipes and metal corners.
Practice shows that to make it yourself, you should choose the last two options: metal or wooden frame. These two options are best suited for working at home.
Frame for an acrylic bathtub
Making from wood
We will present you with an example of assembling a classic frame made of chipboard and timber for a standard oval bathtub.
Algorithm of actions:
- along the perimeter of the bathroom you will install boards that will become the base of the frame;
- the racks will be located on this base;
- On top of the racks you will lay another board, which will subsequently become the top of the frame;
- Cover the top of the frame with a sheet of chipboard (or any thick plywood) and cut a hole for the bathtub.
The last point of our plan has a peculiarity: for rectangular bathtubs, there is no need to cover the frame with a sheet of chipboard; the frame is simply made according to the exact shape of the top of the acrylic bathtub.
In the process of making the frame, it is very important to use waterproof plywood (FK or FSF grades) with a thickness of at least 15 mm, or waterproof chipboard sheets with a thickness of at least 25 mm.
Calculation of dimensions
First, determine the height of the racks: the size should not exceed the frame, but not be too low. Try to determine the optimal height so that both children and the elderly can use the bathroom comfortably.
Formula for calculating the height of the racks:
- install the bathtub and measure the length from the floor to the bottom edges;
- From the resulting figure, subtract the thickness of the top boards, the base of the frame, the chipboard or plywood backing, the tiles (for facing the screen) and the mortar on which the tiles will be attached.
Once all the calculations have been made, we move on to the next step.
Brick frame
Preparing the base
Please study the following steps very carefully, as they determine the design and reliability of the design.
Work progress:
- Install boards around the entire perimeter of the future frame.
- Using concrete screws, attach the boards to the floor.
- Based on your calculations, cut out the required number of racks, taking into account the section near the wall. Then securely attach them to the base.
If you are concerned about the number of racks, everything is simple here: the minimum number is four, located in all corners of the frame. Add each subsequent post only 50 cm from the previous section.
To simplify the installation of racks, you can use metal corners.
Installation of a frame for an acrylic bathtub
Now we can safely begin installing the frame with our own hands.
Sequence of steps:
- Lay boards on top of the racks and secure them with screws. If the board is installed along the wall, it also needs to be fixed.
- You need to cover the frame with a fairly thick sheet of chipboard and plywood and attach it around the entire perimeter.
- Mark for cutting the hole using a template and a long straight block. Please note that your bathtub may have included a template that can greatly simplify the task.
- Cut the hole directly with a jigsaw or a narrow hand saw.
At this stage, making your own frame for the bathtub is finished. All that remains is to install the bathtub on the frame and finish the screen.
Wooden frame for acrylic bathtub
Installing an acrylic bathtub on a frame
Bathtub installation sequence:
- To make the bottom of the bathtub reliable and stable, create a cement pad. If the screen is already covered with ceramic tiles, then after pouring the cement, you can install the bathtub. If not, follow these steps:
- lift the bathtub above the frame, taking into account the height of the future tiles and the adhesive underneath; use pieces of plywood or cutting boards of the required thickness as a bedding for the bowl;
- try to place such gaskets so that the bathtub is exactly in its place.
- Gently and carefully lower the bathtub onto the hole in the frame. For this stage, you will need an assistant to eliminate the possibility of falls and injuries.
- Once the cement has hardened, the acrylic bath can be connected to the water supply and sewerage system.
- Now you need to trim the plywood sheets with ceramic tiles. Don’t forget to designate a place for the mobile door on the side of the frame.
- Using the basic rules for working with tiles, finish the outer part of the frame.
- Be sure to seal all tile joints, cracks and gaps between the tub, tiles and floor with a sealant.
Wooden frame
Example of assembling a metal frame
If you are afraid that the timber will rot from high humidity in the bathroom, consider assembling a metal frame with your own hands.
In general, the entire process of work is similar to the manufacture of the frame described above, but with several differences:

The principle of assembling the frame for an acrylic bathtub corresponds to the previous version.