How to make a Christmas wreath at home. How to make a New Year's Christmas wreath on the door with your own hands: ideas, master class, photo
How to make a New Year's wreath with your own hands? This issue is especially relevant on the eve of the New Year holidays. After all, everyone wants to create a magical holiday atmosphere, which means it’s time to think about how to make a New Year’s decoration for the door with your own hands.
By the way, are you aware that nowadays the tradition of hanging a wreath on the door is gaining popularity in Russia? According to the teachings of Feng Shui, a wreath is hung on the door not only to please the eyes of passers-by, but also to attract good forces into the house, and scare away evil ones with a bright and beautiful decoration.
Therefore, we tell and show different options on how you can make a Christmas wreath with your own hands using examples of detailed photo instructions.
How to make a base for a wreath with your own hands
Before we begin with examples of how to make a wreath with your own hands, it is worth saying a few words about how you can make a base for it. After all, it is this that largely determines the appearance of the future wreath. Of course, the easiest option is to buy a ready-made base in a retail store or look for them on the Internet. But if you haven’t seen it for sale in retail stores, and you don’t have time to wait for it from an online store, there is only one way out: make it yourself.
What to make the base from? From anything. As a base, you can use an embroidery hoop, wire, a circle cut out of cardboard or foam plastic, a corrugated tube (for example, from an old vacuum cleaner), or thermoflex (this is pipe insulation - sold in hardware stores). If you choose thermoflex or corrugated pipe, you will need to work a little to create a circle shape, namely: simply cut off the required length and glue the edges with tape or tape. A more troublesome method: glue together cardboard toilet paper tubes.
You can also make a good base from newspapers or old paper. And in several ways. You can paste newspaper sheets or newspaper tubes over a cardboard circle or wire, or you can form a tight circle purely from newspaper sheets. In all cases, for reliability, the newspaper base should be wrapped at the end with thick paper towels, and at the end with tape or nylon tights - this way you will align/smooth the edges and give strength to this structure and the wreath as a whole.

In addition to old newspapers and magazines, any other paper will do; secure it to the cardboard circle with threads, as shown in the photo example below.

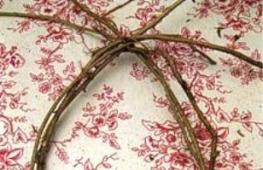
And, of course, we must not forget that you can weave a wreath from branches with your own hands (from birch or willow). It is better to use freshly cut branches for weaving. If they are not elastic enough, they need to be bent every 5 cm or soaked in water (if bending does not help). See the photo instructions below for the weaving process itself. In general, nothing complicated; if the branches slip out, secure them with glue or thread.

How to make a New Year's wreath with your own hands
Now let's talk about how to make a wreath with your own hands. In fact, we will consider different options for decorating ready-made bases.
Since New Year and Christmas are, first of all, the smell of a Christmas tree, first of all we will consider a couple of options on how to make a wreath from living spruce, fir or branches of some other coniferous plant. Where to get branches of a coniferous plant? - As a rule, Christmas tree sellers also sell twigs, or if you buy a live Christmas tree for home, when installing it you will definitely have a few extra twigs.
So let's get down to business. Everything is simple here, we cut the branches of the appropriate size (as shown in photo No. 2 - we cut them from a large branch, smaller branches) and fix them to the base with threads, wire or staples. Using glue, we glue the protruding edges to its side surfaces every once in a while. When it is all hidden under the branches, start decorating: glue small Christmas balls, snowflakes, pine cones, nuts (pre-painted white as an option, except for paints and glitter) and at the end we braid them with beads or garlands. We hang the finished Christmas wreath on the door or place it on the table, placing candles or a bottle of champagne in the center.

By the way, if you decide to make a New Year's wreath from living branches, the branch itself will be perfect as a base; of course, it will not be as lush, but no less beautiful. Follow the instructions in the photo below.

The result is a beautiful New Year's decoration, and, by the way, it will take less time to create it than in the first case.

I hope you get the idea, but otherwise, you can come up with your own way to decorate the wreath: stick to some other color scheme, use some other decorations (wide ribbons, candies, bells, cinnamon sticks, dried oranges) let your fantasies!


In addition, living twigs can be used to braid wire or embroidery hoops. Add decorations in the form of berries or beads, a bow made of a beautiful ribbon and the New Year's decoration on the door is ready.

By the way, such a thin wreath can be hung from the ceiling above the dining table. Add a string of beads to the greenery for an elegant statement piece.

Using different types of branches, cones, artificial horns, God himself ordered to make an unusual wall-mounted New Year's wreath, as shown in the photo below. Agree, it turns out to be quite a worthy New Year’s decoration.

In addition to “green” branches, you can also use “naked” ones to create a Christmas wreath; the main thing is to paint them with paint and/or cover them with artificial snow - you will get a truly magical winter decoration for the door.
Don't know how to make artificial snow? - it’s simple: mix together semolina, white paint, PVA glue and artificial snow is ready. Another way to make artificial snow: mix grated white soap and starch diluted with warm water. You need to beat with a whisk until you get a homogeneous mass. In both cases, adjust the proportions yourself.

Continuing the theme of “natural” materials, it is worth noting the beauty and elegance of New Year’s wreaths made purely from pine cones, walnuts (you can use any other nuts) or acorns.
Pay attention to the way to make a wreath of cones: rings are glued to each cone, which are then strung on wire. Using the same method, you can make a wreath of Christmas balls.


Cinnamon sticks also deserve attention, and you can glue whole sticks, or you can cut them into pieces.


And, of course, round “cuts” of branches, glued to a circle made of wood or cardboard and decorated with a small composition of ribbons, twigs and cones. I think many people will like this New Year's wreath.

And if you do not have the opportunity to use live spruce branches for one reason or another. You can use Christmas tree tinsel to make a beautiful New Year's wreath for your door with your own hands. Decorate it with ribbon and an artificial flower.

Artificial flowers are also worth paying attention to: you can make a wreath from artificial flowers. Make holes in the round base, insert the stems into them and tuck them.

You can also use a voluminous base: simply wrap the stems around it or cut off the stems and glue the flowers.

Yes, if you decide to make a New Year's wreath for your door from tinsel, you don't have to take only green, other colors are also great.

Along with tinsel, “bows” made from ribbons, which are usually used for gift wrapping, are great.

Another great idea to make a New Year's wreath: use glass Christmas tree balls, as mentioned above, you can string the balls on a wire, or you can glue them. The balls themselves can be the same color, or you can combine multi-colored balls with each other. In both cases, the finished New Year's wreath is pleasing to the eye.


In addition to glass balls, you can use “wool” balls. To create them, you need to wrap foam balls with threads or make small loose balls of wool alone.


You can make a good wreath if you wrap the base with woolen threads and glue only a few woolen balls.

Or make wool pompoms.

Or you can combine balls with paper (pages from some not very interesting book). Make small bags out of paper and cover a circle with them, and decorate the top with small balls or beads.

Or make a wreath for the door purely from tubes of some beautiful colored paper.

In addition, you can make an accordion out of paper, which can be used to braid a hoop.

Or you can make paper stars or snowflakes. In the case of stars: it is better to make them from thick paper or cardboard, glue the stars to the hoop and paint the almost finished wreath with spray paint. After the paint has dried, wrap the wreath in several layers of twine with beads glued on - and you can enjoy the result.


A New Year's wreath made of plastic snowflakes looks very beautiful; they can be additionally decorated with small mirrors and/or decorated with rhinestones and sparkles. In addition, paint it one color, or vice versa, make it multi-colored, sprinkle it with sparkles, etc. You will get an unusual Christmas wreath.


And don't forget that the wreath can be wrapped in a garland. It will make your wreath truly magical.

Or you can make a large snowflake wreath for the door from ordinary ice cream sticks.

Let's return to woolen threads, you can wrap the base for the wreath with threads, and glue flowers made of felt, beads, etc. on top.


Another great way to make your own wreath is to use old socks. In this case, we used hoops of different sizes, laid them on cardboard and cut out a circle, which was then wrapped in socks, threads and placed between the hoops. The result was a beautiful unusual New Year's wreath for the door.


In addition to socks, you can use any other fabric: burlap, organza, etc.


In addition to cuttings of different fabrics, you can use an old sweater. Spread the sweater and wrap the round base with suitable pieces (you can sew the edges with threads or glue them with glue), decorate the top with felt or felt flowers. The result will be a soft, somewhat “cozy” wreath.

In addition to different fabrics, different ribbons, twine or rope will be useful.

By the way, here is a clear example of using a corrugated tube from an old vacuum cleaner. At first glance, you won’t guess what such a wreath hides inside.

You can also make a cute wreath using cotton balls. Moreover, if you add only a burlap bow to it, as shown in the photo below, you will get a wreath in a rustic style. Or you can use brighter decorations.

You can even create a spectacular wreath from candies (if you don’t mind them).

If you have a foam base: cut out/extrude leaves on it, decorate it with a green marker or paints, without touching the extruded areas, and glue the beads. The finished wreath will please you and it won’t take you much time. By the way, even a small child can do it.

By the way, if you decide to make a wreath for the door with your own hands, you don’t have to make it round. You can use an old frame. Paint it and tie multi-colored balls on ribbons to it - you will get a bright wreath.

Or you can even build a snowman on the door.

In general, as you can see, there are many ways to make a New Year's wreath on the door with your own hands, so experiment! And you will definitely be able to make a beautiful Christmas wreath with your own hands. Happy New Year!
Before guests arrive, everyone cleans up the house and hangs decorations. And among all the garlands, candles and gifts, of course, the Christmas wreath occupies a special place. It can be hung on a door or wall, or placed in the center of the dining table.
In stores on the eve of the holidays you can see a large selection of wreaths of various designs: with ribbons, balls, candles. But to make it truly special and unique, and also cost much less, make it yourself. How to make a Christmas wreath with your own hands? Very simple! 
Here you will find 5 step-by-step master classes on making a Christmas wreath. Choose which one you like best: from balls, spruce, pine, pine cones or even mesh.
First, let's look at how to make a traditional Christmas wreath from spruce, which can then be mounted on the front or interior door.

Tools:
- straw wreath mold (optional size),
- balls (must match the size of the wreath: as the base of the wreath increases, the size of the toys also increases),
- decorations in the form of branches with red and zloty beads, a red ribbon for a bow, pine cones (large and small),
- spruce branches (thin so that they are easy to bend),
- several other branches (for example, pine),
- scissors, floral wire (preferably green),
- red and gold decorative flowers (three pieces each).

Lay everything out on the table and get to work.

TIP: You can make this form yourself from dry grass and cling film. Additionally wrapped with tape.
Step-by-step production
STEP 1: Making a base from branches


- First, make a base of pine branches. Lay them out in the same direction, e.g. counterclock-wise, let the ends of the branches be on the right, and lay the soft tops of the branches to the left side. Attach them to a straw wreath, tie around with floral wire, tie down to the base.
- Continue adding more branches around the shape.
- Look, are there any empty seats left?, fill in all the gaps with smaller branches.
- So far he looks a little disheveled and sloppy. Wrap a little more wire around to tie down any large branches that are sticking out. The wire should be hidden behind the branches. Now you have a uniform, lush wreath - the foundation for further work.
Step 2: Decorate the wreath


- Now add a few other branches (in the same direction as the pine ones), distributing them evenly throughout the wreath.
- Attach a red bow. You can do without it, then the look will be more festive.
- You can add small pine cones if there were none on the branches themselves.
- The distribution of colors should be symmetrical(so that it doesn’t turn out that all the red decorations are in one place, otherwise it will look like a red spot). Divide the wreath into 4 parts, one of them has a bow, and the other three add a branch with red beads.
In principle, it already looks good and you can leave it like that, you can finish it.
IDEA: Or hang the wreath in this form first, and after a week add decorations, this way you definitely won’t get tired of the wreath during the holidays
Step 3: Add More Decorations

- For contrast, attach several branches with gold beads.
- Attach the pine cones: wrap the floral wire around the pine cone close to its base and attach it to the wreath, securing it well in place. Make sure the wire is visible, as less as possible. You can also stop at this point, or continue adding balls.
- Attach three balls, taking into account the same conventional division of the wreath into four parts
- Add three red and three gold decorative flowers.
You did it! The result is a wonderful Christmas wreath, all that remains is to attach it to the door to delight yourself and your neighbors!
How to make an Advent Wreath

Following the workflow just described, you can also create an Advent Wreath.
According to tradition, there are four candles on it: the first one was lit 4 weeks before Christmas, each subsequent Sunday one more was lit, so it was visible how the holiday was approaching.
Now a wreath of this type can be made with for traditional reasons and for decorative purposes. In any case, it will help create a festive atmosphere.
So, let's get to work:

- We create the base of the wreath from the branches, add small pine cones, as in the previous case.
- Fasten with hot glue gun candle holders(preferably with sharp pins at the bottom to insert into the wreath between the branches, but ordinary ones will do too), insert candles into them.
- We decorate the wreath with large cones and decorative flowers (two each in red and gold).
ATTENTION! Do not leave such a wreath unattended with lit candles!
Master class No. 2: Balloon wreath
To make such a wreath, you most likely won’t even have to go to the store for materials. After all iron clothes hanger and Christmas balls Almost everyone has it. So choose a time to work and get going!
You will need:
- 1 wire hanger, red Christmas balls (the number depends on the size of the balls you have at home),
- pliers, wire cutters (optional),
- bow ribbon,
- pine or Christmas tree branches (or garland),
- wire or strong thread (preferably green).

Step by step execution:

Step 1:
- Use pliers to give the hanger a round look. Don't worry if it's not perfectly level, the balls will cover all the unevenness.
- Unscrew the hanger, that is, disconnect it at the attachment point under the hook.
Step 2: 
- Place the balls on the wire. If the end is too sharp or uneven, cut it with pliers. Once all the balls have been strung, bend the hook with pliers to secure the circle.
- There is no need to hang the balls on top near the hook, since there will be ribbon and pine branches in this place.
Step 3:
- Attach branches to the top of the wreath on both sides of the hook (tie them with wire or thread).
- Make a ribbon bow and attach it under the hook.
- All is ready! There’s even a hook right away, all you have to do is hang it!
Master class No. 3: Pine cone wreath
A Christmas wreath made of pine cones is very simple to make, but its main advantage is that it is stored for a long time and does not fall off, unlike a spruce wreath. It can be sent for storage until next New Year.

Materials:
- Dry cones from 30 or more pieces, depending on the diameter of the wreath
- The base for the wreath (if you don’t have one ready like the photo, cut out a torus from thick cardboard)
- Glue gun.
- Decor at your discretion.
Work order:
Stage 1: Laying the first circle
- Using a glue gun, we attach the cones to the inside of the Torus or circle.
- Inside is best attach smaller cones.
- The distance between the cones is 1-2 cm. They should not be attached closer. Maybe even 3-4 cm.


Stage 2:
We do the same thing, but on the outside of the circle with larger cones. Distances between them - 3-4 cm. They should lie freely - not overlap each other.

Stage 3:
- And now fill the middle row- he seems to should be on top internal and external row. You can attach the cones not vertically upward, but slightly pointing them in different directions, filling the voids.
- We decorate with sprigs of berries or live spruce.


TIP: If you add a garland on top, it will be even more spectacular!

Master class No. 4: From pine branches
“Simple and tasteful” is the most suitable phrase for this method of production. Christmas greenery and minimal decorations. but nevertheless, when you look at the door with such a wreath, it immediately becomes clear that there is a truly festive atmosphere here!


Materials:
- wreath mold made of thick wire,
- greenery (real or artificial pine branches, other conifers are also suitable),
- cones, wire (for tying branches),
- glue gun,
- small bells,
- ribbon for bow.
ATTENTION! When choosing the length of the wire form, keep in mind that after attaching the branches, the wreath will increase several times in size.
Manufacturing stages:
- Take a few pine branches and Attach them to the form using wire. First fix the ends of the branches, then wrap them around the wire several times, wrap them with wire. Wrap the entire base in this manner.
- Make another ball of twigs on top of the previous one, in the same way. You should get a uniform coniferous wreath.
- Attach some pine cones.
- Add 3-4 bells golden or silver to create a festive mood. Attach with a glue gun.
- Make a ribbon bow and attach it to the wreath.
Every time you open the door, you will hear the quiet ringing of bells and understand that the holiday is in the air around you!
Master class No. 5: Wreath made of decorative mesh
You will definitely surprise all your neighbors with this wreath! This colored hemisphere will not leave anyone indifferent; just looking at it will make you smile and have a sweet anticipation of the holiday!

Materials:
- round wire wreath base,
- decorative mesh in rolls about 50 cm wide (several colors, compatible with each other),
- fluffy decorative wire.

TIP: If you don’t have such a base for a wreath, then you can cut it out of thick cardboard with a torus thickness of -10-15 cm. Then attaching the mesh can be done using a needle and thread or a glue gun.
Manufacturing stages:
Step 1:


- Cut off approximately 25-30 cm mesh and roll it into a roll. Squeeze in the center with your fingers. To make it more convenient, you can take someone as an assistant to hold the packages.
- You will need a lot of these rolls, they don't have to be exactly the same length.
Step 2:

- Group rolls together 4 each, connecting the centers and tying them in this place with fluffy wire. Leave the ends of the wire for attachment to the base.
- Tie each such part to the base of the wreath(the remaining ends of the wire). They should be close to each other, leaving no free space.
- Continue until the entire space is filled.


Ready! It turned out very colorful and festive! If desired, you can hang a toy on the wreath so that it is in the center. But be careful not to overdo it, so that it doesn’t turn out to be “too much”, because everywhere you need to know when to stop.

Wreath ideas
Finally, I would like to point out that here are some ideas for making wreaths. And, in fact, there are a lot of them! After all, it’s worth replacing a small part, making your own amendment, and you’ll get a new unique copy! Turn on your imagination and create! Involve the whole family in this process to make the process even more interesting and enjoyable!
Merry Christmas!!!


Designer wreaths 2019
In 2019, vertical wreaths are coming into fashion; they are mounted not on the wall, but on the ceiling, like a pendant. The principle of assembling the wreath is the same as described above. BUT
- You can place candles on top of them.
- Add hanging elements
There is no limit to fantasy. The main thing is that there is somewhere to hang it on the ceiling! If your chandelier is not very good, then you can just place it under it.


Master class with step-by-step photos on making a New Year's wreath
Gaponova Natalya Mikhailovna, technology teacher at MKOU "Secondary School No. 29" in the city of Revda, Sverdlovsk regionDescription of work: The master class is intended for technology teachers, additional education teachers, children aged 13-18 and their parents who want to try themselves in working with various materials and decorate the interior of the apartment with interesting New Year's works.
Purpose: The product can be used as a gift for New Year's celebrations, as well as as decoration for the interior of an apartment, classroom, or any room.
The purpose of the teacher’s activity: Develop creative thinking, perception, accuracy. Follow safe work rules.
So, let's start creating!
Christmas wreaths are an interesting and versatile decorative element. It can be used to decorate almost any room and object, since the wreath can be either hung or simply placed on a flat surface.
We owe the appearance of the Advent wreath to the Lutheran theologian Johann Hinrich Wichern. As the story goes, he mentored several orphans in the early 19th century. The theological expert in every possible way expanded the children’s knowledge in the field of theology, and to make religious dogmas easier for them to perceive, he came up with various “visual aids.” To count the days of fasting before Christmas, he invented a wreath, or rather, it was an ordinary wheel on which candles were placed (a kind of prototype of the future Advent wreath), which served as calendar days - small candles were lit on weekdays, and large ones on weekends.

So, once upon a time the Advent wreath replaced the calendar, and after a significant amount of time, it turned into a symbolic and beautiful attribute of the New Year holidays.
The Christmas wreath began to be decorated in all sorts of ways - with fir branches, New Year's toys, ribbons, etc. And also, he changed the location - now not only tables are decorated with wreaths, but they are also hung on doors and windows. Thus, while maintaining the status of a symbol of the winter holidays, the Christmas wreath has completely lost its original purpose and meaning.
There are no restrictions in creating Christmas wreaths, and wreaths made using different techniques and from completely different materials can easily coexist within the same apartment.

To make our New Year's wreath we will need:
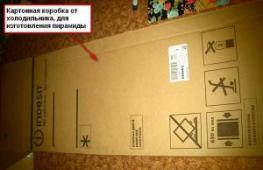
1. Thick cardboard for making a circle.

2. Old unnecessary magazines, newspapers to create the volume of the wreath.

3. Artificial spruce branches, New Year's balls of different diameters, satin ribbons, New Year's beads, fir cones, a glue gun and glue sticks for it, masking tape, green corrugated paper and various New Year's elements.

Stages of work:
1. We prepare cones. We select by size (this depends on the radius of the wreath), if the radius is large (25-30 cm), then the cones are larger, if the radius is small (18-23 cm), then the cones are smaller. We paint the cones with acrylic paint (spray can).

2. Decide on the radius of the wreath. Cut out a circle from thick cardboard, as shown in the photo above. We fold an accordion out of old magazines or newspapers and glue it tightly to the circle.

3. In this way we fill the entire circle.

4. Wrap this blank tightly with masking tape.

5. Then we wrap the workpiece with green corrugated paper.

6. Strengthen the hanger. This could be some kind of decorative loop or satin ribbon. In my case it was a satin ribbon.

7. We begin to fill the circle with spruce branches. We glue the twig so that part of the twig looks to the side, and the other part is tightly glued to the circle. Glue with a glue gun.

8. Gradually fill the outer and inner circle of the wreath.


9. Fill the circle with spruce branches so that there is room in the center for decorative elements.

10. We begin to decorate the wreath. Glue cones and New Year's balls of different diameters.

11. It is important not to overload the wreath with various elements, but this is a matter of taste...

12. I made wreaths as gifts for all my family and friends, this is what I came up with!


13. If the wreath is not made of spruce branches, then the color of the corrugated paper may not be green, but the color of your wreath, as in my case the paper was pink.
Last weekend, people who were passionate about the New Year and floristry gathered around a round table in a cozy cafe. The creator of the flower workshop Aquamarine Flowers, Alina Martynova, told and showed how to make beautiful New Year's decor: a wreath made of natural fluffy spruce, the aroma of which filled the entire room. In this article, we will not hide any important details, so it will not be difficult for you to create your own wreath at home.

What you will need and where to get it
Main ingredient - Canadian spruce. It does not crumble, but dries out: the wreath will hang calmly during the holidays, and next year it will be better to replace the branches. Canadian spruce has large and non-thorny needles, so it is pleasant to work with. In Moscow, branches can be purchased at the Riga market, where they also have a wide variety of decor with which we decorated the wreath.
Next you will need wreath base. If you like a fluffy wreath, then the appearance of the base is not important - the branches will cover it. In this case, you can buy a foam circle at a craft store or at a Crafts Fair. You can make the base yourself: cut a ring out of cardboard, and then tape crumpled newspaper or wrapping paper to it on one side to create volume.

There is another type of base - from twigs. They are sold at the same Crafts Fair (they may be in florist shops, but not for sure). This base does not need to be completely covered with branches; it is beautiful on its own.

You will need the following tools:
- thin black or green wire (less convenient options are fishing line or strong thread),
- scissors and secateurs,
- glue gun.
And of course decor. Here you are limited only by your imagination, but we used:
- cones,
- cinnamon sticks,
- coconut shell stars,
- Christmas balls,
- cotton,
- dried oranges,
- tapes.

Buy decor in multiple colors or hand paint it to make your wreath look brighter and more festive. Oranges, by the way, are not as easy to dry as they seem, so you can buy them (like pine cones, if you live far from the forest) in specialized stores.
Basic stage
Use pruning shears to cut large spruce branches into smaller “legs” - the desired size can be easily determined by attaching the branch to the base. These branches will need to be wrapped around the base using wire. Wire works best because it holds the structure together well, even if you let go of a loose branch. Due to the properties of the wire, the wreath can be additionally formed by hand after winding if the shape is not ideal.

Tie the wire to the base, then attach one or more branches (usually three is optimal to cover the front, outside and inside of the ring) and wrap. Try to guide the wire between the branches, rather than on top, so that it is less noticeable.

Add new branches, tucking their tips under the previous ones, continuing the winding. If there are gaps left, don’t worry - you can later add branches where there were not enough. If you wrap the entire wreath in a circle, move clockwise - this arrangement of branches is considered the most harmonious and positive. After finishing the winding, tie the wire into a knot on the wrong side of the wreath and cut it (if you wound it with a spool in your hand).


Take a critical look at what you've got. Using new portions of wire, add branches where there were not enough, or wrap protruding branches more tightly if they are out of order. The branches can be safely moved by hand, the structure will not be damaged: our wreath after wrapping turned out to be slightly oval, but a simple compression from the sides and displacement of a couple of branches was enough to correct the situation.

The wreath is ready, all that remains is to decorate it!
Wreath decoration
The main decoration tool is a glue gun. Plug it in and let it warm up. During this time, select decorative elements and arrange them harmoniously on the wreath. Here Alina gave some universal advice:
- There are two approaches: form groups of elements and then fill the voids between them, or evenly distribute the elements one at a time throughout the wreath.
- You can create groups from objects of the same type, the same shape or the same color - one or at most two parameters must match.
- Groups with three objects each look best.
- In groups, it is better to have connecting elements so that they come together in a composition: for example, the same object or color will be present in all groups.

- Arrangement of groups in an equilateral triangle should be avoided.
- The main thing is to try to avoid the “eye” effect - two identical or very similar objects symmetrically opposite each other. It will seem like the wreath is looking at you - we mean it. In this case, it is enough to place these elements diagonally - the effect is lost.
- Don't be afraid to place similar objects in pairs if that seems harmonious to you.
- Rely on your sense of beauty.


Gluing elements onto a wreath is very simple: squeeze a little glue onto the back of the decor, press it to the desired place on the wreath and hold it for a while. The main thing is not to try to glue it into the air between the branches - we tested it, it doesn’t work. Try to recess the decor a little into the branches: this way it looks like part of the wreath, rather than lying on top, and it sticks better.

The last step is to decorate the wreath with ribbon, if desired. You can tie a bow directly on the wreath, or you can make it separately and stick it on top like the rest of the decor. The ribbon can be a fastener for hanging a wreath on the wall, or it can be a purely decorative detail. Then you need to make a wire loop on the back of the wreath.

The last thing left is a test of strength. Lift the wreath and shake it - if nothing falls off, then you did a great job with the glue gun, and the product will not be damaged even if you slam the door on which the wreath hangs. If it falls off, repeat gluing.
By the way! The wreath can not only be hung on a wall or door, but also placed on a table or chest of drawers, placing a composition of candles or a vase of tangerines in the middle.

Happy New Year to you!
,
However, I found a very detailed master class on the net..
1. The first thing we do is take the base, which we need to make voluminous. Cut out a stencil - a ring - from cardboard. To make our wreath look harmonious, let's remember the rule of the golden ratio - to calculate the outer diameter of a cardboard ring, you need to multiply the size of the inner diameter by 1.6.


Take twine or wire (floral) and scissors. We create a frame from a stencil and paper. Squeeze the paper tightly. We cut off the excess. With a second layer of twine we level and further compact the frame. You should try to pull the paper in one direction. We smooth out the imperfections with our hands. We get something like a donut.


3. The next step can be taken in several ways. With special staples, a hot glue gun or twine (thick, green). We will need 2 good branches of nobles (spruce variety). This variety is good because a wreath made from such a spruce will stand until spring without crumbling.

4. So, we take the spruce branches and start working with pruning shears. Place the cut branch on the inner surface of the frame and secure it with staples, twine or glue.


We must make sure that the spruce is well fixed. The thickness must be placed in different places so that it is natural. Cover all visible gaps to create a sense of continuity and uniformity. If there are any holes in the wreath, you can glue the flaws directly onto the gun.


5. The next step is decoration. We chose red and white colors. White always goes well with red. To decorate our Christmas wreath we will use: gift filler (to imitate ilix branches), Christmas balls, snowflakes from a Christmas tree garland, nuts, cones and New Year's ribbons.
First, we take ordinary Christmas tree balls and break off all the excess. We place them on the wreath first of all as the largest elements of the composition. Next, we separate the details we like from the garland - stars or snowflakes - and attach them.


6. We will make ylix twigs with our own hands using gift filler and thin sticks. We coat the stick with glue and lower it into the filler, carefully adjusting it if necessary. We attach the finished ilix branches to the wreath.


7. Paint the walnuts and hazelnuts with white water-based matte paint. We use a rough brush, deliberately not painting some areas, in order to achieve the effect of fallen frost. The paint dries very quickly and has virtually no odor. It is better to paint hazelnut twice.


The next thing we'll take is rosehip. Like hazelnuts, it is better to make clusters out of them. We wait for the glue to dry and begin decorating. We try to attach it naturally to create the impression that the berries are growing from spruce branches. For such decoration, anything will suit us: ordinary pine cones or alder, everything that grows in the forest - birch catkins, cones, pieces of bark, seed pods.


8. The final stage remains. We take a beautiful New Year's ribbon and finish decorating our wreath. You can also make the ribbon yourself. The final touch is to choose a whitewashed candle, the whiter the better. Place a candle in the middle of the wreath and decorate the Christmas table.