Chinese garland: diagram, repair. How to make a powerful New Year's garland with Chinese brains How to check the light bulb from a garland
Greetings to everyone. Today I offer a review of the New Year's garland that I I do not recommend buying. This garland has been on sale for quite a long time and there have been enough reviews about it. Including very laudatory ones. Details below.
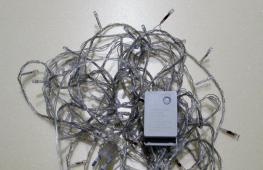
The garland was bought a year ago, as you guessed it, for use on the Christmas tree. I don’t remember which seller, but I indicated it in the header for reference. Confidently worked the New Year holidays and was put away for storage in the nightstand. Today I continue to make repairs (probably I won’t have time for the New Year =() I came across this garland and decided to check its operation before future holidays. A visual inspection revealed unhealthy darkening of the and insulators of some LEDs. In addition, one channel did not work. I thought - throw it away... but First to see what it was. I found a break in the garland of one channel and repaired it. It was on this defective area that I took a series of pictures. Turned it on - everything works, but there is a problem The tori that are located in the LED insulators are mostly blackened, in some places more and in others less. For several minutes I observed the garland and came to the conclusion that the greatest heating of the resistors occurs in red LEDs. Blue ones, on the contrary, are quite warm. I remembered that which LEDs consume different current, depending on the color of the glow, and the current-limiting resistors are installed the same. galvanic isolation from the network and a fuse. The latter is in order and is found everywhere.
The garland, like all cheap items, was delivered in a package with air bubbles. Inside there was already a garland in its original packaging. Some come in a cardboard box, apparently I got the economy version. Unfortunately, the photo was not saved.
The length of the garland is stated to be 10 meters, the number of LEDs is 100 pieces.
Moreover, of these 10 meters, 60 cm is allocated to the power cord: 
LEDs are used in four colors: red, green, yellow and blue. Moreover, green and blue are located on the same branch. The garland has 8 operating modes. All modes are partially interchangeable: they blink one by one, then all at once, then they light up smoothly and go out just as smoothly. The worst mode is when all the LEDs are on continuously.
Controller:
One single button - you can cyclically switch the operating options indicated on the front surface: 
EK-04 controller type. There are many beautiful icons that, apart from their presence, give nothing more: 
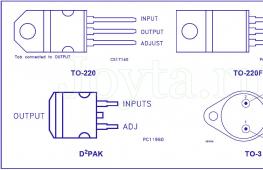
Input output, on the left there are two wires for 220 V power supply and 4 wires for channels. There is a free place: 
There should probably be another, fourth channel, but they saved: 
That’s right, there are only three thyristors, but if you wish, you can add one more: 
By the way, thyristors are 400 Volt and 0.5 Ampere. 
Garland scheme with full four channels.
Please note that the brightness adjustment is phase-based. And there is no smoothing capacitor at all - pulsation is 100% You won’t be able to look at the Christmas tree for a long time, even though the brightness is low: 
The plug promises to withstand up to 2.5 Amperes. It is difficult to fit into sockets with curtains. Strives to bend over. 
The insulation is, of course, better than that of the crossover wire, 220 Volt seems to hold, but doubts remain: 
What LEDs with insulators originally looked like: 
The same, but with a resistor. The hard insulator resembles the material of a ballpoint pen: 
Defect found and remedy:
Break. While I was turning the skewer in my hands and the other end broke off. 
Strong heating of the resistor until the coating becomes charred. The strands on the wires are thin, they do not hold the load, they tear, and oxidize. 


Using heat shrink, whatever you can get your hands on. White looks better, and even better, of course, transparent. But with the renovation you won’t understand what’s where =( 
The controller was also modified - the fuse was installed at 0.2 A.
On sale there are options with different plugs: EU and USA, which brings to mind the idea of different supply voltages. That is They will send you your choice, but it is unknown what the current-limiting resistors will be. Maybe everything is the same, only the fork changes.
A short video describing the shortcomings of the garland and demonstrating how it works:
Conclusions:
Short power cord.
There are a lot of beautiful icons on the case, which are essentially deceiving the consumer.
In the constant burning mode, overheating and damage to part of the garland occurs.
Soldering is performed using either active flux or acid.
Thin wires (cores).
LED ripple 100%
The quantity is actually 100 pieces and the total length is 10 meters. But blue and green LEDs are on the same branch. It would be better if they made a 4th channel.
One of the advantages for homemade ones is that you can strengthen the outputs and make a much more powerful garland.
Conclusions were drawn based solely on the use of a personal garland.
I don't recommend taking it.
Bcex c safe upcoming!
Among the many lighting devices used to decorate New Year trees, the Chinese garland design occupies a special place. It, like all similar Chinese products, is simple and cheap. There is a lot of controversy about the reliability of such garlands, however, most consumers use them.
Diagram of a classical Chinese garland
This design is equipped with smooth brightness control. For this, phase control is used to regulate the opening angle of the thyristors. Automation uses as many as eight programs that provide a wide variety of control algorithms. Due to its qualities, the device is very cheap, which is why it sells in millions of copies.
The controller is based on a small board with space provided. A microcontroller with four outputs is also located here. It is a small piece of genitax, where a microchip is attached using epoxy resin. Through the outputs of the microcontroller, using current-limiting resistors, four thyristors are controlled. This device is designed for anode voltage up to 600 volts and a current in the range of 0.6-0.8 amperes. In some designs of cheap garlands, instead of the input diode bridge, one diode remains. At the same time, the electrodes that control the thyristors are connected directly to the microcontroller outputs, without limiting the current.

As a rule, the power of the microcontroller is very small, therefore, it is not able to control the operation of powerful triacs. In order to solve this problem, it is necessary to use a separate low-power power source that is galvanically isolated from the general network. For these purposes, you can use a low-power adapter, for example, one that powers a television antenna amplifier that contains a stabilizer in its circuit.
Other ways to solve problems
To combine a low-power microcontroller with powerful triacs, it is practiced to use transistor switches, where transistors with a high current gain are used. Thus, the Chinese garland circuit does not overload the microcontroller outputs. To ensure galvanic isolation, special microcircuits are used, the input of which contains an LED, and the output has a low-power triac.
In order for the Chinese garland to work normally, it must be synchronized with the network using a signal. For this purpose, a phase with a nominal value of 220 volts is supplied to the input of the microcontroller through an installed resistor. The neutral wire of the network is connected to the common wire of the entire device.
Replacing the Chinese garland control unit
How to repair a New Year's garland
New Years is soon! Christmas trees, toys, all kinds of lights... lift your spirits. But how “pleasant” is the situation when we take a brilliant invention of mankind - an electric New Year's tree garland, plug it into the network, but it does not work in whole or in part. What to do?
The easiest way to solve the problem is to go buy a new garland! But if you don’t want to spend money, believe in your strength and patience, then you can try to become a “reanimator” of the New Year’s beauty.
Let's start by remembering: the simplest garland consists of a certain number of light bulbs connected in series
With this connection, the operating voltage of the consumers is summed up. And we can, for example, connect 55 light bulbs, designed for a voltage of 6 V each, into a network with a voltage of 220 V. But if at least one of them burns out, the entire circuit opens.
How to find a problem spot in a garland?
Here you can act methodically and consistently. Then in the worst case, in the example considered, you will have to check 54 light bulbs. This is a lengthy process, especially in the case of checking non-removable garlands (the modern Chinese version is “disposable”).
Another method will be more effective and efficient. The garland is divided into two parts and the faulty one is determined. The smaller part with a break is divided into two more parts, from which the faulty one is determined, and so on until a break is found. This method will be optimal, since it involves a minimum number of measurements.
Some practical tips when repairing a garland.
When determining a break in non-separable garlands, you can use a tester with probes to which ordinary sewing needles are attached. Without removing the insulation from the wire, you pierce it with a needle and get to the “core” of the conductor.
In the case of repairing a garland with an electronic control unit, you should pay attention to the fact that it consists of several (usually from 1 to 4) sections connected to its own control channel.
If none of the sections of the garland works, then first of all, you should check the power cord to the control unit, and then the common wire for all “branches” of the garland. The control unit itself may fail. In this case, it is better to buy a new garland.
If you find a burnt-out light bulb in a non-separable garland, then you can replace it like this: short-circuit the wires near its contacts. That is, “short-circuit” it. The electric current will bypass the light bulb, and the garland will be saved.
ATTENTION! You should not abuse it this way. This method can be used 1 – 2 times in one branch of a garland consisting of at least 50 light bulbs. Otherwise, each of the remaining working lamps will experience a voltage overload, which will significantly reduce the operating time of the garland.
Go for it! And it’s better to drink a new high-quality one New Year's garland! We need to start the New Year with new things!
Tags and key phrases
Garland Ek-04 scheme, mini controller EK-04 , EK-04 , repair of garland EK-04, ek-04 mini controller repair, connection of controller ek-04, EK 04 wiring diagram, ek-04 repair, mini controller circuit diagrams ek-04, PROGRAMS mini controller ek-04 datasheetShare this information on social networks to popularize the portal:
/ BuyInCoins Coupons
Price: $5.58
Search for products in other stores in China
The garland came in such a simple package with the name “Happy Diwali”:
What else is Diwali and what does Santa Claus have to do with it?
Although there is a proud MADE IN CHINA on the packaging, it is possible that the development could not have been done without Indian developers. Wikipedia tells us that Diwali is a major Indian and Hindu festival. Diwali is celebrated as the “Festival of Lights” and symbolizes the victory of good over evil and candles and lanterns are lit everywhere to mark this victory. The main theme of the festival decorations is glowing lanterns, lights, fireworks and lit candles.
The mode switching unit is a small, lightweight white plastic box with a single button. The block lists the available modes:
- Combination
- In Waves
- Sequential
- Slo-Glo
- Chasing/Flash
- Slow Fade
- Twinkle/Flash
- Steady On
Control block: 
An autopsy showed that the block inside is not empty: 
No strong otherworldly odors were noticed, just the usual faint smell of plastic (if you sniff specifically). There are also no smells during operation.
The garland has a Euro plug, very flexible wires in a translucent colorless braid. The inscription on the plug is 2.5A 250V (the store states the power is 6 W). The plug ends are not rounded, making it difficult to use in childproof outlets. 100 LEDs stated (did not count). The distance between the LEDs is approximately 8-10 cm. The approximately measured length of the garland turned out to be about 9.7 m (including the wire going to the block). The wires could perhaps have been made thicker, but no problems arose during operation.
The lighting is quite bright, the video may have a very frequent flickering effect, but this is mostly due to the rapid change of modes when shooting, and in general most of the modes use fairly smooth color changes in the effects.
Photo of the garland in working mode: 

This is how it works in real life:
It’s worth noting right away that LEDs in a pile don’t look as nice as if the strip were hung, for example, on a Christmas tree. She worked successfully last season for about a month, several hours a day (she’s also working now). Definitely worth the money.
EK-004A
Radio designer "Your radio" No. 4A. Controlled by Arduino
5237 rub.
FM radio receiver controlled by Arduino Nano - for the most advanced and purposeful. Arduino combines play and learning, allowing you to create something worthwhile and interesting. This platform empowers the creative person in the field of electronics, even if he knows nothing about it! With the help of Arduino, any humanist can become familiar with the basics of electronics and programming. The programming language for Arduino devices is based on C/C++. It is easy to learn, and at the moment, Arduino is perhaps the most convenient way to program devices on microcontrollers.
Specifications of EK-004A| Parameter | Meaning |
| Upit. constant, V | +4,5 ... 5,5 |
| Upit. nom. constant, V | +5 |
| Recommended power supply not included |
USB port PC with miniUSB cable, USB adapter with miniUSB cable, TGR-025, PW0530B ES18E05-P1J, GS15E-1P1J |
| Radio module type | MP1090S |
| Tuning range, MHz | 76…108 |
| Sensitivity, µV | 1,7 |
| Stereo channel separation is no worse, dB | 25 |
| Stations in memory | 3 |
| Microcontroller type | Arduino_Nano_V_3_0 |
| Output power, W | 2 x 1.5 |
| Speaker system power, W | 2 x 0.5 |
| Suitable for | MP1090 FM radio 65...108 MHz, MP1095 Real Time Clock (RTC), MP1094 IR remote control with receiver |
| Overall dimensions of the speaker system, mm | 80 x 80 x 80 |
| Overall dimensions, LxWxH, mm | 160 x 210 x 50 |
| Operating temperature, °C | 0...+55 |
| Relative operating humidity, % | ...55 |
| Production | Contract manufacturing in Russia |
| Warranty period | 12 months |
| Weight, g |
The “coloring” construction set allows you to show both technical and creative abilities, as a teenager can create his own design of a radio receiver. FM radio is assembled from ready-made modules, each of which represents a complete device. Requires soldering of 2 points (jumper). The Arduino Nano module is programmed with code that allows, after assembling all the modules into a single structure, to obtain a stereo radio receiver.
Structural diagram of EK-004A EK-004A controls lighting LEDs
Frequently asked questions about EK-004A
EK-004A controls lighting LEDs
Frequently asked questions about EK-004A
I connected the EK-004A according to the instructions, but it does not work. In this case, only one white indicator blinks next to the constantly lit blue light on the microcontroller. What else is he missing?
- Please connect the Arduino module to the USB port of your PC.
- Go to Start --- Settings --- Control Panel --- System --- Hardware --- Device Manager --- Ports (COM and LPT).
- Make sure that the Arduino module is detected by the PC OS.
- Does your OS see the Arduino module? If yes, everything is in order, let's continue. If not, install the driver for the Arduino module. Read more about this http://arduino.ru/Guide/Windows
- Judging by the description, the Arduino module is clean, i.e. It does not have a radio receiver flashed into it. In this case, please follow these steps:
- Download the programming environment IDE Arduino 1.0.5 Windows Installer, Windows (ZIP file) from the page http://arduino.cc/en/Main/Software (also in Russian http://arduino.ru/Arduino_environment).
- Install Arduino IDE 1.0.5 on your PC.
- Download the Arduino library archives, for example, to your PC desktop from here:
http://masterkit.ru/zip/MP1090S.zip
http://masterkit.ru/zip/MP1091.zip
http://masterkit.ru/zip/MP1092.zip
http://masterkit.ru/zip/DS1307RTC.ZIP
http://masterkit.ru/zip/Time.ZIP
http://masterkit.ru/zip/PinChangeInt.ZIP
- Unpack the Arduino library archives into the arduino-1.0.5\libraries folder.
- Make sure that the relevant files are in the appropriate folder, i.e., for example, the files MP1091.h and MP1091.cpp should be located in the MP1091 folder, etc.
- Download the radio receiver sketch archive from the page http://www.masterkit.ru/main/set.php?code_id=1183334
- Unpack the sketch anywhere on your PC.
- Open the sketch by double-clicking the left mouse button on it.
- Click the button with a check mark (on the left) “Check”, after which the message “Compilation completed” appears.
- Connect the Arduino module to the USB port of the PC.
- Press the arrow button (next to) “Load”, after which the sketch is loaded into Arduino.
- Install the programmed Arduino with EK-004A and connect the power.
Getting started with Arduino is described in detail at http://arduino.ru/Guide/Windows
A description of Arduino programming is available at http://arduino.ru/Reference
Ready-made examples are available at http://arduino.cc/en/Tutorial/HomePage
A description of the Arduino programming language commands is available at http://arduino.cc/en/Reference/HomePage
Ready-made Arduino libraries for use can be found at http://www.henningkarlsen.com/electronics/library.php?id=34