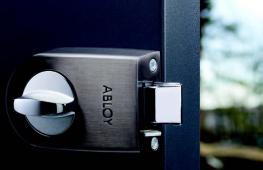
Installing a lock into an interior door: step-by-step instructions. How to install a padlock on a wooden door How to install a padlock on an interior door
Every person tries to protect their home or apartment in every possible way. One of these methods is a reliable entrance door with an equally reliable lock that protects your home from unwanted entry. Very often they are installed on interior doors in order to provide a cozy atmosphere and the like.
Installing a durable locking mechanism is a rather labor-intensive and responsible process. There is no need to rush here; all actions should be as accurate as possible. Every detail and every little detail during installation is of great importance. However, if everything is done with maximum precision, very scrupulously and carefully, then even the most ordinary person who does not have any special knowledge or skills in this area can handle the installation.
Locks may differ in size, in the principle of operation of the mechanism as a whole, in the installation method, and in the level of reliability that they provide. The last parameter is the most important. It is influenced by various factors. But first, let's figure out what types and types of doors exist. This will help you make the right choice.
Differences in reliability level
In the selection process, each person is primarily interested in the level of reliability of the mechanism, the presence of various protective functions, and the like. It must be said that ideal devices in this regard simply do not exist. Manufacturers can be sophisticated in a variety of ways, but there will always be someone who can get inside the keys. That is why all models that are currently being produced can be divided into four reliability categories. More precisely, we are talking about how long it may take a burglar to open the door without keys, that is, to break into it.
The third category has a higher level of reliability. To open such devices without keys, an attacker will need more than ten minutes. This time, as a rule, is enough for law enforcement officers to respond to a call. If, of course, the room is equipped with an alarm system.
As for the fourth category, it is considered the most reliable. To open a model from this category, even a person with very extensive experience will have to spend more than thirty minutes. These locks are suitable for installation on the front door.
Differences in installation method
If we talk about installation methods, then all locks are divided into three categories:
- Mortise type.
- Overhead type.
- Mounted type.
We will now look at each of these types according to their level of reliability.
Mounted models
They are quite easy to hack, regardless of their complexity. Just one movement with a pry bar is enough to either break the mechanism or completely rip off its hinges. Installing such a model on the front door is a very bad idea. They are most suitable for locking sheds and other premises of a similar nature, where there are no valuables.
Overhead models
Such devices cannot be called too reliable either. As a rule, they are chosen only because there is no need to violate the integrity of the beautiful door leaf. As you understand, if the latter is weakened, then such a door can no longer be called too reliable. It can be knocked out with just a strong blow. Another disadvantage of overhead models is that they spoil all the beauty. But this nuance is paid the least attention, since such models are considered the most reliable. But we note that such devices are not installed on metal products.

Mortise models
They are installed both on metal entrance doors and on interior doors of any kind. Such locks have one significant advantage, which is their hidden installation. In the case of interior doors, this characteristic gives the door more aesthetics. If we talk about entrance doors, then hidden installation serves as an additional barrier for a burglar. Therefore, we can say with confidence that mortise models have the highest level of reliability. Especially if they are installed on a metal sheet.
Of course, when comparing mortise-type and overlay-type mechanisms, their level of reliability is approximately the same. The main role in this case is played by the material from which the canvas is made. On metal doors, using both models will give approximately the same result. Therefore, everything here depends solely on what you choose. This trick will not work with wooden canvases.

About locking mechanisms
In addition to everything that was written above, products are also classified according to the method of locking. Not only reliability, but also ease of subsequent operation also depends on it. There are several locking mechanisms.
1) Crossbar devices. Such products are distinguished by the fact that they are opened not by turning the key, but by its linear movement. To do this, the key must be long enough and have special oblique slots. The main disadvantage is that a person will have to carry a rather large key with him.
2) Electronic models. Previously, they were installed only in cars. But times are changing. Now similar mechanisms are installed on ordinary doors. Control is done by typing the desired combination of letters and numbers. For this, a special panel or simply a magnetic key can be used. Many professionals tend to consider such a device the most reliable. However, one detail needs to be clarified. The lock must remain closed even if the power is completely cut off. Another nuance concerns electronics. An experienced professional is quite capable of deceiving her.
3) Code. The main and only advantage of this model lies in the fact that you do not need a key in the material sense. Essentially, the key is a code number that you should always keep in your mind. However, nothing lasts forever. The older the mechanism, the more its buttons wear out and become stuck, which makes the job easier for burglars. After all, this will help them easily determine which buttons and in what order are used most often.
4) Level models. They are considered classics of the genre. They are created on the basis of a set of special code plates and a rather massive core. It is almost impossible to physically damage such a mechanism. But it is quite possible to open it with a master key. The more slots the key has, the more levers will be used in the mechanism. This makes the job of burglars much more difficult.
5) Cylinder products. They are the most common. The high demand is due to several factors.
A) it is very difficult to find a master key for such a device.
B) the keys are compact.
Of course, there are also models called screw ones. However, they are usually installed in sheds, garages and basements. Please note that a high quality lock must have a certificate. It must specify the level of reliability, the material used in manufacturing, as well as other nuances.
Installation process
As we wrote above, the installation process requires maximum precision and attention, and cannot be rushed. Attention is paid to every little thing and detail. However, if you follow everything with utmost precision. Then each person can install the locking product independently.

Where to begin
The first step is to choose the appropriate type of lock, which is not always easy. Many devices, both domestically produced and imported, are sold in specialized markets. All of them differ in their quality characteristics and cost. Which model to choose depends on these parameters. However, in this case you should not save, as this may not always be justified. It is best to spend money once and purchase a reliable device at a high price that will serve you for many years.
Preparing tools
To ensure that the installation of the lock takes the minimum amount of time, you must prepare all the necessary tools in advance. This work does not require the use of any special devices. As a rule, everything you need is available in every home.
- Hammer.
- Electric drill and drill bit set.
- Chisel and chisel.
- Ruler, tape measure.
- Pencil, square.
How to install a mortise lock
First, let's look at how to install a mortise device in a door. Such mechanisms got their name due to the fact that they are completely hidden in the door leaf.
Preparation
Before you begin the installation process, the door leaf must be securely fixed. The entire structure should not wobble or move. This will allow you to more accurately mark and carry out the necessary installation steps as accurately and efficiently as possible.
Cutting a groove for the lock body
The first stage is cutting out the plane where the mechanism itself will be placed. Before this, it is necessary to attach the back surface of the lock to the end part of the blade. It is she who will go deeper into the door. Then you need to outline it with a pencil. After this, you can begin sampling the nest. In the beginning, a drill is used for this. With its help, channels are drilled within the markings. In this case, it is advisable to use drills that do not exceed the thickness of the lock itself.
Next, the internal surfaces of the socket are leveled using a chisel and chisel. At this stage, it is extremely important to pay attention to how smoothly the device is inserted. Distortions, even very minor ones, should not be allowed. Note that you need to drill out the socket gradually.
When the sampling process is completed, the lock is fitted to the socket to the groove. If the lock fits in easily, then you can start cutting out a niche for its bottom plate. The device is applied to the desired location on the edge of the door and outlined with a pencil. Next, you need to use a chisel and chisel to select a recess in the wood so that the outer plank is hidden flush with the end of the door.
Cutting a hole
At this stage, the locking structure is installed. To do this, the lock is applied to the door to adjust the thickness taking into account the outer strip. Next, you need to mark the places for drilling, which is done with a very thin drill. After this, the finished channels are finished with a chisel. If the lock has a handle and an additional latch, then for them you also need to drill channels in which the rod will be placed connecting the handle, screws and latch switch. No mistakes should be made. Otherwise, they will immediately become noticeable the first time you use them. After this, the lock must be placed in the hole and secured with screws or self-tapping screws.
Installation of the response mechanism
Installing the response mechanism is the final stage. Grooves for bolt locks are being installed. The latch, if any, is also mounted. In addition, it is necessary to carry out accurate and neat orientation markings. For this, it is best to use regular chalk. After this, you need to close the door and turn the key. Those areas that are smeared will leave a noticeable mark on the door frame. It will mark the place where you need to cut out the nesting hole. This is done in the same way as described above. Note that the nest itself should have small reserves in size. This will ensure easy movement of the mechanism during operation. Now you can fix the metal striker plate with screws or self-tapping screws.
It's time to check the operation of the lock by closing and opening it several times. Only after everything works smoothly, without jerks, can the work be considered completed successfully.
Installation of the invoice model
Overhead devices are much easier to install. They are installed by simply applying them to the door. The tools used are the same as for the mortise model. First the marking is done. The space for the lock cylinder is designated separately. After this, channels are drilled with a thin drill, which are finalized using a chisel and chisel. You can also use crowns to specially select some holes that have a large diameter.
When the hole is ready, the mechanism is installed and fixed with self-tapping screws or screws of suitable length. Then you need to check the functionality of the device by opening and closing. The key should turn smoothly and easily. A metal striker plate is then placed on the door frame body. To do this, you need to close the door and close the lock so that the locking bolt moves out. He will leave a mark where you need to make a recess in the tree. It is in this place that the locking plate will subsequently be installed. It is fixed with screws or self-tapping screws.
At the final stage, a thorough check is carried out to see how accurately, smoothly and easily all the parts work. If there are no defects, we can assume that the work has been done with high quality.
Video. Installing a lock on an interior door
Video. Do-it-yourself door lock mortise
Requires a minimum set of tools:
- Drill
- Chisel 19 mm
- Crown diameter 50 mm
- Spade drill 23mm wide
- Drill bit for wood or metal 4 mm
- Hammer
- crosshead screwdriver
- And a pencil
So, let's start cutting into the lock.


Drill a hole in the center with a 4mm drill bit.

We place the lock flush with the door and make a mark according to the fact

We drill through the hole with the same drill, maintaining a right angle.

Using a 50 mm crown we make a cut on one side of the door.
Attention!
Your specific case may require a different size crown.

Let's finish on the other side.


We take a self-tapping screw of a suitable length, close the door along the door frame and through the 50 mm hole, insert the self-tapping screw into the remaining 4 mm hole and, using pressure, make a mark in the door frame.


Using a 23mm feather drill, we cut a hole at the mark to a depth sufficient for the lock latch to engage.

Using the same drill, we drill a hole for the lock along the mark.

We insert the lock and make a mark with a sharp pencil to recess it into the door leaf.


Using a chisel, we make notches strictly according to the marks and make a selection so that the lock sits in the pocket, then we fasten it with self-tapping screws.

We begin to assemble the lock, insert the outer part into the grooves (as a rule, it does not require disassembly).


Then carefully remove the decorative “cup” sitting in the grooves, then press the latch and remove the handle.


We connect the two sides with screws.

We insert the handle so that the latch operates.

Snap the decorative “cup” into place.


We attach the striker, make a mark, use a chisel to remove the excess and screw it on.

Done!))) A correctly embedded lock closes freely by pressing the door leaf until it slams.
Video explanation for installing the lock
Instructions for installing a door lock (knob)
1.Marking the door

Apply markings on the door leaf to install the knob (lock) according to the template. Recommended distance from the floor is 965 mm.
2.Marking holes

After you have made the markings, drill two holes: 50 mm in diameter for the knob (lock) handle and 23 mm in diameter for the latch mechanism.
H. Installing the strike plate

Install the strike plate at the same height as the latch so that the additional tongue of the latch remains recessed into the body of the latch when closing, which is an obstacle when pressing.
4 Disassembling the knob (lock)
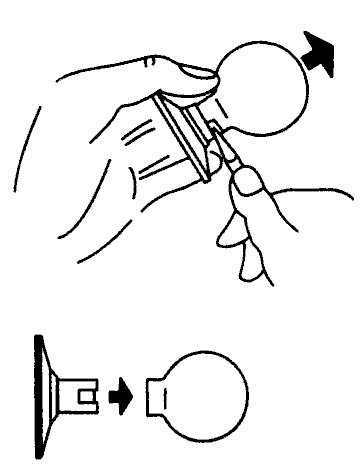
To disassemble the knob (lock), use a special key to press the spring-loaded latch at the place where the handle is attached and remove it.
5. Latch length adjustment

6. Installing the latch

Install the latch into the groove of the door (make sure that the bevel of the latch is directed towards closing the door). Install the cover plate with the rod so that the rod and coupling sleeves fit exactly into the grooves on the latch body.
7. Installing the knob trim(castle)

First, slide the inner jujube cover plate onto the rod and secure it with screws (or screws). Then screw on the outer part of the trim.
8. Handle installation

Install the handle so that the groove on the rod coincides with the groove on the knob handle, press the handle until it “clicks.”
9. Rearranging the mechanism in the halyard handle

For models of latches with a halyard handle (versions 01 and 03), installation is also provided for both left and right doors. To do this, it is necessary to remove the cylinder mechanism and the fixing mechanism from the handle body and swap them (according to the figure), in accordance with the side of the door opening.
Installation procedure.
1. Determine the installation location of the knob and apply markings, following the template and installation instructions.

2. Using the installed latch body, mark the installation location of the strike plate on the door jamb and select a groove for the strike plate.
3.Install the strike plate and secure it with screws.
4. Alternately check the operation of the knob from outside and inside the room.
5. For models of latches with a halyard handle (versions 01.03), installation on left and right doors is also provided. To do this, it is necessary to swap the locking mechanism and the cylinder mechanism from the handle body.

As you can see, fitting a lock into a door is not such a difficult task, the main thing is not to rush.
—————————————-
Photographer: Vladislav Mazitov
After purchasing and installing interior doors, the question of installing fittings arises. This problem can be solved by calling a specialist or studying the technology of cutting in a locking device and performing the procedure on their own.
Experts recommend purchasing and installing interior doors with a built-in lock. In this case, there is no need to install it. But they cost much more. In order to minimize financial resources, some craftsmen try to attach locks themselves.
These instructions will help you install a lock on an interior door. Beginners who have not yet encountered such a process will be able to understand all the nuances and perform the procedure for installing the mechanism with their own hands.
Before choosing a castle, you need to familiarize yourself with its types. When purchasing a mechanism, special attention is paid to color and design. The fittings should be in harmony with the interior and match the furniture.
Some craftsmen choose a ready-made door handle with a lock, others choose a lock without a handle and then install it on the inside and outside.
Mortise locking mechanisms are divided into the following types:
- with latch;
- with lock;
- with key;
- electromagnetic.
Before purchasing, the accessories are carefully inspected and examined for defects.
Preparatory stage
After the door handles and locks have been selected, before installation they study their features, the procedure for carrying out the work, prepare the necessary tools for embedding the lock, and make markings.
At the preparatory stage, the following points are taken into account:
- Experts recommend not cutting a locking device into a pre-installed interior door. First, the lock is inserted, then the canvas is installed in the box.
- The thickness of the vertical beam of the canvas must correspond to the width of the locking device and be at least 40 mm.
- The handle is placed at a convenient height.
- The fittings are most often installed at a distance of 1 m from the floor.
How to properly embed a lock is described in the lock installation instructions, which are included with the hardware.

Tools and materials
Door handles with a locking device can be assembled and installed in the door yourself using the following set of tools:
- tape measure or measuring tape;
- pencil or chalk;
- ruler;
- carpenter's square;
- flat and Phillips screwdriver or screwdriver;
- electric drill;
- wood drills or crown;
- chisel;
- hammer;
- file;
- cutter;
- screws and fasteners;
- carpenter's knife, awl.

Marking
Do-it-yourself insertion of an interior door lock must be carried out in accordance with the installation norms and rules. At the preparatory stage, the canvas is always marked, which consists of the following:
- The markings are made with a pencil or chalk, applying a locking device to the door.
- Measure 1 m from the floor and place a horizontal mark.
- Draw a vertical line. The intersection point is the center of the lock installation.
- At the end of the door, mark a place for the hole for the latch, and on the surface of the door - for the handle.
- Place the mechanism body against the lines and mark the bottom edge.
- Spread the strips to the thickness of the locking device, measure 5 cm using a tape measure, draw 2 parallel lines perpendicular to 2 horizontal ones.
- The locking mechanism must be placed in the center of the leaf on its end side. Find and mark this point. Using the tip of an awl, the hole at the end of the door is slightly deepened for further installation of the self-tapping screw.
- The distance from the central recess to the latch strike plate is measured on the device. Using a square, measurements are transferred to the surface of the canvas on both sides. Mark the location of the latch.
- To mark the location of the handle, using a drill bit, make a hole for the fixture. To do this, select a circle of the required diameter and deepen it slightly in the center of the marking.
The installation of the locking mechanism depends on the accuracy of the markings.
How to install locks on interior doors
Installing a lock on an interior door is as follows:
- Take a drill and install a feather drill. Its diameter should correspond to the thickness of the locking device, the depth of the drilled hole should correspond to its length.
- Using a feather drill, we drill, focusing on the line at the end of the door, a hole for the lock.
- We mark the parameters of the base plate and select a flat area.
- Use a feather drill to make a hole for the handle. Drilling is done carefully. It is carried out so that it does not drill through the wooden panel. Then work continues on the other side. Drilling through the door leaf completely could damage the door.
- Now you need to insert the device into the prepared place and mark the holes for the screws. If the markings are suitable, install the lock and attach it with self-tapping screws.
To complete the work, you can insert a round or L-shaped door handle into the holes and install the door leaf into the hinges.

Mechanism with handle
The handle with a lock for interior doors is attached after marking and drilling holes for the latch at the end of the door leaf and the handle on the surface.
The work process for embedding a lock with a handle is as follows:
- Using a chisel and a hammer, a recess is made at the end of the door leaf for the front strip. It should fit completely into the door.
- Secure the latch mechanism with self-tapping screws.
- To install the handle, its internal halves are partially disassembled to gain access to the mounting and tightening screws.
- Install the handle. The rod and coupling sleeves must fit exactly into the grooves of the latch mechanism. The operation is performed according to the diagram of a lock with a handle.
- The inner plate of the handle lining is attached to the reverse side and secured with screws.
- Insert a decorative strip and secure it to the rod.
- The groove on the handle should match the groove on the rod. It is put on the gutter until it clicks.
- The turn handle counter plate is mounted in the same way as latch locks.
During installation, you must make sure that the latch tongue remains recessed into its body.
Complex
An electromagnetic mortise lock for a wooden door is installed as follows:
- Prepare the necessary components of the mechanism.
- The lock comes with a mounting sticker. Insert it at a 90° angle, stick it in the corner of the box, attach it to the door.
- During the installation of the lock, the interior door must be closed.
- Using a drill, drill holes for the handles and lock using the sticker marks. First, the work is carried out on the box, then on the canvas for attaching the striker.
- Remove the sticker.
- Remove the protective cover from the electromagnetic lock.
- Unscrew the fastening strip and adjust its position relative to the door block.
- Fix the bar with self-tapping screws.
- Connect the power wire through the service hole.
- Connect power to the lock, secure it to the mounting plate using a hexagon.
- Install the protective cover.
- The fixing dowels must be inserted into the strike plate.
- On the outside of the interior door, tighten a bolt with a semicircular or smooth head; on the inside, make a backing using a rubber gasket, install a counter element, and secure the nut. Do not tighten the nut too much; it should spring back a little thanks to the rubber gasket to allow free magnetization to the locking device.
When working, follow all the steps for inserting a lock and the installation manual.
The door lock is an important detail. It performs not only a decorative, but also a protective function, so the requirements for it are high. From this article you will learn how to embed a lock into an interior door yourself.
Depending on the insertion method, ease of use and other characteristics, the following types of locks are distinguished:
- Flat, having a rectangular frame and tongues separated from the lock latch. The design is highly reliable and is equipped with a push handle (halve).
- Round locks in a cylindrical body, the latch and tongue are combined. The handle can have any shape. The stopper and the cylinder cylinder of the lock are inserted into the spindle.
- Reduced size flat locks equipped with a rotary handle. The latch is missing.
- Round, in the design of which there is a special knob handle.
Castles can be classified according to other criteria. The types of locking mechanisms are as follows:
- bolts;
- fall;
- latches with lock;
- mortise type;
- invoices;
- magnetic.
The latter type of locking devices does not create a sharp sound when closing and can be mounted in any interior door (even one already installed); Magnetic locks are becoming increasingly popular.
To install a lock into a newly purchased door, you need to know the thickness of the door leaf and the features of its structure. There are these types of interior doors:
- MDF 35 mm wide.
- MDF 45 mm wide.
- Wooden door of a new design (panel width from 50 mm).
- A wooden fiberboard door of an old design with a plank frame.
You can install locks on interior doors yourself, knowing the design features and operating principle of the lock.
Flat
This category of locks is the most expensive. They are more difficult to install, but provide good burglary protection. They put additional load on the door, unlike round locks. The flat latch will fit the existing door.
It is permissible to install only flat locks of reduced size on a door made of MDF with a width of 35 mm. Also, only those locks whose widest tongue is 15 mm are allowed to be embedded in MDF. The end plate must not exceed 24 mm in width. This is due to the fact that only a wooden frame can bear the dynamic load created by the lock, and MDF is a weak material.
Round
This type of locks is most suitable for an apartment or residential building. They are designed to fit into any door. The push handle is most often used in homes where people with limited mobility live. Using the rotary handle requires more effort.
The knob handle is distinguished by its safety: it is impossible to get hurt or get caught on clothes.
The installation process for round locks with any handle remains the same. The lock mechanism with a cylindrical body is produced for doors whose thickness is 35-45 mm. Locks for large wooden structures cannot always be found on sale in small towns. But round locks are different in that they can be adapted to any door thickness. To do this, you need to replace the latch carrier by installing a longer one. It is a rectangular steel plate 2-3 mm thick. There is a hole at one of its ends.
The latch exit toggle switch must be placed in a position that will correspond to the material from which the door jamb is made. For wood it is 70 mm, for MDF – 60. The production of locks for interior doors has its own characteristics: their cylinder is located inside for the convenience of locking the door from the inside.
When the door opens to the left and a suitable lock has not been found, the latch and cylinder must first be swapped. To do this you will need to disassemble the structure. This option is not suitable for office premises, because such a lock from the cylinder side is easy to disassemble even without the use of special tools.
Preparatory stage
The insertion technique depends on the design of the lock. The easiest way to install is the latch handle. For this purpose, a hole of the required diameter is carefully made. (Craftsmen recommend carrying out all finishing and installation work after the floor repairs have been made.)
Installing an interior lock with a rotary lock (or with a handle and a cylinder) is more labor-intensive: it will be necessary to make a nest at the end of the door leaf, as well as 2 holes for the cylinder and the handle.
It is necessary to correctly calculate the height at which the handle will be installed. When choosing a wooden door, there are no restrictions on this parameter. On a frame structure, the handle should be embedded at the location of the cross beam, located at a distance of 90-100 cm from the base of the door leaf. The thickness of the vertical beam varies depending on the thickness of the door leaf.
Most often, the lock is installed in an installed door, but you can cut it in before installation. When it is planned to make a recess for the lock using a manual electric router, the blade must be firmly secured in a lying position using a slipway, turning the side to be processed towards you.
Lock Mortise Tools
To install the locking mechanism in the door, you need to have the following tools:
- Pencil for marking.
- Joiner's triangle.
- Roulette.
- Screwdriver complete with a set of bits.
- Screwdrivers (flat and Phillips).
- Feather type drill, 6 mm wood drill, crowns of the required size.
- Hammer and chisel.
- Bit.
- Slipway.
- Manual electric milling machine.
There are special tool kits that include all the necessary drills and crowns.
Mortising a lock with a milling machine
The lock should be attached to the canvas, having first retreated a distance of 1 m from the floor. The handle can be located at a different height depending on the wishes of the owners. Now you need to determine the depth of the insert: using a triangle, measure the body of the mechanism and mark the required depth with a simple pencil; trace the upper part of the device along the contour.
Then you should choose a location for the keyhole and latch. The locking device is measured from the end to the center of the keyhole, and markings are made on the door. After this, the holes for the keyhole and latch are drilled using a feather drill.
Then marks are made for the future recess for the lock. To do this, it should be leaned against the end side of the door with a crossbar. A cutter of the corresponding circle is inserted into the router, after which the recess is drilled. Care should be taken to ensure that the crossbar completely fits into the door leaf.
Then you need to cut a recess for the lock structure. A groove cutter is “loaded” into the router, with which the groove is cut. This must be done so that the locking mechanism fits clearly into it. The boundaries of the recess should be processed with a hammer and chisel to give them an aesthetic appearance.
It is necessary to remove the shavings from the recess and then place the lock there. The crossbar strip is attached using self-tapping screws to the side of the door, and then the door hardware is installed.
Mortise a lock without a router
To install the locking device manually, the following tools are required:
- pencil;
- ruler;
- roulette;
- electric drill complete with drill 10-14 mm;
- chisels of different widths;
- round files.
It is necessary to count from 70 to 100 cm from the bottom edge of the canvas and mark the future location of the locking mechanism. Having placed it sideways, you should mark its inner part and note the width of the rear plane of the structure. After that, according to the markings, we drill holes. Then you need to drill holes deep into the door. To do this, hold the drill at a slight angle.
Using a chisel, you need to level the surface of the socket so that the mechanism can fit into it. Having attached the lock to the front part of the blade, you should mark the position of the handle and the core, drill holes and align them using files. Repeat the same process on the opposite side of the door. The structure is inserted into the groove, then a rod is threaded onto which the handles are attached.
The locking tab is exposed. Marks for the tongue are placed on the door jamb, a recess is made under it with chisels, where the mating part of the lock (bar) is placed. The bar is secured, after which the lock is ready for use.
Marking
Before installing a door lock, you need to figure out how to correctly mark the required type of locking device.
Most often, markings are applied using templates or corresponding parts of the locking mechanism that are applied to the door. It is recommended to draw lines using a sharp awl or needle to work directly along the contour. When using a pencil, you will need to take into account the width of the drawn line and its distance from the part. This is not easy to do even for a professional.
It is forbidden to use a mechanic's scriber for this purpose, since the indentation from it is even greater than from a pencil, and it is impossible to erase scratches after it. The door will need to be repaired.
Round
First you need to determine the place where the round lock will be located, after which you should mark it using the installation instructions and template. The distance from the floor should be 965 mm. This side of the marking should be applied taking into account the thickness of the door and the length of the lock tongue. Marking is applied from the side of the larva.
When marking two points on the front part of the door leaf, it is necessary to retreat from the end edge of the door 60 mm (for the first point) and 70 mm (for the second).
It is necessary to mark a hole on the door leaf, the diameter of which is 50 mm. It is intended for a pen. The second hole is made at the end of the door, opposite the main hole. It is 23mm in diameter and is designed for a snap-on design.
Flat
On the door jamb, the vertical and then the horizontal axis are marked with a pencil. The latter is applied at a height of 965 mm from the floor (for structures made of solid wood and older specimens - 800 mm). Marking is carried out according to the attached lock using a pencil. You must select a slot for the lock along the marked line. As a result, it will turn out a little larger than necessary. This will create the necessary gap for installing the mechanism.
There are some peculiarities when marking the recesses for the cylinder and the spindle: it is done by attaching a lock to the side, while the holes are made with an additional indentation from the door end. These holes should be equal to the width of the end plate.
Flat lock mortise
If the door is made of wood, then the lock can be inserted anywhere. If the door is made of MDF, then the locking mechanism must be embedded at a level of 1 m from the floor, since the location of the wooden beam inside the hollow door is at this level.
It is preferable to drill a hole for the lock using a feather drill, the diameter of which exceeds the thickness of the lock structure by 1-3 mm. It is best to drill through pioneer holes in 2 passes.
Then we select the nest with a chisel and make a hidden one (after marking its outline along the embedded lock) according to the instructions.
The shaped recess for the larva is performed in the following steps:
- Drill a larger round hole for the cylinder.
- Drill a round hole of smaller diameter for the bottom of the pin cassette.
- Using a chisel, remove the remains.
After this, you can insert the lock into the door. To do this, you need to remove the handle and larva from it, and then insert it into the socket. After this, the fittings are installed back. The assembled loose lock should have a play of 1 mm on all sides.
Now you should identify and mark the holes for the screws. When the places for the screws have already been marked, we drill holes for them according to the markings. Having attached the lock structure to the door with their help, you need to install the handle and the lining under the tongue.
Handles can be round or L-shaped. To install the handle, you must:
- Install decorative overlays on both sides of the canvas, securing them with self-tapping screws.
- Insert and secure the handle bar.
- Close the door and make a mark on the frame where the tongue is located.
- Determine the length of the tongue using a ruler and make appropriate markings on the box.
- Attach the overlay to the marks and trace it.
- Drill recesses along its boundaries, bringing them to the required shape using a chisel.
- The final stage: the cover is inserted and secured with self-tapping screws.
You should check whether the door opens and closes easily. If necessary, the location of the tongue can be changed.
Lock mortise with cylinder
The insertion of the locking mechanism with the cylinder is carried out similarly to the previous option. Having made marks on the door end, you should drill a vertical strip of recesses located as close to each other as possible. You can remove the jumpers by using a chisel. A nest of the required size should be prepared. A hole is drilled in the door leaf for the cylinder (or rotary key) and handle on both sides using a crown.
After this, a chisel is used to make a selection for the lock plate, and the locking device, handles and the counter part of the bar are mounted.
It is best to carry out this work using a router: problems may arise when using other tools, such as a chisel and chisel. A hand router allows you to achieve smooth surfaces with the smallest errors. In this way, it will be possible to maintain the aesthetic appearance of the door.
Round lock mortise
To drill holes according to the markings, you need to select a crown of the appropriate diameter. It must be calculated so that the hole is covered by the outer casing of the device. But the circumference of the recess should be sufficient for the installation of internal mechanisms.
In specialized stores you can purchase kits for inserting round locks. They consist of 2 crowns of the required diameter.
Having prepared the necessary tools, you can begin drilling the hole according to the previously made markings. To prevent the appearance of cracks, splits and other deformations of the door leaf, you should make a hole from 2 sides down to the middle. Then you need to make a hole in the end of the door in the same way, into which the mechanism will be placed. The strike plate in the door frame is installed in the center of the drilled hole for the tongue.
The device should be placed in the finished socket and traced around it. After this, the latch is pulled out. Using a chisel, you need to make a hole large enough to fit the outer plate. This work should be carried out with care so as not to exceed the required hole depth and not damage the side of the blade.
Now you can install the mechanism, checking that it closes correctly (you can read in detail in the instructions for how to install a lock on the door).
Installing a lock on a metal front door is not the easiest thing and requires a competent approach. Therefore, for those who are not confident in their abilities or have never encountered such work, it is better to call a professional. For those who want to do everything themselves, we recommend that you read our article.
Choosing a castle
Be patient before starting installation and choose the lock itself, which will serve faithfully for years. Finding a good castle is not so difficult now. It is important to know what exactly you want to purchase. In turn, we will help you make your choice and tell you about the main types of locks installed on entrance doors.
Now, taking into account technological progress, all locks that can be embedded in a metal door are divided into three groups - cylinder, lever and electronic.
All locks differ in class - locks of 3 and 4 reliability classes are considered the best, but locks of a lower class should be purchased for less important doors. It is better not to purchase locks whose packaging does not indicate the security class.
The most common are cylinder locks, the design of which involves the presence of specially shaped pins and a key with matching holes for them. Locks of this type, intended for entrance doors, have a disk code mechanism. These discs and the key have comparable cutouts and grooves.
No matter how complex such a lock may be in terms of secrecy, it will not cause problems for burglars, since the lock cylinder can easily be knocked out with a strong blow. However, high-end locks usually have an armored tab that protects the mechanism from this type of hacking.


Lever locks are so named because of the levers - steel plates, which, when the lock is opened with a key, are arranged in the order specified by it. The more such plates in the mechanism and the better the quality of the material from which they are made, the higher the class of the lock. These locks are also equipped with an armored insert, so they cannot be opened with a kick. However, you can select a master key for this type of lock.
Locksmiths advise purchasing and installing two different types of locks on the front door for greater reliability.
Electronic locks, due to their ingenuity and relative newness on the market, are more expensive than the two previous types. Some locks can be opened using a magnetic card, some can be opened using a remote control, and some can be opened by typing a code on a keypad.
Particularly wealthy residents can afford the luxury of locks that recognize the owner by a pattern on the finger or retina.
Installing a lock on a metal door
If you need to install or reinstall a lock on a metal entrance door, you will need a screwdriver, electric drill, grinder, drills, metal screws, taps and files. In addition, you will need a carrying device that matches the power of the power tool, as well as safety glasses and dielectric gloves.
When choosing a lock, pay attention to the thickness of the metal sheet on your door. A lock that is too powerful can damage the door if the material thickness is less than 3-4mm.
It is best to embed a lock into a metal door. This way you will hide and protect the lock mechanism from harmful external influences. If the lock plate is installed on the end of the door, then you can install such a lock yourself. If the lock has increased reliability and is hidden in the door so that you can only see the crossbars at the end, it is better to trust the professionals. Believe me, such a lock is worth the additional expenses for the work of a master.
In this case, we will not consider overhead locks - the inside of the door is too unreliable to secure such locks, and the appearance of the door and hallway will suffer.
Instructions for installing a door lock (video)
First, mark the place where the castle will be located. The best height for it from the floor level is 90-110cm. The markings should be carried out according to the dimensions of the lock.
Using two small drilled holes, mark the top and bottom boundaries of the lock mortise area.
Next, a grinder with a cutting disc comes into play - it makes two cuts from top to bottom along the vertical marking lines. If the resulting hole is slightly smaller than required, cut off the excess and remove the burrs with a file.
Now you need to insert the lock and mark the location of the mounting screws. Holes are drilled for them and the thread is cut with a tap.
The diameter for the screws is made slightly smaller than necessary - usually this difference is 0.2 mm.
Now you need to attach the lock to the door on both sides and mark a place for the keyhole. This place is drilled and cut with a grinder.
Now the lock itself can be inserted into the door, secured with screws and checked for readiness for operation.
We attach the pads to the door, insert the key into the lock and mark the places where we will make holes for their fastening using self-tapping screws.
The door tabs are secured on both sides, and the lock itself is again checked for smooth operation. The key should turn easily and not get jammed by the pads.
Holes for crossbars must be marked with special attention. If the ends of the crossbars are lubricated with something coloring (paint, chalk), the door can be closed and the key turned all the way. The necessary contours and marks will remain on the opposite part of the door.
The holes for the crossbars are drilled with a drill and cut out with a grinder. The same applies to installing overlays.
Are there other lock options?
When purchasing doors with an already installed electronic lock, you will be spared the hassle of fiddling with installing the lock. All that remains is to come up with an electronic digital key.
As soon as you come up with a code, save it in your head. Now no one except you can open the lock, not even the master who installed the door and connected the lock.
True, if you are well versed in electronics and electromechanics, it will be even easier for you to install such a door yourself than a regular mortise lock.