Switching power supply for an air humidifier. We repair the air humidifier with our own hands - expert advice
An air humidifier is not a useful thing, even if people think otherwise. By doing things correctly, you will significantly reduce the incidence of illness in your household. The main thing is to fit the relative humidity indicators within the required limits; doctors recommend a value of 45 - 60 percent. Although 65 will not cause lethal consequences. The problem is limited to the purchase of a hygrometer, although not everyone can assemble a piezoelectric steam generator. What will a person who wants to repair a humidifier with his own hands face? We plan to discuss today.
What types of humidifiers are there?
When humidity decreases, the mucous membranes of the respiratory tract dry out. The epithelia are infested with bacteria that find favorable conditions for reproduction. The mucus ceases to protect the surface of the cells, the microflora destroys the membranes without interference, causing infectious diseases. A knowledgeable engineer will name three designs, at most, one of which differs little from an electric kettle:
In fireplaces, the flow of water molecules is illuminated by a lamp, resulting in such a real imitation of a flame that there is a fear of getting burned. Cold stream of evaporated liquid. In order for the element to work, the device is equipped with a special mechanical harness. There is no other word for seeing miracles. The tank contains a recess with an emitter, and a float is located on the side. To avoid making holes in the bottom, the sensor is magnetic. When the water in the humidifier runs out, the float moves down and the field is captured by the sensitive element of the electronic board. As a result, the device stops working.
In Chinese models you can find a turbine that pumps air inside through a small rise in the bottom. Let's try to describe the design so that buyers avoid mistakes:

- The bowl, which resembles a teapot, is placed on top of the housing containing the electronics.
- In the center of the container there is a vertical vent located above the emitter.
- There is a recess on the side, complemented by a float.
- The container is filled from below, the lid has a valve through which water is gradually released.
- The tank has the shape of a cylinder with a cutout in the form of a vent; liquid seeps into the working chamber slowly.
- To speed up the distribution of steam, a turbine hole comes out to the piezoelectric element of the humidifier. Creates excess pressure, steam rushes out. Air is sucked in from under the base, through the cracks.
Please note: if you pour water into the vent, the liquid will flow through the turbine opening to the electronic circuits, causing temporary or permanent failure. The devices lack grounding, making them extremely dangerous to life.
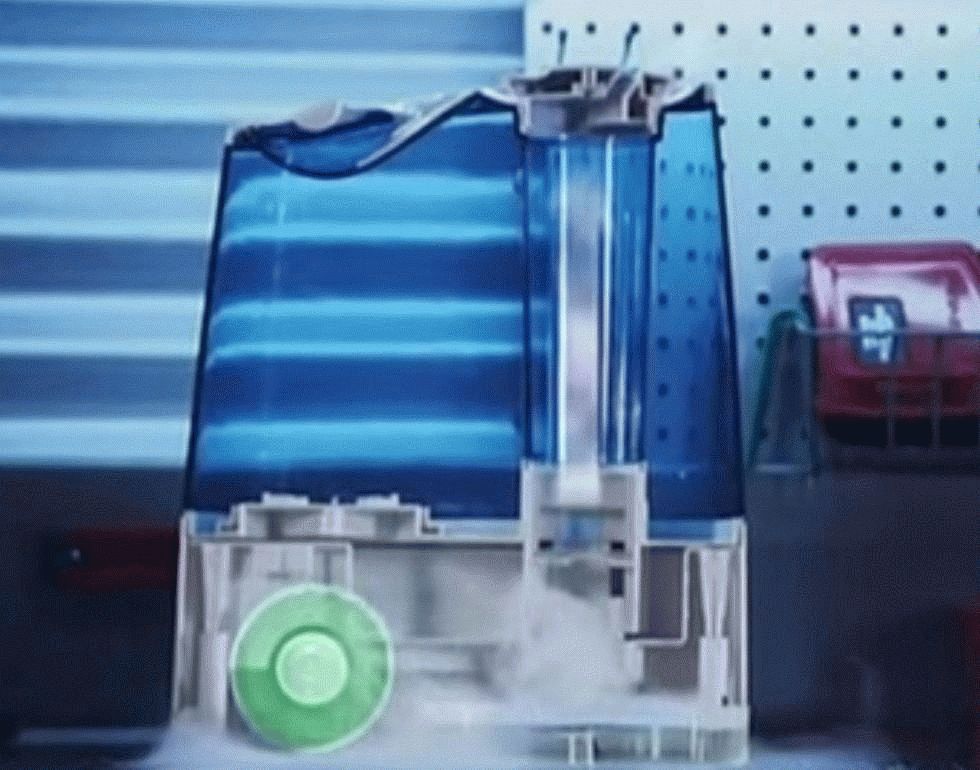
Internal structure of the humidifier
The air humidifier device includes power boards that generate ultrasonic frequencies. At the same time, fungi and microbes are killed inside. Readers are familiar with the reviews of the VashTekhnik portal regarding water purifiers. Entire pools are disinfected with ultrasonic emitters; germs have no place inside the generators. The difference is in power; for a small tank you don’t need much.
The power board generates the supply voltage for the active elements of the amplifier with positive feedback. The cascade generates oscillations. The transistor is installed on the radiator to remove excess heat. The turbine engine is powered by rectified voltage; we do not rule out the presence of models using 230 volts.
First of all, we look at the nature of the malfunction. A working piezoelectric element can be easily determined by the bubbling of water. If the steam doesn't come out, the turbine motor is probably at fault. We call the windings, if they are in order, we measure the supply voltage. Tests performed will help determine the cause. In the absence of movement of the piezoelectric element, the first suspicion is a generator; the quartz crystal is quite durable. You should start with a power transistor; a remote thermometer will come in handy here. When working, the generator generates heat. Avoid sticking your hand in while the humidifier is energized; you can point the remote meter at the desired point. As a last resort, remove the plug from the socket and feel the surface of the radiator with your finger. If it's completely cold, chances are the generator has broken down.
Initially, we check the supply voltage; if it is OK, the transistor rings. If bipolar, each junction behaves like a diode, giving low resistance to direct current in one direction. For a field worker, everything depends on the type; you’ll have to look through the reference book. Sometimes the oscillations are controlled by a triac; the likelihood of such a situation seems unlikely. This is not a power unit that takes a drastic approach. If this turns out to be the case, check the control pulse generator for functionality.
The capacitors are ringed and checked for swelling. Resistors don't have to be black (although most still work). The board tracks are checked for integrity. What else can break down in a humidifier? Power board!
Humidifier power supply
Typically, modern devices use a switching power supply with stabilization of the voltage rectified by Schottky diodes. At the input, after the power cord, there is a block (or a pair of terminals), from which the process of converting 230 volts to the required nominal value and frequency begins. If an outdated power supply runs on a transformer that outputs 50 Hz, in our case everything is different.
There are one or more filters at the inlet of the air humidifier. This includes capacitors, chokes, and resistors. Each item is checked for suitability. Separately, the zener diode generates the voltage of a high-frequency pulse generator controlled by the electrode of a thyristor, transistor, triac or other key element. You can recognize the key by the radiator; a lot of heat is dissipated here.

Separate protection is provided by varistors. Variable resistances that depend strongly on the applied voltage. If the voltage skyrockets, the varistor closes the circuit to ground, the fuses. The protection is triggered and the device turns off. The varistor is located at the input of the generator; there is no separate power supply for the element; naturally, it cannot consume 230 volts.
Switching power supply fuses are replaced with low-resistance resistors. It will burn out from overload and at the same time limit the current, protecting the elements of the air humidifier circuit from burning. A feature of switching power supplies is that in normal condition no current flows through the fuses. Therefore, they use the traditional method of localizing the breakdown. A light bulb is turned on in the fuse circuit; if it lights up, the troubleshooting continues.
The diode bridge rectifies the voltage, after the key transistor, entering the transformer in high-frequency pulses. It is possible to reduce the mass of the windings without loss of power. The transformer is compact and losses are reduced. At the output of the cascade there are Schottky diodes and ripple smoothing filters.
If 230 volts are used to power the device, the high voltage lines run separately from the direct current generation path. The turbine can be turned on by a relay, the voltage for which is generated by a transistor switch or a zener diode. Viewed according to the diagram.
The story about repairing a humidifier with your own hands is coming to an end. There are differences among the models, but all devices are built on the same principle. The best ones are equipped with humidity sensors located at the entrance of the air intake tract. Allows the device to turn off when the indicator reaches the set value. There must be a relay that interrupts the power supply to the keys in the power supply. As we saw above, the causes of breakdowns of air humidifiers often lie in incorrect operation. That's why we recommend reading the instructions. By the way, models from Germany are no simpler in this regard than Chinese ones. Operate the device correctly, and you won’t have a headache, how to fix a humidifier yourself.
And here's another thing! It is not recommended to refill the humidifier from the tap in areas with hard water. Although boiling does not occur as such, the salts remain on the surface of the piezoelectric element, the bottom of the working chamber, forcing you to periodically clean the device. It is better to use bottled water, filtered or distilled.
Good afternoon Today I will tell you and show you how to repair the ultrasonic air humidifier Supra HDS-111 with your own hands as an instruction. Do you know how to humidify the air in a room without a humidifier? Our grandmothers and mothers also did this with the help of basins with hot water and wet towels on radiators.
I have experienced many ways to humidify a room in an apartment in a children's room. Basins take up a lot of space and work while the water is hot, that is, about half an hour. A basin with heated water consumes a lot of electricity. Wet towels on the radiator moisturize the house longer. For about an hour or two, if you dip one edge of the towel into a nearby container of water, it will last for several hours. Cheap and cheerful - the popular method. However, all these wet dances take a lot of time. That's why I decided to choose the best one for my family and put it in the children's room when the heating is turned on. It turns out that all pediatricians will confirm that moist, cool air is the safest for the spread of winter colds. The mucous membrane does not dry out and the barrier against bacteria is maintained.
Choosing a humidifier
I spent a long time choosing and finally took, in my opinion, the optimal model in terms of price-quality-aesthetics ratio. In general, I bought ultrasonic humidifier in a white case. A kind of egg-shaped something with backlight. In addition to the appearance and dimensions, I especially liked the adjustment of the direction of steam movement. Not upward, but at an angle, and the steam jet that forms is quite powerful and high.
Since the steam comes out cooled, it immediately tends to drop below the heated air. So the humidifier in the room should be placed as high as possible. I have it on my water cooler. It doesn’t hit the ceiling or chest level and the steam disperses well throughout the room. Recently it began to buzz and had to be repaired.
So today I will tell you and show you as instructions how to disassemble and clean ultrasonic air humidifier. First, remove the container of water and carefully inspect the water tray with the ultrasonic emitter. Despite the fact that I only filled the humidifier with purified water, after six months of use, a certain dark coating appeared on the internal surfaces.
It seems that some of the dust in the air from the room settled on the insides of the cooler and caused this plaque to appear. And on white plastic it is clearly visible. This model has few recesses in the tray, so everything can be easily washed with a toothbrush or rag.
To disassemble the lower part of the humidifier
you need to drain and thoroughly wipe the water, turn the case over and unscrew four screws, three of them for a Phillips screwdriver. And one with a tricky hat - under.
I want to say that this tricky self-tapping screw can be easily unscrewed with an ordinary star bat without a recess. The main thing is to have a long enough bit to reach the head of the screw.
Inside the humidifier
Unfortunately, most humidifiers are made on this principle, so the only solution is to place a lightweight air filter in front of the fan.
In addition to the fan, the humidifier housing contains two boards - a power supply and a control board. What can you control in a humidifier, you ask? And there you can control the oscillation power of the piezo emitter, flashing LED backlight, fan speed and monitoring of water level sensors and a thermal protection sensor. To remove the control and power boards, you need to unscrew several screws shown in the photo.

These deposits were not only on the contacts of the microcircuits, but also directly on the board.
The Chinese have thoughtfully coated the boards of the air humidifier with varnish, perhaps this protects the circuits from fading, but the coating is very uneven.
Salt deposits have even gotten onto the radioelements themselves - all this must be cleaned out.
We especially check the contacts of the air humidifier control controller - they must be well soldered, without microcracks or deposits.
Emitter diagnostics
After removing the boards, you need to make sure contact integrity and surface - the most important element of the humidifier. After unscrewing two screws, remove the metal cover of the piezo emitter.
We inspect the surface of the piezo emitter - there should be no microcracks on it; if there are microcracks, then it’s time to think about buying a new emitter that is suitable in size.
Also checking the soldered contacts to check for the absence of white deposits or microcracks in the soldering.
The seat for the piezo emitter should not have any deposits or irregularities in order to prevent water leakage after reassembling the humidifier.
To clean the humidifier fan,
you need to disassemble the shell type shell. To do this, you need to release three latches around the perimeter of the fan housing.
A lot of dust has collected on the impeller - sometimes this dust at high speeds can disrupt the balancing of the impeller.
It turned out humidifier fan non-separable, that is, it has a plastic-filled bushing for the impeller axis. In such cases, sometimes the impeller can be removed by hand. But that didn’t work out for me with this fan. I had to carefully drill the sealing area.
We drill until we hit the impeller axis. And we constantly remove the shavings so that they do not fall asleep inside.
In principle, you can completely drill out the hole to remove the plastic washer and free the impeller axis. I did it differently - I poured alcohol into the hole that formed, twisted it, dried it, inserted a needle and squeezed out thick lubricant from the syringe. I turned on the fan so that the lubricant was evenly distributed along the axle and sealed the hole with a factory sticker.
I want to say right away that this procedure did not help very well. It looks like the lubricant was bad, so next time I will thoroughly disassemble this fan. When reassembling the fan, you need to glue it with hot glue, just as it was mounted at the factory.
Cleaning the humidifier board
After the fan, be sure to clean the boards from white deposits. It is better to wash the humidifier boards with alcohol and cover them with an additional layer of varnish. This is to improve reliability and short circuit protection.
If in a humidifier board burned out, then you can pick up a similar board in.

My humidifier also recently broke down, without which I can no longer function normally. The problem was with the air intake filter, it was clogged. I decided to buy a new filter, since it is very cheap, and installed it in the humidifier. Imagine my surprise when everything started working again. Frankly, I completely believed that the problem was a faulty emitter, but after I read the article, I immediately found the cause of the breakdown.
I have a humidifier in my children's room. It recently broke down. At first I wanted to take it in for repairs, but then I decided to figure out what was wrong myself. The emitter was working, there was a characteristic “gurgling” sound, the generator was felt, it was warm. I also checked the piezoelectric element. It also functioned normally. But for some reason there was no steam. This is where I got confused because the humidifier fan was working properly. The air intake filter was clogged. Ordered a new filter. Replaced it and now everything works.
My humidifier hasn’t broken yet, but if something happens, I’ll try to repair it myself too. I think it will work.
I’ve been using my humidifier for about a year now, but since I clean it regularly and also change the water in it, thank God so far there haven’t been any problems with it.
In the winter, we heat our office with fan heaters, and they “dry” all the air, so we constantly use a humidifier. It works all day long and therefore breaks down over time. After an expensive repair, I decided to try to repair it myself. After a long disassembly and checking the functionality of all parts, it became clear that the failure was in the piezoelectric element. I ordered it online and replaced it. I did everything myself, but it took a lot of time. Therefore, next time I’d rather take it to a workshop, it will be more expensive but much faster. Although, if someone has a lot of free time, then you can do it yourself.
In my humidifier, the steam production at first slightly weakened, I didn’t attach any importance to it, after a couple of days the steam stopped coming out completely. I thought it was a generator, checked, as you wrote about heating the radiator, thank God it worked out... In the end, I determined that it was a piezoelectric element, opened the device, photographed the wires and wrote down their location. Now, actually, the most difficult thing is to find a replacement part... Radio stores are not a common occurrence in our city, I couldn’t find them on the iron market, I’ll probably have to really look in online stores, although I don’t want to wait at all, we use the device every day.
And I completely disassembled my ultrasonic humidifier down to the screw. I checked each part in the same order as it was disassembled. Believe it or not, I did everything except check the voltage on the turbine windings(((. I took it to the service center, they did it for me in one day. Recently my wife began to complain about the smell of rot from the humidifier. I bought a new one, the old one was sitting until today until I came across this article. As they say: “Everything ingenious is simple.” Now we have two ultrasonic humidifiers, we will be healthier :)
But my humidifier works intermittently, either gurgles slightly or gurgles loudly. that with it xs you need to measure the voltage on the element.
Tell me, I have a Rainbow humidifier, in my opinion it is not ultrasonic. Everything works, the turbine spins, but no steam comes out. What is the reason?
Please tell me what could be wrong. The humidifier produces steam and everything works in it, but it overflows water. After half an hour of work there is a puddle under him. where to look?
Hello! They asked us to repair the POLARIS PUH5505DI humidifier. It broke down after being cleaned by the owners. The malfunction is as follows: when the pairs are turned on, it takes about five seconds, and that’s it. Press the button again, same thing. It was clear on the power supply that there was a breakdown of the 4N65F field-effect transistor. I replaced it and measured the power at the power supply connector: approximately 10 and 36 volts are coming out. The problem remains. The membrane is undamaged. The transistor on the BU406 generator is good, but I replaced it just in case. The problem remains. The generator has an op-amp LM358L - replaced. The same. I measured the frequency at the membrane contacts with an oscilloscope - it appears for 5 seconds and everything disappears. Maybe you can tell me what else needs to be checked. I don't want to give up.
Good afternoon, tell me, I bought a new humidifier and it started leaking from below when it was turned off, but when it was working it didn’t leak. How to repair this flaw?
Views: 18,965 website 17.01.2017
Once, with the help of a newspaper of free advertisements, I was lucky enough to buy a faulty domestic (admittedly Chinese, but quite well built) humidifier called Novex for almost nothing (for only 4 dollars!). “Lucky” - not only because the price was so ridiculous, but also because there was absolutely nothing to do for the next few evenings. And here is such an opportunity to work with both your head and your hands! Moreover, repairing an ultrasonic humidifier was new to me.
The seller reported that the performance regulator was not working. Opening and measurements showed: the switching power supply of the humidifier does not “plow”. Doesn't start at all. I still hoped that the fuse had blown or the diode had been broken, but everything turned out to be much worse: the “field switch” - the field-effect power transistor - had broken. In this case, the resistors were intact, the power diodes were serviceable. Only the “field switch” of the ultrasonic “Novex” was broken along the internal diode and, therefore, needed to be replaced (such things cannot be repaired). As a result (the very next day) I bought an analogue of the “defunct” component.
However, no miracle happened. I smeared the new transistor with thermal paste, soldered it where it should be, turned on the ultrasonic humidifier - and in response there was silence. The repairs had to be continued because the transformer had not yet started up.
Multimeter in hand - and we call everything. I started with low-power glass diodes. And when I got to the zener diodes, I found that they were short-circuited. Soldered it out. I went to the store with one zener diode. True, the seller was initially pleased that he could not determine the voltage from the markings. And when we tried to determine the nominal value together, and I said that the zener diodes were located opposite each other in a series circuit, he completely rolled his eyes: they say, this does not happen. I probably wouldn’t have believed it myself, but I soldered them myself... In short, I bought a pair of 100-volt zener diodes at my own peril and risk. And you were right! With the new filling, the repaired power supply began to work. And, of course, the entire ultrasonic humidifier. And after rummaging through reference books, I later found out that the zener diodes are switched on counter to suppress the alternating voltage.
By the way, while repairing an ultrasonic humidifier, I more than once paid attention to the good quality of the printed circuit boards. It turns out that not everything that is collected in China is bad! By the way, on the forums (including Yandex Market) people are happy with Novex. Moreover, the device is inexpensive (around a thousand rubles). At the same time, it has a large tank and good performance. There is an ionizer, or rather an ozonizer: a small glass flask with which the air flow created by the fan “meets”. True, there is almost no ozonation in my device. I see only the blue glow of the bulb. Most likely, this happens due to the design: one electrode is covered by a flask, and the second is a mesh that is put on this flask. In this case, the path to the emitted ozone is blocked by glass.
An air humidifier is a healthy, fairly safe (in terms of electric shock or fire) household appliance. This is a very simple device. Repairing an air humidifier with your own hands is not difficult, since neither disassembly nor some types of diagnostics pose any problems.
In order to carry out repairs, it is necessary to understand the functioning of the humidifier. Devices are divided into 3 groups:
Ultrasonic humidifiers are considered the safest and most effective. Therefore, they literally dominate the modern market. Ultrasonic air humidifiers Boneco, Electrolux, Bork, Venta are among the best-selling brands from the household appliances sector under consideration. Let's consider the features of their repair.
Electrical problems
Short circuits and other electrical problems are very common. This often occurs due to the user’s fault or due to damage to the device due to a fall. If everything is clear with the last reason - the device has fallen, the gasket may have moved, or part of the housing may have cracked, then the first one needs to be clarified.
The air humidifier circuit has two technological holes with which the user interacts. Water is poured into one, steam comes out of the other. Most appliance owners have no idea how the appliances work inside. Therefore, attempts to pour liquid through the steam outlet holes are repeated quite often.

The red arrow points to the water hole
To repair a humidifier from Electrolux, Boneko or any other brand that shows no signs of life, you must first (disconnect the device from the mains) check:
- availability of power supply in the outlet;
- condition of the fuse in the plug, which is equipped with models from Venta;
- integrity of the power cable;
- absence of wire fractures at the points where they exit the plug and enter the housing;
If possible, you should try to turn on the humidifier by replacing the power supply if the model is powered by a voltage converter.
If everything is in order, but the humidifier does not work, you need to open the case (more on this below). Having gained access to the inside of the device, it is worth inspecting it for the presence of moisture. If it is, you will have to deal with the electrical part. Eliminating this problem requires the intervention of specialists.

However, the humidifier may not start due to automatic protection blocking. To make sure that this reason does not exist, you need to inspect all parts of the device that use electricity. There should be no blackening or parts with uneven color on the control board; the fan coils, if visible, should also have a uniform color.

If everything is visually in order, you should remove all moisture from the inside of the device and dry it thoroughly for 24 hours. Such repairs help restore the functionality of humidifiers in most cases.
Opening the case
Humidifiers are easy to disassemble. For this:
- The device turns off and is disconnected from the network.
- Remove the container with water.
- The body turns over.
- To gain access to the inside of the device, several screws are unscrewed. They can be hidden under rubber feet. In rare cases, the case is equipped with latches that hold its parts. To find them, you need to use a thin blade: by moving it along the line of contact, you can find the fastening point that should be pressed.
After disassembling the humidifier housing, all its components will become visible. These are sealing gaskets, a fan unit, a membrane sector, a pipe for liquid inlet, a control board, various parts for converting air flow and removing steam.
Typical faults and their elimination
Repairing an air humidifier, if we are not talking about the electrical part, can be done with your own hands. Malfunctions are as follows:
- Unpleasant odor during work. Repairing the humidifier in this case is very simple. This is due to banal contamination and the growth of bacteria or mold. It is necessary to remove, clean and rinse each of the parts, and based on the results of a visual inspection, it is possible to make a decision to replace individual elements or the unit as a whole. Do not use aggressive chemicals for cleaning. The best choice if you don’t want to bother with warm water is a weak solution of hydrogen peroxide or ammonia.
- The humidifier makes a sound, but the water level does not decrease. It is necessary to check the condition of the feed motor and pressure conversion membrane (ultrasonic type). The cause of the breakdown may be contamination, pump failure, or displacement of structural elements as a result of the device falling. The device parts are inspected, adjusted or cleaned if necessary, and the device is tested.
- If streams of steam are not visible, the reason most often lies in clogged outlet openings. You should check the outlet grille, the operation of the exhaust fan, and clean the filter. If you suspect that the engine is failing, you should call a specialist.
Most of the failures of a humidifier, given the simplicity of its design, are associated with contamination. Therefore, if cleaning and checking the position of all structural elements does not bring results, and there are no visual manifestations of problems with the electrical part, it is best to seek qualified help.